Table of Contents
Drive Test: How to Check the Drive in Windows 10 is easier to understand when the core ideas are paired with practical examples. The sections below explain the topic clearly, highlight useful steps, and point out details that can prevent common errors.
Microsoft hard drive repair and scanning tool, Check Disk (Chkdsk) has been around for over 30 years and is still useful today. Users running Microsoft's latest operating system can still use this tool to check the drive. You will show you how to check the drive on Windows 10.
- Three ways to check the drive in Windows 7
- 5 ways to hard drive 'live' longer
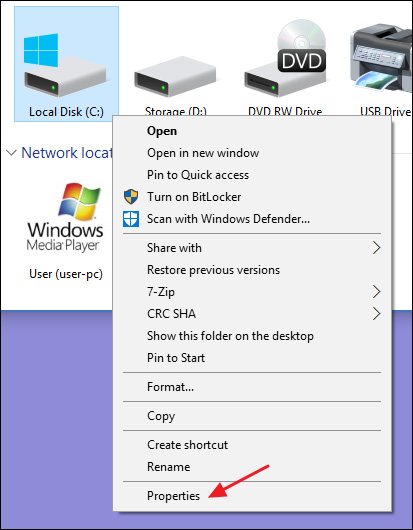
Running the Check Disk tool from Windows desktop is easy. In File Explorer, right-click on the drive you want to check and then select " Properties ".
In the properties window, switch to the " Tools " tab and click the " Check " button.
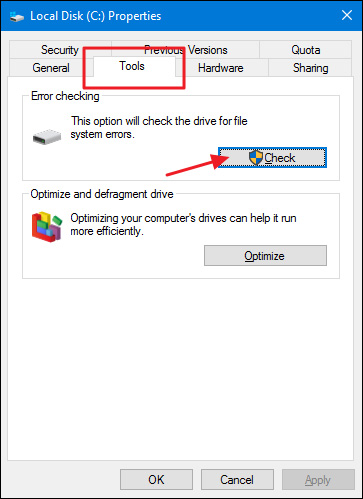
Windows 10 may announce that no errors were found on the drive, but users should still perform manual scans by clicking " Scan drive ". This operation is not intended to fix any errors, so it will not restart the computer at this time.
- Check and fix hard drive errors with CMD on Windows

After Windows scans the drive, if no errors are found simply click " Close ".

I wish you all success!
FAQ
What is Drive Test: How to Check the Drive in Windows 10?
Microsoft hard drive repair and scanning tool, Check Disk (Chkdsk) has been around for over 30 years and is still useful today.
Why is Drive Test: How to Check the Drive in Windows 10 important?
A clear understanding of Drive Test: How to Check the Drive in Windows 10 helps you make informed decisions, avoid common mistakes, and use the relevant tools or techniques more effectively.
How should beginners approach Drive Test: How to Check the Drive in Windows 10?
Start with the fundamental concepts, follow the examples step by step, and test each change in a safe environment before applying it to important systems or data.
Related Articles
 5 Ways to Check Hard Drive Effectively to Help Periodically Check11 minutes read
 Hard Drive Check: How to Check Hard Drive Health in 3 Ways4 minutes read
 Check and Fix Hard Drive Errors with Chkdsk on Windows10 minutes read
 How to Check Windows Computer Using SSD or HDD?5 minutes read
 3 How to Check the Working Status of the Hard Drive4 minutes read
 How to Easily Check a Bootable USB Drive on Windows 105 minutes read
Reader Comments 0
Sign in with email or Google to join the discussion.