How to add / remove 'Allow wake timers' from Power Options in Windows 10
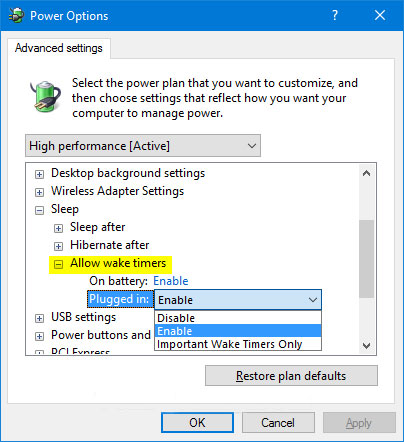
The Allow wake timers setting in Power Options allows Windows to automatically wake the computer from sleep mode, aiming to perform scheduled tasks and other programs.
Table of Contents
The Allow wake timers setting in Power Options allows Windows to automatically wake the computer from sleep mode, aiming to perform scheduled tasks and other programs. You can set this mode to on, off or just 'wake up' time at important times.
Wake timer is a timer event that wakes the PC from sleeping and hibernating state at a specific time. For example, a task in the Task Scheduler is checked in the "Wake the computer to run this task" checkbox.
Wake timer in Windows 10 includes things like rebooting after Windows updates.
This tutorial will show you how to add or remove the Allow wake timers setting under the Sleep section in Power Options for all users in Windows 10.
Note : You must be logged in as an admin to be able to add or remove this setting in Power Options.
Add or remove "Allow wake timers" in Power Options with Command Prompt
1. Open a Command Prompt with admin rights.
2. Type the command below you want to use into the Command Prompt and press Enter .
(Add - default)
powercfg -attributes SUB_SLEEP BD3B718A-0680-4D9D-8AB2-E1D2B4AC806D -ATTRIB_HIDE
Or:
(Erase)
powercfg -attributes SUB_SLEEP BD3B718A-0680-4D9D-8AB2-E1D2B4AC806D +ATTRIB_HIDE
3. You can now close the Command Prompt if desired.
Add or remove "Allow wake timers" in Power Options with the REG file
The downloaded .reg files below will modify the DWORD value in the following registry key:
HKEY_LOCAL_MACHINESYSTEMCurrentControlSetControlPowerPowerSettings238C9FA8-0AAD-41ED-83F4-97BE242C8F20BD3B718A-0680-4D9D-8AB2-E1D2B4AC806D
1. Follow step 2 (to add) or step 3 (to delete) below for what you want to do.
2. To add "Allow wake timers" to Power Options, download this file and go to step 4 below.
3. To remove "Allow wake timers" from Power Options, download this file and go to step 4 below.
4. Save the .reg file to the desktop.
5. Double click on the downloaded .reg file to merge it.
6. When prompted, click Run> Yes (UAC)> Yes> OK to approve the merge.
7. You can now delete the downloaded .reg file if you like.
Was this article helpful?
Your feedback helps us improve.
Related Articles
 How to enable / disable the Allow Wake Timers option in Windows 103 minutes read
 Steps to add/remove 'Link State Power Management' from Power Options in Windows 103 minutes read
 How to add / remove 'Lid close action' from Power Options in Windows3 minutes read
 Steps to add/remove 'Maximum processor state' from Power Options in Windows3 minutes read
 How to add or remove 'SEC NVMe Idle Timeout' from Power Options in Windows 103 minutes read
 Steps to Fix 'There Are Currently No Power Options Available' error on Windows 106 minutes read
Reader Comments 0
Sign in with email or Google to join the discussion.