How to turn off all notifications from Groups on Facebook
There is no denying the benefits, rich experiences and extensive exchanges that Facebook brings to users. However, following that is also troublesome, such as you hacked Facebook account, Facebook scams, or spam messages and notifications coming from groups of "gods". Our Facebook public.
And the status of spam notifications coming from groups like inviting, announcing posts on groups is not uncommon when you use Facebook. This will cause minor discomfort, when we always see the group's notice on the bulletin board. And if you are in this situation, the best way is to prevent any notifications from Group on Facebook following the instructions of the Network Administrator.
Video tutorial to turn off Facebook group notifications
1. How to turn off notifications from Group on Facebook:
Note, the method below helps you prevent notifications from Facebook but can still track the content of the group.
Step 1:
First of all, you need to log in to your personal Facebook account. Next, at the main interface click on the inverted triangle icon and select Install .
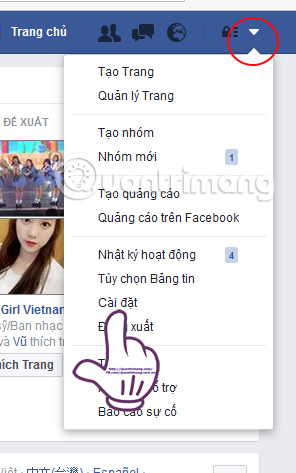
Step 2:
Next, go to the Notification (Notificaiotns) section on the left menu. Look to the right at the On Facebook (On Facebook) line, we click on Edit (Edit).
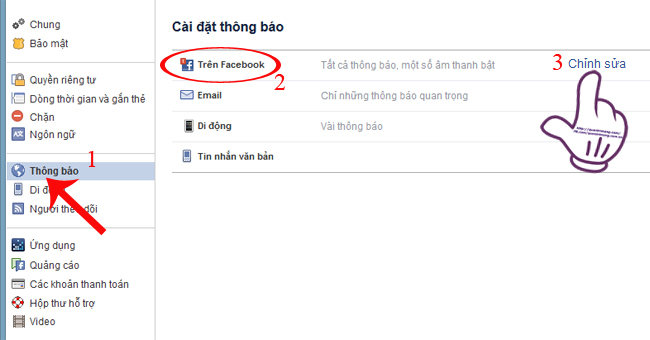
Step 3:
When switching to the new interface, go to Group activity and select Edit (Edit).
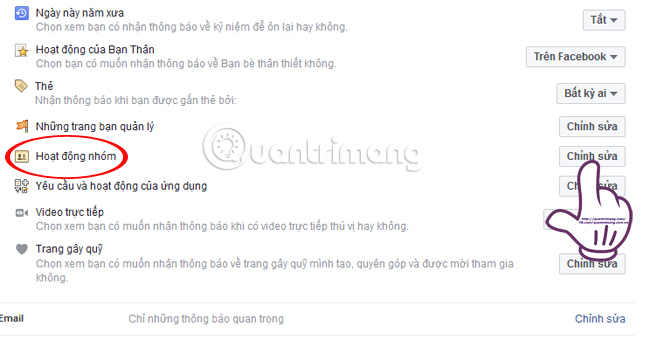
Step 4:
A dialog box is set up with the Facebook group list that users join. We will proceed to refine and adjust the receipt of notifications in groups that you find annoying. Click Off to turn off all notifications from selected groups.
For any group you still want to receive notifications, select All posts (All Posts), or just receive Friends' Posts notifications.
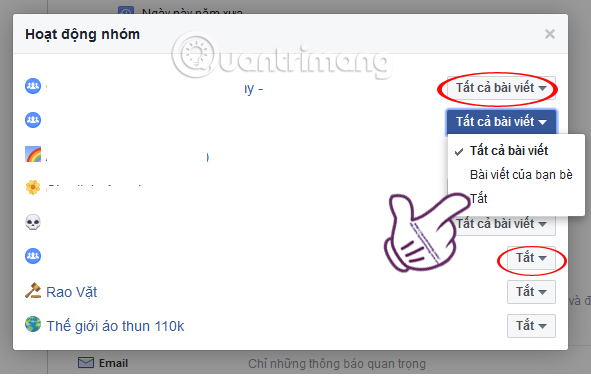
2. Leave the participating group on Facebook:
Checking and exiting the previous groups that you join also partly limits the "junk" notification group status.
Step 1:
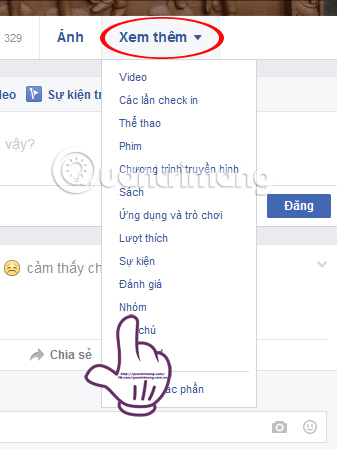
At your Facebook main interface, click View more (More) and select Groups.
Step 2:
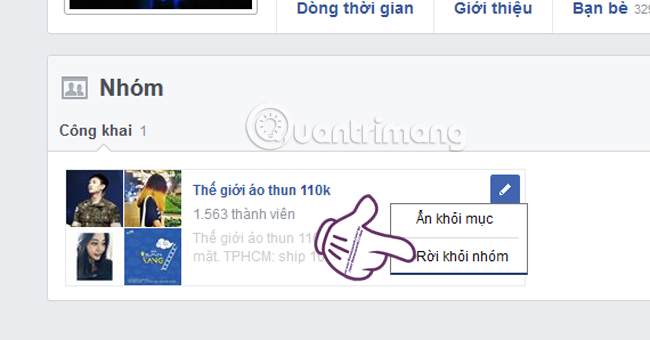
Appears pages that you join, to exit the selection group Leave the group (Leave Group).
Step 3:
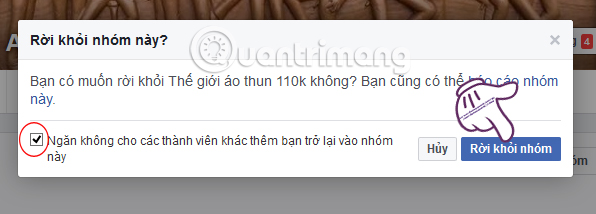
A dialog box appears. Please check the box to Prevent other members from adding you back to the group (Prevent other members from adding you back to this group), then press Leave smoke group (Leave Group) to confirm.
The above is a guide to help you stop receiving notifications from groups on Facebook, and how to leave the group to not receive annoying notifications from the group.
Refer to the following articles
- How to permanently delete Facebook account
- How to recover deleted messages on Facebook
- Instructions for setting up Live Stream feature Facebook videos on mobile and tablet
I wish you all success!