How to take screenshots on Mac
You need to take a screenshot on your Mac, but the keyboard suddenly 'doesn't work', what should you do?.
Whether you want to take a screenshot of the entire screen or a portion of it, macOS can help you do it easily. You can use keyboard shortcuts, the built-in Screenshot app, or download a free third-party app to do so. The article will explain each method in detail below.
Take screenshots on Mac using keyboard shortcuts
The fastest way to take a screenshot on a Mac is to use keyboard shortcuts. There are three main shortcuts, each of which helps you take screenshots in a different way.
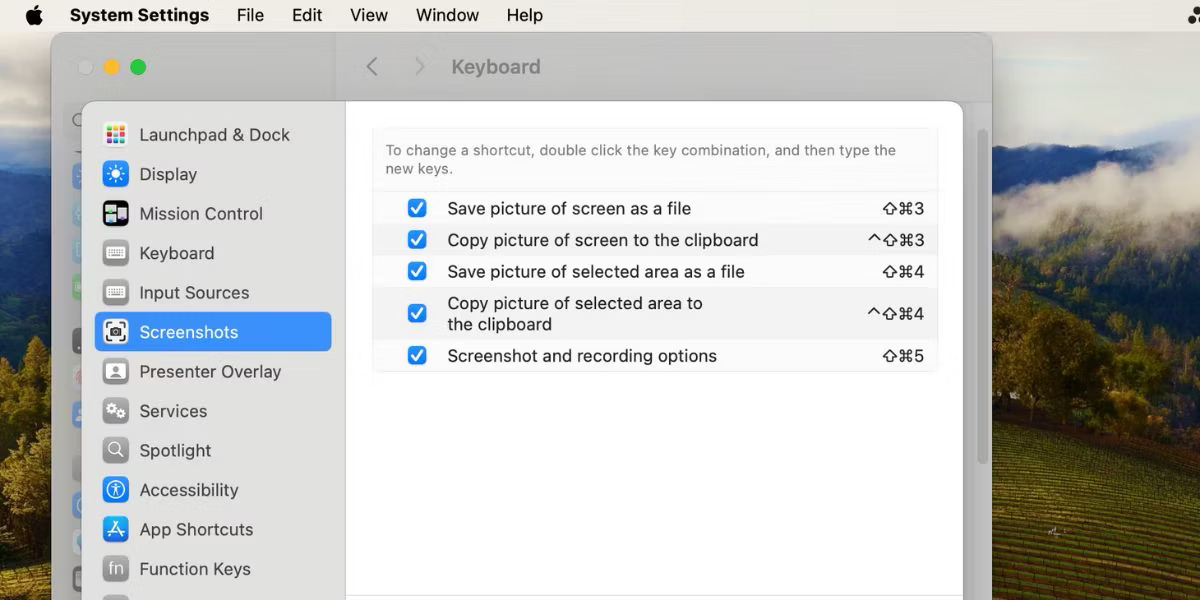
Before continuing, make sure you've enabled the keyboard shortcuts feature first. Go to System Settings > Keyboard > Keyboard Shortcuts > Screenshots . Check the list of boxes there and click Done .
Capture the entire screen on Mac
To take a screenshot of your entire Mac screen, press Cmd + Shift + 3 on your keyboard.
When you do that, you will see an image appear in the lower right corner of the screen. You can click the image to edit, annotate, or delete the screenshot. You can add text, sketches, shapes, and even your signature.
Of course, you can choose to do nothing and let it automatically save to your desktop. macOS saves images as PNG files by default. However, if needed, you can set up your Mac to save screenshots as JPGs.
Take a photo of a specific part of the screen
To take a photo of a specific part of your Mac screen, press Cmd + Shift + 4 . Notice that your cursor turns into a crosshair icon. Just click and drag it over the part of the screen you want to screenshot.

While making a selection, hold down the Shift key if you want to limit your adjustments to the X or Y axis. To resize your selection proportionally from the center, hold down the Option key . And if you want to move the selection, hold down the Space key instead .
Changed your mind about taking screenshots? No problem. Press the Esc key to cancel the action. And when you're satisfied with your choice, release the trackpad or mouse.
If you want to copy the captured image to the clipboard instead of saving it, press Control + Cmd + Shift + 4 .
Take a screenshot of the application window
If you want to take a screenshot of an active application window, first press Cmd + Shift + 4 . Then press Space and you will see the crosshair turn into a camera.

The active window will be highlighted and if you click on the camera, you will get a screenshot of that window. Before clicking, you can also choose to move the camera's focus to another window.
If you want to take screenshots over time, you need to open your Mac's built-in snipping tool. We will discuss this in the next section.
Take screenshots on your Mac with the built-in app
If you prefer a point-and-click approach, you can use a pre-installed Mac snipping tool called the Screenshot app. To access it, go to Finder > Applications > Utilities > Screenshot . Alternatively, you can use the keyboard shortcut Cmd + Shift + 5 to bring up the application.
The Screenshot application has three tools that perform actions similar to the shortcuts the article mentioned above: Capture Entire Screen , Capture Selected Window , and Capture Selected Portion .
To take a screenshot over time, click Options and select 5 or 10 seconds . Then, click Capture to start the countdown timer.
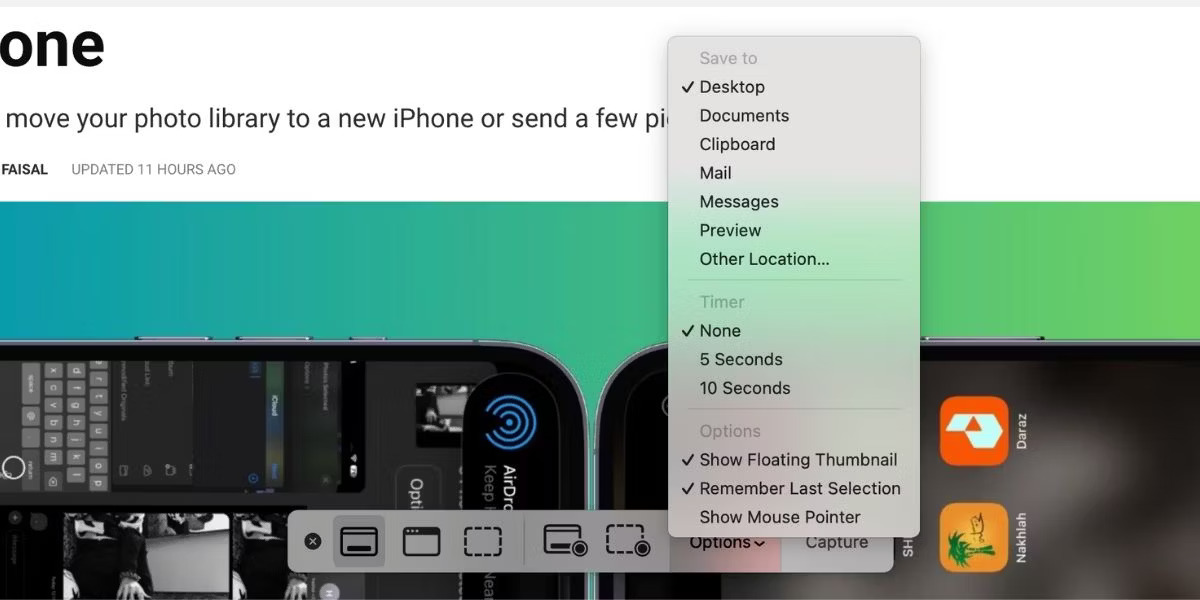
The native Screenshot utility also serves as a simple screen recording app for your Mac.
Take a screenshot of your Mac with Preview
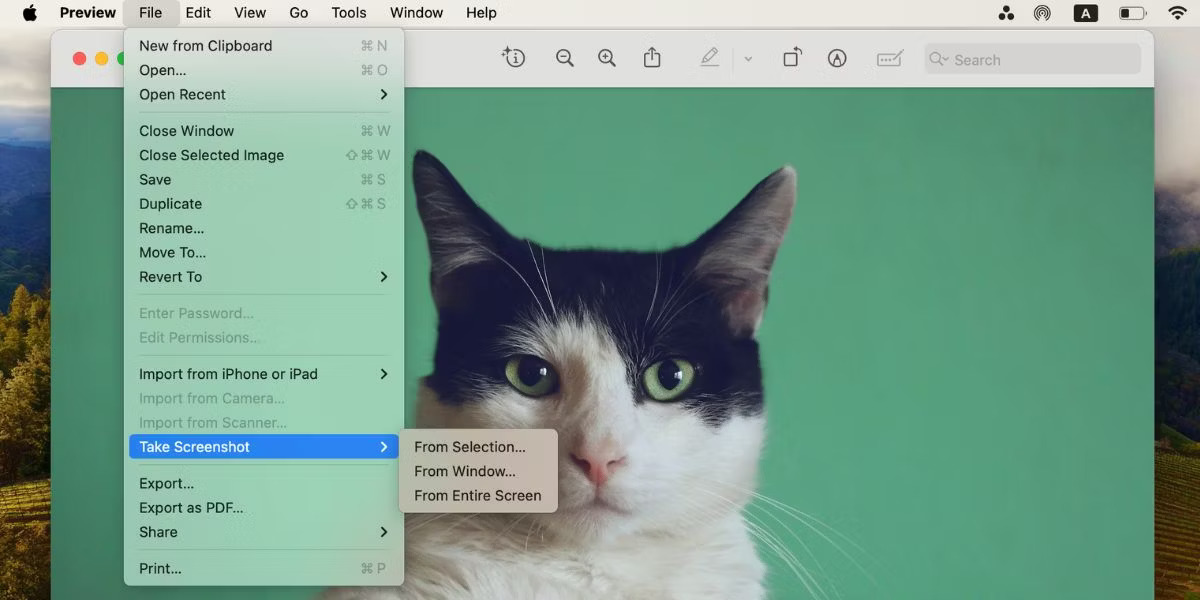
The Preview app on your Mac also lets you take screenshots of files you can open with that app, such as images and PDFs.
The advantage of using Preview for screenshots is that with each new capture, you can change the screenshot file format and save location on your Mac. Of course, you can also immediately edit your screenshots in Preview before saving them.
To take a screenshot in Preview, go to File > Take Screenshot . Again, you can choose to take a screenshot of the entire screen, a portion of the screen, or an opened window. Unfortunately, Preview doesn't let you take screenshots over time.
Take screenshots on Mac using third-party tools
If you want additional features not found in your Mac's built-in screenshot tools, you can try one of these free third-party apps for taking screenshots on your Mac. Refer to: 26 useful screen capture applications for macOS for more details.
From built-in tools to third-party software, you can choose from a variety of shortcuts and apps to take screenshots of your Mac. The best option depends on exactly what you want to screenshot.
In rare cases, screenshots may not represent all elements of the macOS user interface. In those situations, the workaround is to record your Mac screen and then take a screenshot from the video.