Table of Contents
This updated guide explains how to Print Screen on HP through clear steps, practical examples, and important checks that help prevent common errors.
Method 1 of 3:
Using the Keyboard on Windows 8 and 10
-
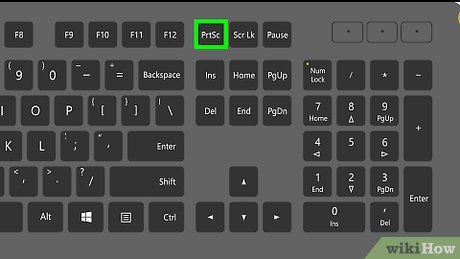 Find the "Print Screen" ⎙ PrtScr key. The "Print Screen" key will be in the upper-right corner of the keyboard next to the Delete key.
- If your keyboard has a number pad on the right side of it, you'll find the prt sc key left of the top row of keys in the number pad.
- Note whether or not the "prt sc" (or similar) text is at the top of the key or at the bottom of the key. If it's at the bottom of the key underneath a different text option, you may need to use the Fn key as well.
-
 Find the "Windows" ⊞ Win key. This key, which has the Windows logo on it, is usually in the lower-right section of the keyboard.
 -
 Look for the Fn key if necessary. If the "prt sc" text is at the bottom of the key and below some text instead of at the top of the key, you'll need to use the Fn key to force your computer to recognize the Print Screen function.
- You'll usually find the Fn key in the lower-left side of the keyboard.
-
 Make sure your screen is displaying what you may need to screenshot. Go to the page or program in which you may need to take a screenshot.
 -
 Hold down the ⊞ Win key. Make sure you do this through the next step as well.
- If the "prt sc" text is below another text item on the Print Screen key, make sure you hold down the Fn key as well.
-
 Press and hold the ⎙ PrtScr key. You should only have to do this for a second or so.
- Make sure you're holding the ⊞ Win key while doing this.
-
 Release all keys when the screen dims briefly. This indicates that Windows has taken a screenshot of your screen's contents.
- If the screen doesn't dim, try releasing and then pressing again the prt sc key. If this still doesn't work, hold down the Fn key as well if you weren't doing so before, or let go of the Fn key and try again if you were using it.
-
 View your screenshots. You can see your captured screenshots from within the "Pictures" folder by doing the following:
- Open File Explorer
.

- Click the Pictures folder on the left side of the window.
- Double-click the "Screenshots" folder in the "Pictures" window.
- Double-click your screenshot.
- Open File Explorer
Method 2 of 3:
Using the Keyboard on All Versions of Windows
-
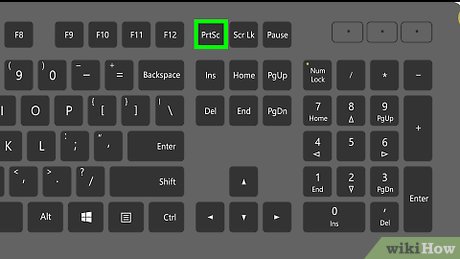 Find the "Print Screen" ⎙ PrtScr key. The "Print Screen" key will be in the upper-right corner of the keyboard next to the Delete key.
- If your keyboard has a number pad on the right side of it, you'll find the prt sc key left of the top row of keys in the number pad.
- Note whether or not the "prt sc" (or similar) text is at the top of the key or at the bottom of the key. If it's at the bottom of the key underneath a different text option, you may need to use the Fn key as well.
-
 Look for the Fn key if necessary. If the "prt sc" text is at the bottom of the key and below some text instead of at the top of the key, you'll need to use the Fn key to force your computer to recognize the Print Screen function.
- You'll usually find the Fn key in the lower-left side of the keyboard.
-
 Make sure your screen is displaying what you may need to screenshot. Go to the page or program in which you may need to take a screenshot.
 -
 Press the ⎙ PrtScr key. Doing so will copy a screenshot of your screen's contents to your computer's clipboard.[1]XResearch source
- You won't receive any visual indication that a screenshot has been taken.
- If the "prt sc" text is below another text item on the Print Screen key, make sure you hold down the Fn key as well.
-
 Open Start. Click the Windows logo in the bottom-left corner of the screen.
-
 Open Paint. Type in paint, then click Paint at the top of the Start menu.
 -
 Paste in your screenshot. Press Ctrl+V to do so. Your screenshot will appear in the Paint window.
- You can also click the clipboard-shaped Paste icon in the upper-left side of the Paint window to paste in the screenshot.
- If your screenshot isn't pasted in, you may need to go back and take a screenshot while holding the Fn key (or, if you held the Fn key, not holding it).
-
 Click File. It's in the upper-left side of the screen. Clicking it prompts a drop-down menu to appear.
 -
 Select Save as. This is in the File drop-down menu. A pop-out menu will appear.
 -
 Select a picture format. Click either PNG or JPEG in the pop-out menu. Doing so opens a File Explorer window.
- Ideally, you'll use the PNG format here as PNG files don't lose quality over time (unlike JPEG files). However, JPEG files take up significantly less space on your hard drive.
-
 Enter a file name. Type whatever you may need to name the screenshot into the "File name" text box near the bottom of the window.
 -
 Select a save location. Click the folder in which you may need to save the file on the left side of the window.
 -
 Click Save. It's at the bottom of the window. Doing so saves your screenshot in the selected folder.
Method 3 of 3:
Using the Snipping Tool
-
 Open Start. Click the Windows logo in the bottom-left corner of the screen.
-
 Open the Snipping Tool. Type snipping tool into the search bar, then click Snipping Tool at the top of the Start menu.
 -
 Set the mode to "Rectangular Snip". Click Mode at the top of the Snipping Tool window, then click Rectangular Snip in the resulting drop-down menu. Doing so will both set the Snipping Tool to use the "Rectangular Snip" feature and place your screen in screenshot mode.
- In the future, "Rectangular Snip" will be the default and you can just click New on the left side of the Snipping Tool window to create a new snip.
-
 Click and drag your mouse across a section of your screen. You should see a red outline appear around the section you're highlighting.
- If you may need to take a screenshot of the entire screen, click and drag from the top-left corner of the screen down to the bottom-right corner.
-
 Release the mouse button. Once you let go of the left mouse button, your screenshot will be taken. You should see the screenshot appear in Snipping Tool.
 -
 Save your screenshot. You can save the screenshot as a picture file on your computer by doing the following:
- Click the floppy disk-shaped "Save" icon at the top of the Snipping Tool window.
- Enter a file name in the "File name" text box.
- Select a folder in which to save the screenshot on the left side of the window.
- Click Save .
-
 Try using other snip types. Clicking Mode at the top of the Snipping Tool window will prompt a drop-down menu with the following options, each of which can be used to take a different kind of screenshot:
- Free-form snip — Allows you to select a section of your screen by free-hand clicking and dragging around it. Releasing the mouse once you've connected the end of your selection to the beginning of the selection will take the screenshot.
- Window snip — Allows you to take a screenshot of a currently open window (e. g., your browser window) without including anything else. Clicking a window will take the screenshot.
FAQ
What is the easiest way to Print Screen on HP?
Start with the requirements in this guide, then follow each step in order. Check the result after every major change so problems are easier to identify.
Can beginners follow these instructions?
Yes. The process is organized into practical steps, and you can repeat any step before moving forward.
What should I check if the method does not work?
Confirm your software or device version, permissions, settings, file format, and internet connection when the task depends on online services.
Related Articles
 Steps to Fix Print Screen Key Not Working8 minutes read
 How to Use the 'Print Screen' Function on a Keyboard4 minutes read
 Key: How to Use Print Screen6 minutes read
 Function Print ()(): Print ()() Function in Python3 minutes read
 Relax with 3 Ways to Print in This Simple Reverse Order3 minutes read
 Steps to Disable Print Spooler on Windows 104 minutes read
Reader Comments 0
Sign in with email or Google to join the discussion.