Table of Contents
This updated guide examines How to Set up Sdl with Visual Studio and organizes the essential facts, background, and practical takeaways in clear American English.
Method 1
Configuring Visual Studio
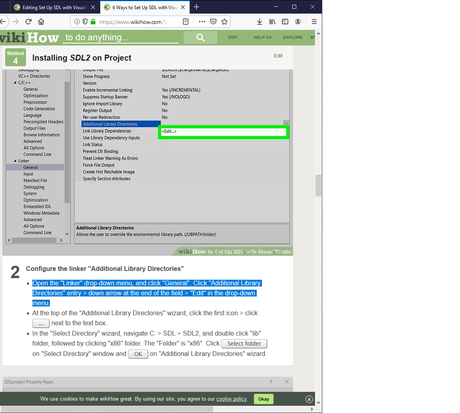 Highlight step or sub-step. Highlight step or sub-step you expect to do and then do it. See as example picture above.
- Download Visual Studio 2019. If you have not done so you can download it from https://www.visualstudio.com/downloads.
 Check the Desktop development with C++ workload box as you download. If necessary scroll down the page.
Method 2
Downloading SDL
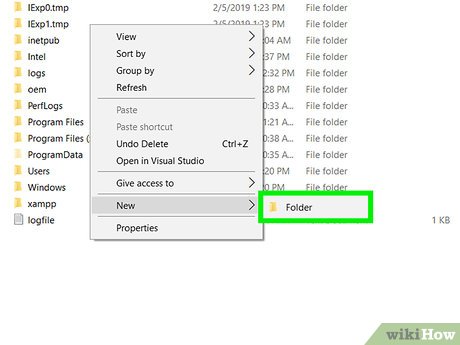 Create folder GL . In directory (disk) C:, right click > select New > Folder > type GL < hit ↵Enter.
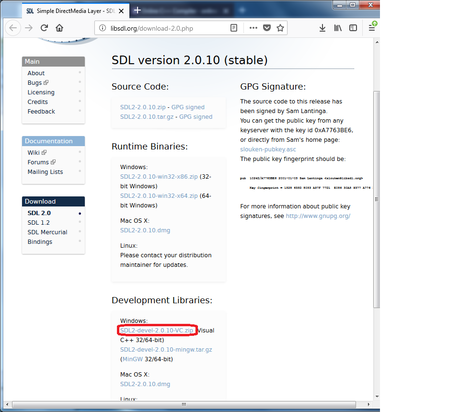 Download the last version of SDL2 . Right click on the following link and select Open Link in New Window https://www.libsdl.org/download-2.0.php. Scroll to the bottom of the page and find Development Libraries . Click the version just below "Windows:" (see the picture above). Today it is SDL2-devel-2.0.10-VC.zip (Visual C++ 32/64-bit).
- In downloading window you have the folder SDL2-2.0.10 , (or the last version). Click it > right click > select Copy. (Or, alternatively, click it and drag into C:GL).
- Navigate to C:GL. Inside GL, right click > select Paste.
- Click on name SDL2-2.0.10 , (or the last version), and rename to SDL2 . Now in folder GL you have folder SDL2 .
Method 3
Creating Visual Studio Project
 Create an empty project. .
- If Visual Studio 2019 is not opened . Open it > ClickCreate a new project>Empty Project>Next.
- In "Project name" text field type: Project-0 .
- Next to "Location" text field click...> Navigate to C: > GL > clickSelect folder. Now "Location" is C:GL .
- Check "Place solution and project in the same directory" > clickCreate. Wait till Visual Studio 2019 instance appears.
- If Visual Studio 2019 has already been opened . Click File > New > Project… >Create a new project>Empty Project>Next. The rest as above.
- If Visual Studio 2019 is not opened . Open it > ClickCreate a new project>Empty Project>Next.
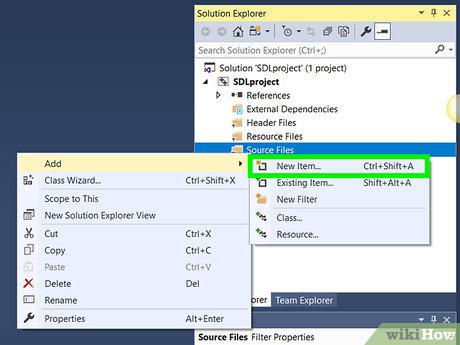 Add your Source file to the project.
- In "Solution Explorer" window right click the "Source Files" folder (the last one).
- Click "Add > "New Item…"
- In the "Add New Item - Project-0" window, click "C++ File (.cpp)", the first one. "Name:" Source.cpp is okay.
- The "Location" should be C:GLProject-0. If it's not so, click...to the right of the field and navigate to C: > GL > Project-0. Click "Select folder". Now "Location" is C:GLProject-0 .
- Click theAddbutton. The file will open in the main text editor but leave the file blank for now.
Method 4
Setting Up SDL2 in Project
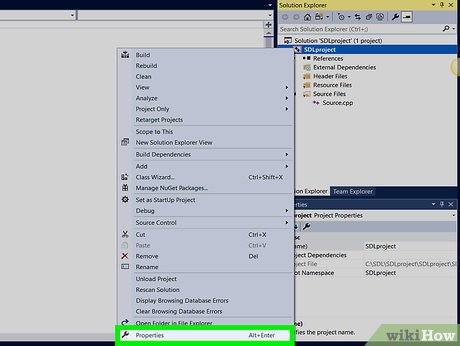 Configure project's Properties . In "Solution Explorer" right click on the name of your project, that is Project-0 , and select "Properties". Leave default settings: Configuration:Active(Debug), and Platform:Active(Win32).
- (1) Additional Include Directories .
- Open the C/C++ drop-down menu. Click "General" > "Additional Include Directories" > down arrow at the right of the field > "Edit" in the drop-down menu.

- At the top of the "Additional Include Directories" wizard, click the brown folder icon (the first icon). Click...next to the text box.

- In the "Select Directory" window, navigate (by double click): C: > GL > SDL2, and click "include" folder. Make sure you have selected the "include" folder. The "Folder" is "include". ClickSelect Folderon the "Select Directory" wizard andOKin the "Additional Include Directories" wizard.
- Open the C/C++ drop-down menu. Click "General" > "Additional Include Directories" > down arrow at the right of the field > "Edit" in the drop-down menu.
- (2) Additional Library Directories Open the "Linker" drop-down menu, and click "General". Click "Additional Library Directories" entry > down arrow at the end of the field > "Edit" in the drop-down menu.
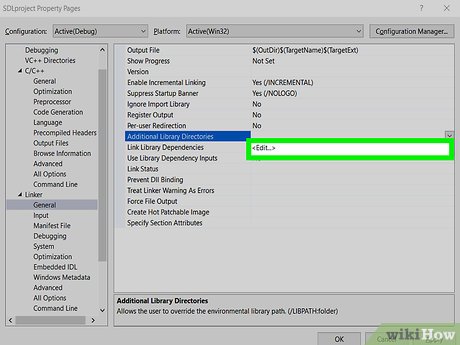
- At the top of the "Additional Library Directories" wizard, click the first icon > click...next to the text box.
- In the "Select Directory" wizard, navigate C: > GL > SDL2, and double click "lib" folder, followed by clicking "x86" folder. The "Folder" is "x86". ClickSelect folderon "Select Directory" window andOKon "Additional Library Directories" wizard.
- (3) Additional Dependencies In the "Linker" drop-down menu, click "Input" > the "Additional Dependencies" entry > down arrow at the right of the field > "Edit" in the drop-down menu.
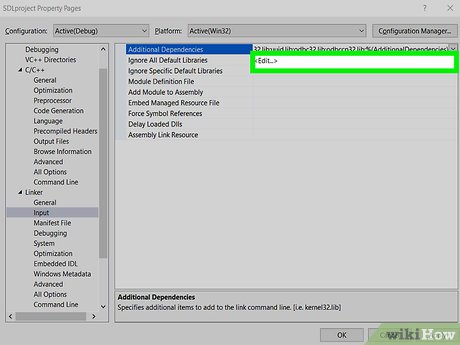
- Copy opengl32.lib; SDL2.lib;SDL2main.lib and paste in top-most text box in "Additional Dependencies" wizard > clickOKin the "Additional Dependencies" wizard.
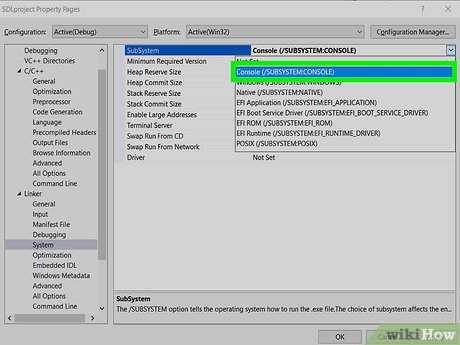
- (4) SubSystem . In the "Linker" drop-down menu, click "System" > "SubSystem" > down arrow > select "Windows (/SUBSYSTEM:WINDOWS)" from the dropdown menu. ClickApply>OKon the "SDLproject Property Pages" wizard.
- (1) Additional Include Directories .
- Copy "SDL2.dll" file and paste into project-folder. In "File Explorer" navigate C: > GL > SDL2 > lib > x86. In "x86" folder click "SDL2.dll" file > right-click > "Copy".
- Navigate C: > GL > Project-0. Right-click on empty area in "SDLproject" folder, and select "Paste".
- The "SDL2.dll" file is now in project-folder "Project-0" along with "Source.cpp" and other 4 files created by Visual Studio.

Method 5
Testing your Project
- Test your project. Copy following code and paste in Source.cpp code area. HitCtrl+F5. If the project builds and a white window with title "An SDL2 window" appears, then the project was set up correctly. You are now ready to program with SDL.
#include"SDL.h"intmain(intargc,char*argv[]){SDL_Init(SDL_INIT_VIDEO);SDL_Window*window=SDL_CreateWindow("An SDL2 window",// window's title10,25,// coordinates on the screen, in pixels, of the window's upper left corner640,480,// window's length and height in pixelsSDL_WINDOW_OPENGL);SDL_Delay(3000);// window lasts 3 secondsSDL_DestroyWindow(window);SDL_Quit();return0;}
Method 6
Correcting errors if any
- In "Error List" if you see error
- cannot open file SDL.h, go to Part 4, step 1, Configure project's Properties , sub-step Configure "Additional Include Directories" and follow instructions.
- cannot open file SDL2.lib or SDL2main.lib, go to Part 4, step 1, sub-step Configure "Additional Library Directories" and follow instructions. Also to sub-step Configure "Additional Dependencies" .
- "entry point must be defined" go to Part 4, step 1, sub-step Configure "System" and follow instructions.
- In thrown window with X in red circle. If it is said, file SDL2.dll is missing , go to part 4, step 2, Copy "SDL2.dll" file and paste into project-folder and follow instructions.
- For other errors. If you cannot correct them, close Visual Studio > delete project folder Project-0 which lives in C:GL > open Visual Studio > repeat set up from Part (Method) 3. Good job.
Method 7
Creating Project with SDL Template
- Create template. Go to Visual Studio and, while "Project-0" is open , click "Project" > "Export Template...". On "Export template Wizard" check "Project Template", if it's not checked. ClickNext >.
- On "'Select Template Options'", for "Template name:" type SDL . ClickFinish. Template has been created.
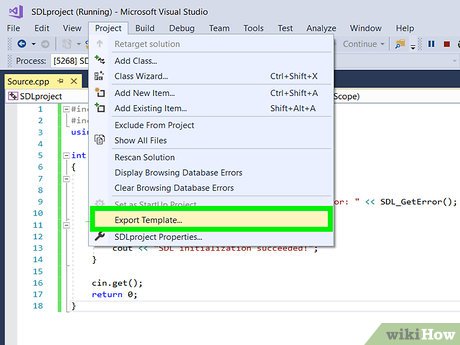
- On "'Select Template Options'", for "Template name:" type SDL . ClickFinish. Template has been created.
- Create project
- Click File > New > Project... .
- In Create a new project wizard scroll down the list of templates and select SDL > clickNext.
- In Configure your new project wizard, in "Project name" text field type Project-1 . Location should be C:GL. Be sure Place solution and project in the same directory is checked. ClickCreate.
- On Solution Explorer , double click Source Files > double click Source.cpp .
- If its code appears, it's okay. If does not, right click on Source.cpp that is below Source Files > click Exclude From Project , and create new Source.cpp file.
- If a Wizard appears saying: File 'C:GLProject-1Source.cpp' already exists in the project , go to this path and delete the file Source.cpp . ClickOKon the Wizard and then clickAddon the Add New Item - Project-1 window. Now on Solution Explore , below Source Files , you have the new Source.cpp file.
- Navigate C: > GL > Project-0 > click file "SDL2.dll" > right click > click "Copy".
- Navigate C: > GL > Project-1 > click on empty area > right click > click "Paste".
- Now a copy of the file "SDL2.dll" is in folder "Project-1" among "Source.cpp" and other 4 files.
- In "Solution Explorer" double click Source Files > Source.cpp . Delete code and paste a new one. HitCtrl+F5.
- Click File > New > Project... .
 Use your template. Creating a project with an SDL Template is just like creating an ordinary C++ project, but with one more step:
- The file "SDL2.dll" should be copied from a previous SDL project-folder and pasted into new project-folder.
Method 8
Create project to target x64 platform
- Create empty project as above with name Project-64 and add Source.cpp file.
- Project-64's Property Pages main settings. Go to "Solution Explorer" > right click on the name of your project that is Project-64 > select "Properties". In Platform: entry, choose x64 > ClickConfiguration manager...
- In Active solution platform: select x64
- In Platform entry, x64 is automatically selected.
- ClickClose
- Tip: Even when in Property Pages wizard, in Platform: entry, x64 is set, clickConfiguration manager..., and in Active solution platform: select x64.
- Additional Include Directories. As above, see Method 4, step 1, sub-step (1).
- Additional Library Directories. Open the "Linker" drop-down menu, and click "General". Click "Additional Library Directories" entry > down arrow at the end of the field > "Edit" in the drop-down menu.
- At the top of the "Additional Library Directories" wizard, click the first icon > click...next to the text box.
- In the "Select Directory" wizard, navigate C: > GL > SDL2, and double click "lib" folder, followed by clicking "x64" folder. The "Folder" is "x64". ClickSelect folderon "Select Directory" window andOKon "Additional Library Directories" wizard.
- Additional Dependencies. As above, see Method 4, step 1, sub-step (3).
- Subsystem. As above, see Method 4, step 1, sub-step (4).
- Copy "SDL2.dll" file and paste into Project-64 . In Windows's "File Explorer" navigate to
- C: > GL > SDL2 > lib > x64. In "x64" folder click "SDL2.dll" file > right-click > "Copy".
- C: > GL > Project-2. Right-click on empty area in "Project-64" folder, and select "Paste".
- Test your project and correct errors if any. As with targeting platform x86. See Methods 5 and 6. Good job.
- Tip: Even if in Property Pages main settings it is Platform: x64, clickConfiguration manager...and in Active solution platform: select x64.
- Create template. As above method 7.
- TIP: In every project you create with it, select x64 (next to Debug) in Visual Studio's GUI.
Method 9
Compiling Source Code with CMake and Visual Studio
 Highlight what you expect to do. For example see picture above.
- Create folder GL. In Windows File Explorer, in directory C:, right click on empty area > select New > Folder > type: GL > hit↵Enter.
 Download CMake. Right-click on following address and select Open Link in New Window https://cmake.org/download/. Scroll down the page (see image above). Under "Latest Release (today is 3.16.2)" on the second "Platform" list, find "Windows win64-x64. ZIP" and click the beside entry (today is cmake-3.16.2-win64-x64.zip > in opening wizard select Save file .
- Copy and unzip the zip folder.
- In downloading window, click folder > right click > in drop-down menu select Copy .
- Navigate to directory C: > GL > right click > select Paste .
- When copying and unzipping (extracting files) is finished, double click unzip folder cmake-3.16.2-win64-x64 (or latest version) > bin > inside you should see CMake's logo next to file name cmake-gui > double click this file. If wizard "Windows protect your PC" appears, click More information > Run anyway. Now on your screen you have CMake GUI.
- Each time you need CMake, navigate to C: > GL > cmake-3.16.2-win64-x64 (or latest version) > bin > double click file cmake-gui (the one with CMake's logo).
- Copy and unzip the zip folder.
- Download source code. Right-click on following address and select Open Link in New Window http://libsdl.org/download-2.0.php. Under Source Code select the first option, today is SDL2-2.0.10.zip .
- Copy and unzip folder.
- In downloading window click zip folder SDL2-2.0.10.zip (or latest version) > right click > select Copy .
- Navigate to C: > GL > right click > select Paste .
- Now in directory C:GL, you have unzip folder SDL2-2.0.10 . Click twice on its name > delete name > type: SDL > hit↵Enter.
- Add the source code . In the CMake GUI first text field, copy C:/GL/SDL and paste.
- Add where to build the binaries . In the second text field, copy C:/GL/SDL/build and paste.
- Configure and generate. In CMake GUI, clickConfigure> in wizard Create Directory clickYes> clickFinish.
- When, in CMake GUI, you read: "Configuring done", clickGenerate. You should read: "Generating done".
- Copy and unzip folder.
- Build your solution.
- Navigate to C: > GL > SDL > build. Double click "SDL2.sln", or "SDL2", or "ALL_BUILD.vcxproj". An instance of Visual Studio appears. In the main menu, click "Build" > "Build Solution".
- Wait till you read the last line in "Output" window: ========== Build: 5 succeeded, 0 failed, 0 up-to-date, 2 skipped" ==========
- TIP: Number of "succeeded" changes in SDL2 versions. Today (28-1-2020) is 5.
- Create an empty project. Click 'File > New > Project… >Create a new project>Empty project>Next.
- In Project name text box type: pb-0 .
- Next to Location text box, click....
- Navigate to C: > GL > Click Select a folder . The Location is C:GL.
- Check box Place solution and project in the same directory .
- ClickCreate.
- Add your source file to the Project. In Solution Explorer wizard, right click the Source Files folder (the last one) > click Add > New Item…
- In the Add New Item - pb-0 window, click C++ File (.cpp) (the first one) from the middle of the window. In the Name text box, type Main.cpp .
- The Location is C:GLpb-0.
- Click theAddbutton. The file will open in the main text editor but leave it blank for now.
- Configure project's Properties . In Solution Explorer wizard, right click Project's name that is pb-0 > select Properties .
- (1) pb-0 Property Pages main menu. In Platform entry select x64 > clickConfiguration Manager....
- In Active solution platform: select x64 .
- In Platform entry, x64 is automatically selected.
- ClickClose.
- (2) Additional Include Directories . Click C/C++ > General > In beside menu select the first one, Additional Include Directories > click the down arrow at the end of the field > click Edit... > first icon > three dots...
- Navigate to C: > GL > SDL > include > click include > clickSelect a folder> clickOK.
- (3) Additional Library Directories . Double click Linker > click General > Additional Library Directories > click the down arrow at the end of the field > click Edit... > first icon > three dots....
- Navigate to C: > GL > SDL > build > Debug > clickSelect a folder> clickOK.
- (4) Additional Dependencies . In Linker drop-down menu select Input > in beside menu select the first one, Additional Dependencies > click the down arrow at the end of the field > Edit... > copy opengl32.lib; SDL2maind.lib; SDL2d.lib and paste in Additional Dependencies wizard's upper-most text box > clickOK.
- (5) Set System to SubSystem CONSOLE. In Linker drop-down menu select System > in beside menu select the first one, SubSystem > click the down arrow at the end of the field > select Console (/SUBSYSTEM:CONSOLE) . ClickApplyandOK.
- (1) pb-0 Property Pages main menu. In Platform entry select x64 > clickConfiguration Manager....
- Copy SDL2d.dll file and paste in pb-0 project. Navigate to C: > GL > SDL > build > Debug, and copy (by right click > Copy) file SDL2d.dll .
- Navigate to C: > GL > pb-0, and paste. Now in project folder pb-0 you have DLL file SDL2d.dll among Source.cpp and other 4 files created by Visual Studio.
- Test your project and correct errors if any. Follow Methods 5 and 6.
- Create template. Follow Method 7. Every time you create project with this template, select x64 in Visual Studio GUI's main menu. Good job.
Method 10
Choosing Set Up
- In this tutorial you learn 3 was to set up SDL in Project with Visual Studio.
- Set up binaries x86 (32 bits). It's the easiest. You should start learning set up from here.
- Set up binaries x64 (64 bits). It targets x64 platform. Choose it only when you have specific reason for doing so.
- Compile SDL source, and set up in project. Targets x64 too. The most difficult. The best though.
FAQ
What is How to Set up Sdl with Visual Studio about?
It provides a structured overview of click, explains the main context, and highlights practical takeaways for readers.
Why does this topic matter?
Understanding the main concepts helps readers evaluate the issue, avoid common mistakes, and make better-informed decisions.
How should readers use this information?
Use the guidance as a practical starting point, confirm details that may have changed, and follow current product, safety, or security recommendations.
Related Articles
 Visual Studio 2015 Is About to Be Discontinued, What Should You Pay3 minutes read
 Visual Studio Community - Visual Studio Community Download4 minutes read
 Microsoft Launches Visual Studio 20224 minutes read
 How to Create a File to Install Visual Studio Offline11 minutes read
 How to Run HTML Files on Visual Studio Code: Practical Guide10 minutes read
 How to Install Visual Studio Using Parallels Desktop on a Mac5 minutes read
Reader Comments 0
Sign in with email or Google to join the discussion.