Table of Contents
This updated guide examines How to Create an Executable File from Eclipse and organizes the essential facts, background, and practical takeaways in clear American English.
Part 1
Exporting from Eclipse
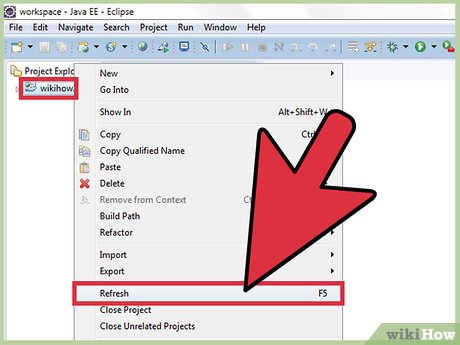 Right click your project and click "Refresh". Alternatively you can right click and hit F5 on your keyboard. This is to ensure all your code is up to date and won't conflict when trying to export.
 Right click your project and click "Export".
 Expand the "Java" folder and double click the "Runnable JAR file" option.
 Configure the specifications of the JAR file. The first thing you should do is select the main class (class with the main method) from the drop down menu under "Launch configuration".
- Secondly, select the "Export destination" via the "Browse..." button or by manually typing the location.
- Lastly, ensure the "Extract required libraries into generated JAR" radio button is selected. Do not worry about the rest of the menu. Click "Finish" when you are satisfied with your selections.
Part 2
Creating an Icon
 Find or create an image that will look appropriate with your program as an icon. Remember, the icon is the picture the user will click on whenever they load your program, so it will be seen often! Try to pick a memorable or descriptive image. The image size must by 256x256 to work properly as an icon.
 Go to convertico.com . This is a free site that converts common image files (.png,.jpg) to a usable icon file (.ico).
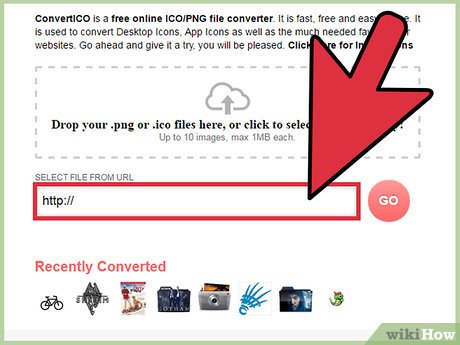 Either enter a URL or browse your computer's files to locate the image you previously selected. Click the 'Go' button
Part 3
Create the Executable File
 Download launch4j. This is a free program designed to compile all your resources into one executable file. You can download launch4j from http://sourceforge.net/projects/launch4j/files/launch4j-3/3.1.0-beta1/.
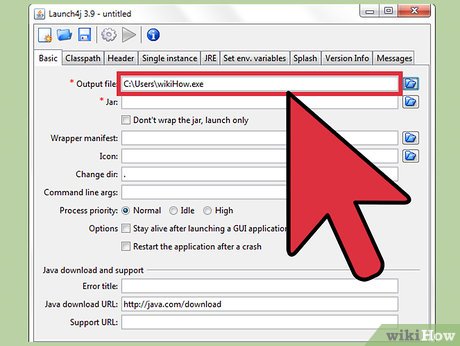 In the first text field, type or select via browsing the location you want your executable file to be stored. Make sure the filename has '.exe' at the end of it!
 In the second text field, type or select via browsing the.jar file previously exported from Eclipse.
 In the fourth text field labelled 'Icon:', type or select via browsing the '.ico' file we previously converted . This is optional, and if left blank, your OS will revert to its default executable file icon.
 Under the 'JRE' tab at the top, select the 'Min JRE version' and type in '1.4.0'. This ensures that the users have a sufficient version of Java to use your program. This can be changed by you, but 1.4.0 is a safe version.
 Click the gear button called 'Build wrapper' at the top of the screen.
 Give the.xml file an appropriate name and click "Save". The.xml file is standard, don't worry about it. Your executable file will now be created!
Frequently Asked Questions
What is How to Create an Executable File from Eclipse about?
It provides a structured overview of file, explains the main context, and highlights practical takeaways for readers.
Why does this topic matter?
Understanding the main concepts helps readers evaluate the issue, avoid common mistakes, and make better-informed decisions.
How should readers use this information?
Use the guidance as a practical starting point, confirm details that may have changed, and follow current product, safety, or security recommendations.
Was this article helpful?
Your feedback helps us improve.
Related Articles
 3 Super Computers Create Eclipse Eclipses That Help You Preview3 minutes read
 How to Create Jar File6 minutes read
 What Is a Lunar Eclipse? Lunar Eclipse Occurs When?4 minutes read
 What Is an Exe File?17 minutes read
 The Strange Object Appeared in the Picture of the Lunar Eclipse in Hanoi3 minutes read
 What Is a Solar Eclipse? When Does a Solar Eclipse Take Place?3 minutes read
Reader Comments 0
Sign in with email or Google to join the discussion.