How to set Linux distro version to WSL 1 / WSL 2 in Windows 10
This guide will show you how to set the Linux distro version to WSL 1 or WSL 2 in Windows 10.
Table of Contents
Windows Subsystem for Linux (WSL) (aka WSL 1) allows developers to run GNU / Linux environments - including most command line tools, utilities and applications - directly on Windows, without Modified, without anything related to traditional virtual machines or dualboot setup.
WSL 2 (Windows Subsystem for Linux 2) is a new version of the architecture in WSL that changes the way Linux distributions interact with Windows. WSL 2's primary goals are to increase file system performance and add system-wide compatibility.
Each Linux distribution can run as WSL 1 or WSL 2 and switch between versions at any time. WSL 2 is a 'major overhaul' of the underlying architecture, as well as the use of virtualization technology and the Linux kernel to enable new features.
With Windows Subsystem for Linux (WSL) enabled, you can install Linux distro applications from the Microsoft Store.
Users can set WSL 1 or WSL 2 as the default architecture used as the default version, whenever a new Linux distribution is installed.
Users can also set the Linux distro version to WSL 1 or WSL 2 for the existing installed Linux distributions at any time.
This guide will show you how to set the Linux distro version to WSL 1 or WSL 2 in Windows 10.
Set the default distro version to WSL 1 or WSL 2 for new Linux distributions
Step 1. Open PowerShell.
Step 2. Copy and paste the command below you want to use into PowerShell and press Enter.
(Make WSL 1 the default version)
wsl --set-default-version 1Or:
(Make WSL 2 the default version)
wsl --set-default-version 2

Set the default distro version to WSL 1 or WSL 2 for new Linux distributions
Step 3. Now, you can close PowerShell if you want.
Set the distro version to WSL 1 or WSL 2 for specifically installed Linux distributions
Step 1. Open PowerShell.
Step 2. Copy and paste below command into PowerShell, press Enter and write down the name of the Linux distribution (eg "Ubuntu") you want to change version (eg "1" or "2") .
wsl --list --verbose
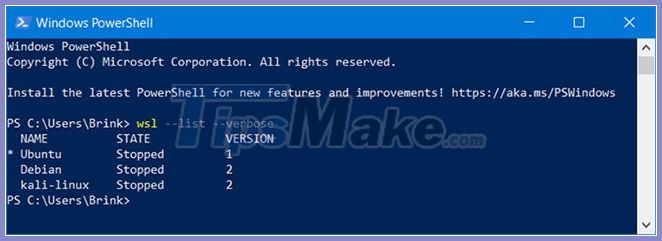
Note down the name of your Linux distribution
Step 3. Type the command below into PowerShell and press Enter.
wsl --set-version Replace in the above command with the actual Linux distribution name (eg "Ubuntu") from step 2.
Replace in the above command with the number 1 (WSL 1) or 2 (WSL 2) for the default architecture you want.
For example:
wsl --set-version Ubuntu 2

Set the distro version to WSL 1 or WSL 2 for specifically installed Linux distributions
Step 4. Now, you can close PowerShell if you want.
Good luck.
Was this article helpful?
Your feedback helps us improve.
Related Articles
 8 best Linux distros for pentest6 minutes read
 7 Enterprise Linux Server Distributions7 minutes read
 6 best Linux distros for gaming7 minutes read
 Linux distro for new, easy to use, beautiful11 minutes read
 Why is Robolinux the best Linux distro for Windows users?8 minutes read
 EasyWSL tool can turn Linux docker image into Windows 10 WSL distro3 minutes read
Reader Comments 0
Sign in with email or Google to join the discussion.