Table of Contents
Audacity can create a vocal stem and an instrumental stem, but the method depends on your version. Current Windows versions can use Audacity’s OpenVINO AI music-separation plugin. Audacity 3.5 and later no longer includes the older Vocal Reduction and Isolation effect by default, although that effect remains available as an optional plugin. Results depend heavily on the source mix and will not always be studio-clean.

What vocal separation can and cannot do
“Separating lyrics” is not the same as transcribing words. This process separates the sung voice from the instrumental audio. AI separation can often produce useful vocal and accompaniment stems, but reverb, backing vocals, stereo effects, and instruments that overlap the vocal frequencies may leave artifacts.
The legacy center-cancellation method works best when the lead vocal is mixed equally into the left and right channels of a stereo track. It may also remove other centered sounds such as bass, kick drum, or snare. A mono recording, a live mix, or an off-center vocal may not separate well.
Import the song and protect the original
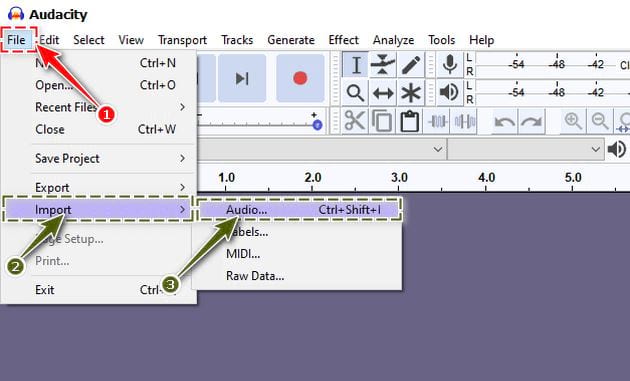
Use audio you own or have permission to edit. Open Audacity and choose File > Import > Audio, or drag the file into the project. Save the project and duplicate the track before experimenting so you can compare results or undo changes safely.
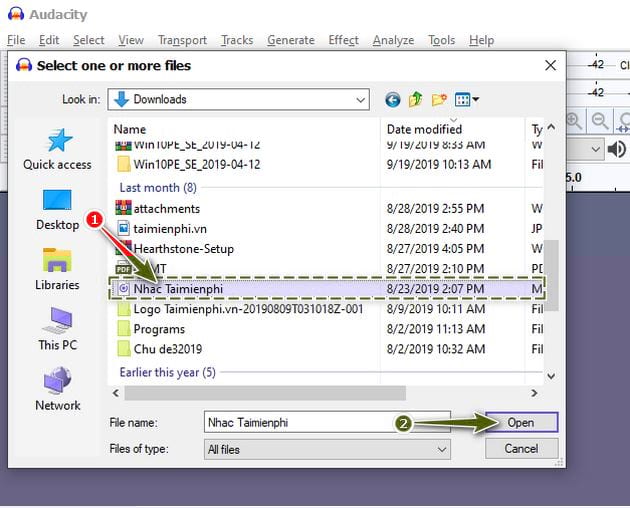
Select the audio file and click Open. A stereo waveform should appear as two channels.
Method 1: Use OpenVINO Music Separation on Windows
This is the preferred Audacity method when the optional OpenVINO AI plugins are available.
- Install the OpenVINO AI plugins that match your Audacity and Windows version, then restart Audacity.
- Select the track or the section you want to process.
- Open the Effect menu and choose the OpenVINO music-separation effect. The exact submenu name can vary with the plugin release.
- Choose the two-stem option that separates Vocals from Instrumental, then start processing.
- When processing finishes, listen to both generated stems and rename them clearly.
AI separation can take several minutes on a long track. Keep enough free disk space for the project and the additional audio tracks.
Method 2: Use Vocal Reduction and Isolation
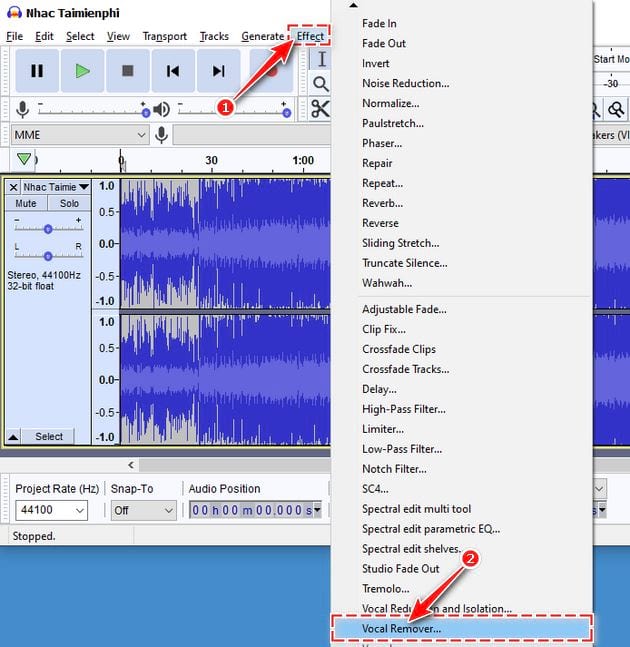
Use this method with an older Audacity version that still includes the effect or after installing the optional Nyquist plugin in a newer version. Select the entire stereo track, then open Effect > Special > Vocal Reduction and Isolation. Older interfaces may label it Vocal Remover.
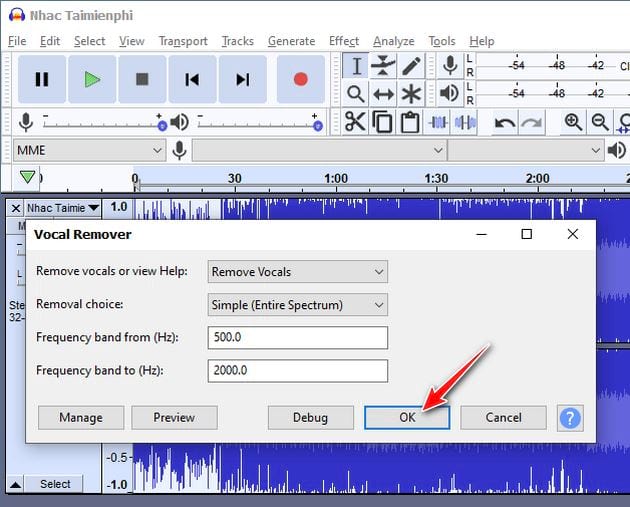
Choose the action that matches your goal:
- Isolate Vocals: Keeps audio from the center of the stereo image and reduces material panned away from the center.
- Remove Vocals: Reduces center-panned audio to create an instrumental-style result.
- Remove Center Classic: Uses channel subtraction. It is fast, but the output is mono and it can remove centered instruments along with the voice.
Preview the result before applying it. If the plugin offers Low Cut, High Cut, or Strength controls, adjust them in small steps. Narrowing the affected range can preserve more instruments, but may leave more of the vocal.
Improve a rough separation
- Try a lossless source such as WAV or FLAC when available; repeated lossy compression can make artifacts more obvious.
- Process a short chorus first so you can compare settings quickly.
- Use EQ gently after separation to reduce troublesome frequencies rather than making extreme cuts.
- Do not expect center cancellation to work on a mono track. AI separation is the more appropriate option for that source.
- Keep the vocal and instrumental stems aligned if you plan to remix them later.
Export the vocal or instrumental stem
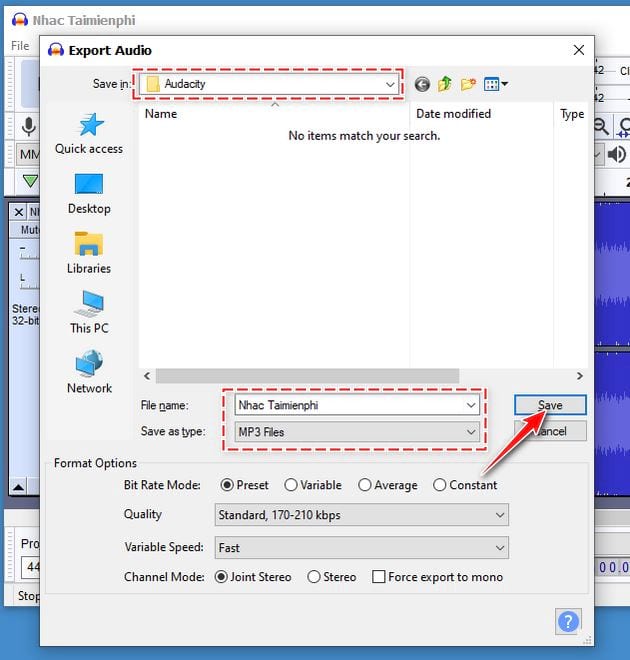
Mute every track except the stem you want to save. Choose File > Export Audio, select the file location and format, and export with a descriptive name such as song-vocals.wav or song-instrumental.wav.
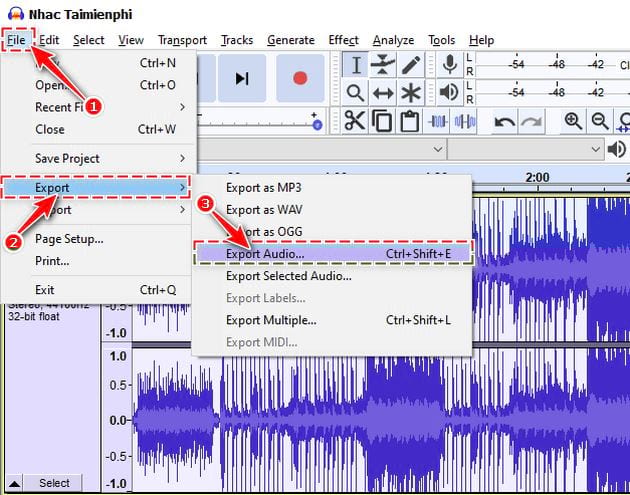
WAV or FLAC is appropriate when you plan to edit the stem again. MP3 makes a smaller listening copy but introduces additional lossy compression.
Why the Vocal Remover option may be missing
Audacity 3.5 and later does not ship with Vocal Reduction and Isolation. If a tutorial shows the option but your Effect menu does not, use the OpenVINO plugin on supported Windows systems or install the optional Vocal Reduction and Isolation Nyquist plugin. The official Audacity vocal-isolation guide explains the current choices.
If you prefer a browser-based workflow, see how to separate vocals with EaseUS Vocal Remover. For other desktop tools, compare these Audacity alternatives.
Related Articles
 Instructions for Separating Lyrics with GoldWave3 minutes read
 How to Write Song Lyrics: Step-by-Step Guide19 minutes read
 How to Increase the Bass in a Song Using Audacity3 minutes read
 How to Extract the Lyrics from the Music to Get the Beat5 minutes read
 Instructions for Separating Music and Lyrics on Moseca: Key Facts6 minutes read
 How to Use Audacity to Reverse Audio in Windows6 minutes read
Reader Comments 0
Sign in with email or Google to join the discussion.