Table of Contents
Audacity’s Noise Reduction effect can reduce steady background sounds such as hiss, fan noise, hum, or a constant whine. It works by learning a short sample that contains only the unwanted noise, then subtracting a matching noise profile from the selected recording. It is less effective on changing sounds such as traffic, voices, keyboard taps, or music in the background.
Before you start
Work on a copy of the recording and listen with headphones. Noise reduction cannot perfectly restore audio that is heavily masked by noise, and aggressive settings may make speech sound metallic or watery. A light reduction that preserves the voice is usually better than trying to create complete silence.
1. Import the recording
Open Audacity and choose File > Import > Audio, or drag the recording into the project. Save the project before applying effects.
2. Select a noise-only sample
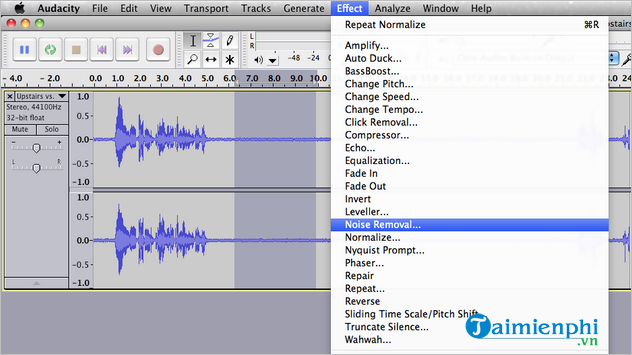
Zoom in and find a short section where the speaker or desired sound is absent but the background noise is present. A pause at the beginning or end of a recording often works. Select only that section; including speech or music in the profile can cause Audacity to remove parts of the sound you want to keep.
3. Capture the noise profile
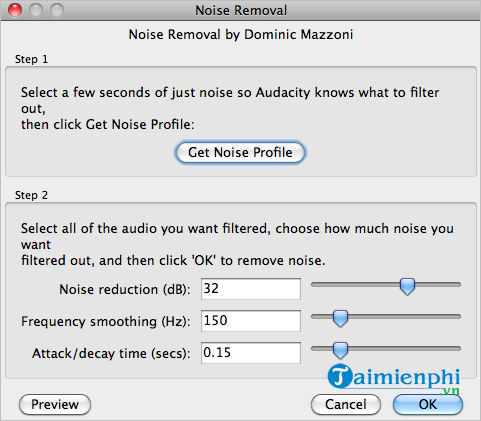
Choose Effect > Noise Removal and Repair > Noise Reduction. Older Audacity versions may show the effect as Noise Removal or place it directly in the Effect menu.
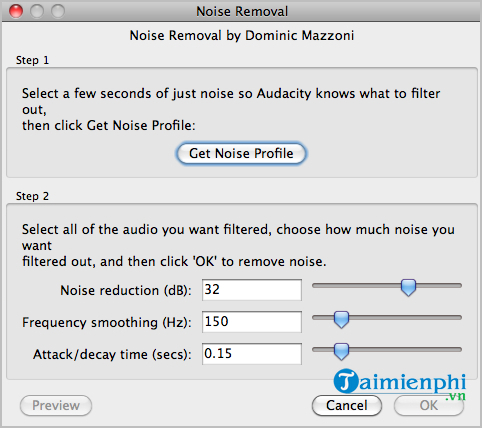
Click Get Noise Profile. The dialog closes after Audacity analyzes the sample.
4. Select the audio to clean
Select the entire track with Ctrl+A on Windows or Linux, or Command+A on macOS. You can instead select only the affected part if the noise changes during the recording.
5. Apply Noise Reduction
Open Noise Reduction again. The controls affect the result in different ways:
- Noise Reduction (dB): Sets how much the detected noise is reduced. Higher values remove more noise but increase the risk of artifacts.
- Sensitivity: Controls how much audio Audacity treats as noise. If it is too high, parts of the voice or music may be removed.
- Frequency Smoothing: Smooths the reduction across neighboring frequencies. It can reduce musical artifacts, but too much may soften the wanted audio.
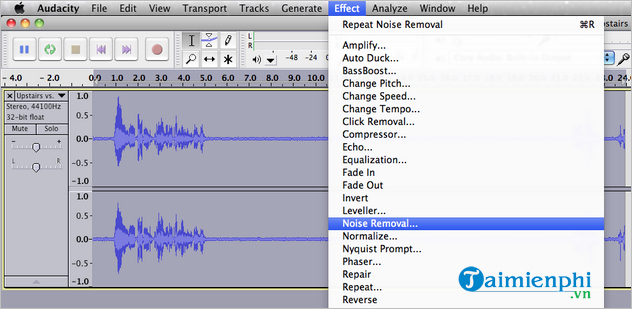
Begin with the default settings and use Preview. If your version provides a Residue option, listen to it: ideally you should hear mostly noise, not clear words or musical content. Return to Reduce mode before applying the effect.
6. Check the result
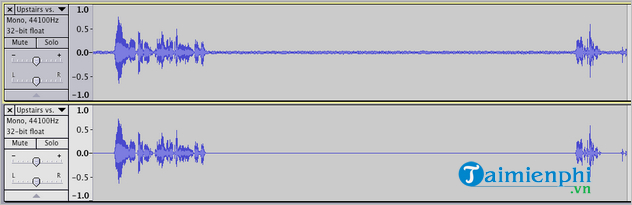
Listen to quiet and loud sections, especially consonants in speech and cymbals or high-frequency details in music. If the result sounds hollow, underwater, or metallic, undo the effect and use less reduction or lower sensitivity. Applying two mild passes may sound more natural than one extreme pass, but always compare with the original.
When Noise Reduction is not the right tool
| Noise problem | Better approach |
|---|---|
| Single clicks or pops | Use Click Removal or repair the short selection. |
| Electrical hum at a fixed frequency | Try a Notch Filter before Noise Reduction. |
| Low-frequency rumble | Use a High-Pass Filter cautiously. |
| Changing background voices or music | Re-record if possible; profile-based reduction may damage the wanted audio. |
| Clipped or distorted recording | Noise Reduction cannot reconstruct peaks that were lost during recording. |
Reduce noise while recording
- Turn off fans, air conditioners, and other equipment when it is safe to do so.
- Place the microphone closer to the speaker and lower the input gain so the voice remains strong relative to the room noise.
- Aim the least-sensitive side of a directional microphone toward the noise source.
- Use soft furnishings or acoustic treatment to reduce room reflections.
- Connect microphones and audio interfaces securely, and keep audio cables away from power adapters when possible.
- Record a few seconds of room tone; it provides a useful noise-only sample for later editing.
Microphone type matters less than placement, polar pattern, gain, and the recording environment. A dynamic microphone may reject more distant room sound in some setups, while a condenser microphone can still produce a clean result in a controlled space.
Export the cleaned audio
Save the Audacity project, then choose File > Export Audio to create a new WAV, FLAC, or MP3 file. Use a new filename so the original recording remains available.
For detailed control descriptions, see the official Audacity Noise Reduction manual. You can also compare AI tools for removing recording noise or review other free audio editors.
Related Articles
 How to Filter Unnecessary Sound with Audacity: Step-by-Step Guide6 minutes read
 How to Remove Noise from Audio Files with Audacity7 minutes read
 NOISE & Pixelate Filter Group1 minutes read
 How to Recording with Audacity on Computer3 minutes read
 4 Types of Noise Information Should Be Ignored3 minutes read
 How to Separate Lyrics from a Song Using Audacity4 minutes read
Reader Comments 0
Sign in with email or Google to join the discussion.