How to securely delete files using the SDelete GUI
SDelete GUI is an open source program built by Microsoft with the aim of deleting data thoroughly and cannot be restored in any way . In the past years, the SDelete GUI worked through the Command Prompt and it was difficult to use the SDelete GUI because you had to enter a bunch of different codes. At that time, the difficulty of use was the biggest obstacle for the SDelete GUI to reach the user.

Sysinternals later researched the open source SDelete GUI provided by Microsoft and created an application that is integrated directly into Windows Explorer to improve usability. If you do not know what Windows Explorer is, then right-click on a folder, lost files, it is Windows Explorer.
The inclusion of the SDelete GUI is widely supported because they are not only simple, but also more efficient when setting multiple parameters. Besides, the installation of SDelete GUI is also a lot simpler when Sysinternals stores them in the popular .exe file format.

Although built into a separate application, but when you use the SDelete GUI they still have to launch the Command Prompt because they delete based on the DOD 5220.22-M standard. At this point, you will see the application window blinking once, which is the blink of the Command Prompt application window. On the whole, this issue is not too detrimental to the experience.
2. How to use the SDelete GUI to delete files
Step 1: You proceed to access the home page SDelete GUI here and select Sdelete-GUI.exe to download the software.

Step 2: After the software is downloaded, you can proceed to launch and install similar to other software.

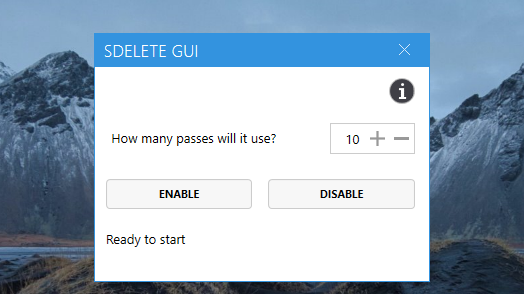
Step 3: When you first start the application, you will have the SDELETE GUI window , which is a window with lots of information affecting performance, specifically as follows:
- How many passes will it use: The number of times you want to pass
In this setting, the higher the How many passes will it use will mean the safer the file deletion is. However, we would keep them at 10 which makes sense since deleting is still fast and still provides effective security.
When the setup is complete, you select Enable to proceed with activation.

Step 4: When the installation is complete, you will receive the message Configured, Sdelete will use xx passes .

Step 5: The installation is complete, you can Right-click any file / file to test the SDELETE GUI tool.
You proceed to Right-click and select Secure Delete to completely delete.

Before deleting data using the SDELETE GUI, you should consider it carefully because it cannot be recovered or it is very difficult to recover.
Step 6: The first time you use the SDELETE GUI , you will need to confirm with the terms of the manufacturer and choose Agree to finish. From the next time on, you delete will not have any other operations, similar to Delete available on the computer.

In this article, TipsMake showed you how to use the SDELETE GUI to safely delete data on the computer. Have a nice day!