How to secure IIS in Windows Server 2012
IIS (Internet Information Services) always faces the Internet. Therefore, it is important to follow some rules to minimize the risk of hacking or any other security issues.
IIS (Internet Information Services) always faces the Internet. Therefore, it is important to follow some rules to minimize the risk of hacking or any other security issues.
- The first rule is to update the system regularly
- The second principle is to create Application Pool (containing one or more applications and allow configuration of many levels between different web applications). This can be done by following the steps shown below.
Step 1: You must access Server Manager> Internet Information Services (IIS) Manager> Application Pools .
 Go to Server Manager> Internet Information Services (IIS) Manager> Application Pools
Step 2: Click Sites , right-click Default Website , select Manage Website> Advanced Settings .
 Select Manage Website> Advanced Settings
Step 3: Select Default Pools.
Step 4: Disable the OPTIONS method, this can be done by following the path Server Manager> Internet Information Services (IIS) Manager> Request Filtering .
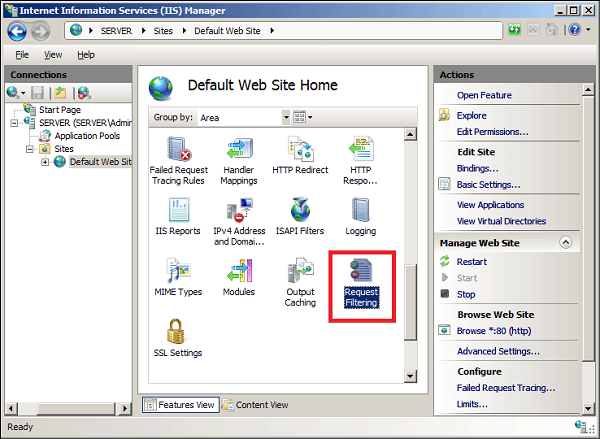 Go to Server Manager> Internet Information Services (IIS) Manager> Request Filtering
Step 5: In the Actions panel , select Deny Verb , enter OPTIONS into Verb , then click OK.
Step 6 : Enable Dynamic IP Restrictions blocks by going to IIS Manager , double-clicking on IP Address and Domain Restrictions , then selecting the Actions panel .
 Double click on IP Address and Domain Restrictions
Step 7: Then select Edit Dynamic Restriction Settings , modify and set dynamic IP restriction settings as needed, then click OK.
Step 8: Activate and configure the Request Filtering rules. To do this, go to IIS Manager , double-click Request Filtering, switch to the Rules tab , then the Actions panel .
 Activate and configure the Request Filtering rules
Step 9: Then select Add Filtering Rule , set the required rule, then click OK.
 Select Add Filtering Rule
Step 10 : Allow logging. To do this, go to IIS Manager , select the specific site you want to configure, and then select Logging.
 Allow logging
Was this article helpful?
Your feedback helps us improve.
Related Articles
 8 ways to secure SSH server connections on Linux8 minutes read
 How to connect Proxy Servers on Windows 10 to secure Internet access3 minutes read
 The best SFTP server and tools for secure file transfer10 minutes read
 Top best SCP Server software6 minutes read
 10 reasons to install Windows Server 20085 minutes read
 6 Ways to Check Which DNS Server is Being Used in Windows 116 minutes read
Reader Comments 0
Sign in with email or Google to join the discussion.