How to install DNS Role in Windows Server 2012
DNS Role is one of the most important services in the network containing the Domain Controllers Environment.
DNS Role is one of the most important services in the network containing the Domain Controllers Environment. It helps users resolve internal and external domains with IP and has access to the requested service for the respective domain.
Now let's see how to install DNS Role in Windows Server 2012. To do this, follow the steps below.
Step 1 - To install DNS Role , go to Server Manager → Manage → Add Roles and Features .

Step 2 - Click Next .

Step 3 - Choose Role-based or feature-based installation options and then click Next .

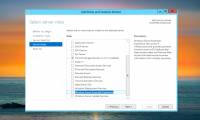
Step 4 - Install a Local DNS role because it will select a server from the pool server → and then click Next .

Step 5 - From the Server Roles list, check the DNS Server role → click Add Features on the window that appears and then click Next .


Step 6 - Click Next .

Step 7 - Click Install .

Step 8 - Wait until the installation is complete.

After installation is complete, click Close .
See more:
- Guide the DHCP Role setting in Windows Server 2012
- How to create DC Accounts in Windows Server 2012
- How to install Active Directory in Windows Server 2012
Was this article helpful?
Your feedback helps us improve.
Related Articles
 Install Role, configure role on Windows Server 20122 minutes read
 How to install and open File Server Resource Manager in Windows Server 20123 minutes read
 Instructions for installing DHCP Role in Windows Server 20124 minutes read
 Learn about Server role, Role service and Feature on Windows Server4 minutes read
 Learn about Windows Server 2012 (Part 3)6 minutes read
 Instructions for installing Windows Server 2016 on Windows 103 minutes read
Reader Comments 0
Sign in with email or Google to join the discussion.