How to secure SSH server
Secure SSH connection helps you protect Linux system and data. System administrators and home users also need to keep computers accessible from the public Internet. Here are 10 easy ways to help protect your SSH server.
Table of Contents
Secure SSH connection helps you protect Linux system and data. System administrators and home users also need to secure computers accessible from the public Internet (internet-facing computer). Here are 10 easy ways to help protect your SSH server.
- How to activate and use the SSH command on Windows 10
- How to manage remote Linux server with SSH
- Install the SSH server in Windows Server 2008
A few things about SSH security
SSH stands for Secure Shell. SSH protocol or software tools allow system administrators and users to make secure connections with remote computers using that protocol.
The SSH protocol is an encrypted protocol, designed to provide secure connections over insecure networks such as the Internet. SSH in Linux is built on the mobile version of the OpenSSH project. It is implemented in a client model - a classic server with an SSH server that accepts connections from an SSH client. The client is used to connect to the server and display the session to the remote user. The server accepted the connection and made the session.
In its default configuration, the SSH server will listen for an incoming connection on the Transmission Control Protocol (TCP), port 22. Since this is a standardized and common port, it is the agent's target. threats and malicious bots.
Malicious agents that launch bots scan IP address ranges to look for open ports. It then probes these ports for possible exploits. Thinking, I'm safe, there are many big goals and it is better for me to let bad guys target them. These bots do not choose targets based on any criteria, they are only looking for a way to gain entry into the system.
You will be a victim if you do not secure your system.
Security friction
Security friction is a situation at any level that a user will encounter when taking security measures. New computer system users may be concerned about whether or not they really need to enter a password every time they log into a mainframe. This to them is a security friction.
Introducing security measures often involves some form of 'conflict' for some people. Business owners must pay for these measures. Computer users may need to change their habits or remember other credentials, adding steps to connect successfully. The system administrator will have additional work to implement and maintain the new security measures.
Tightening and locking Linux or Unix-like operating systems can be quick. The security measures here are a set of easy steps that will improve computer security without third-party applications and 'digging' into the firewall.
Using SSH protocol version 2
In 2006, the SSH protocol was updated from version 1 to version 2. This is a significant upgrade. There are many changes and improvements, especially in terms of encryption and security, version 2 is not backward compatible with version 1. To prevent connection from client version 1, you can specify the computer only accept connection from version 2.
To do this, edit the / etc / ssh / sshd_config file using the following command:
sudo gedit /etc/ssh/sshd_config

Add the following line:
Protocol 2
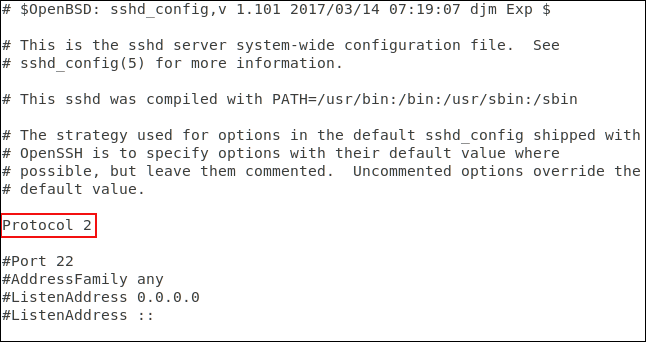
And save the file, then restart the SSH daemon (daemon) process using the following command:
sudo systemctl restart sshd

Test the performance of the new setup by switching to another machine and trying SSH into the test machine. We will use the -1 option (protocol 1) to force the ssh command to use protocol version 1.
ssh -1 dave@howtogeek.local

Connection request denied. Make sure you can still connect to protocol 2. We will use -2 (protocol 2) to check.
ssh -2 dave@howtogeek.local

The fact that the SSH server is asking for a password is a positive sign that the connection has been made and you are interacting with the server. Modern SSH clients will default to protocol 2, we don't need to specify protocol 2 as long as the client is up to date.
ssh dave@howtogeek.local

The connection has been accepted.
Avoid port 22
Port 22 is the standard port for SSH connections. If you use a different port, it adds a bit of security through obscurity (Security Through Obscurity (STO)) to your system. Confidentiality is never considered a real security measure. In fact, some of the smarter attack bots probe all open ports and decide which services they are doing, instead of relying on a simple search list of ports and assume they provide the service. usually, common, normal. But using non-standard ports can help reduce bad traffic on port 22.
To configure a non-standard port, edit the SSH configuration file as above.

Delete # at the beginning of the line of Port and replace 22 with the number you choose. Save the configuration file and restart the SSH daemon.
On another computer we will use the ssh command to connect to the server. The default ssh command uses port 22:
ssh dave@howtogeek.local

Connection refused. Try again and specify port 470 using the –p (port) option:
ssh -p 479 dave@howtogeek.local

The connection is confirmed.
Connect filters using TCP Wrappers
TCP Wrappers is an easy-to-understand access control list. It allows you to deny and allow connections based on the characteristics of the connection request such as IP address or host name. TCP Wrappers should be used with, not replace, properly configured firewall.
TCP Wrappers are already installed on Ubuntu 18.04 LTS. It must be installed on Manjaro 18.10 and Fedora 30.
To install on Fedora, use the following command:
sudo yum install tcp_wrappers

To install on Manjaro, use this command:
sudo pacman -Syu tcp-wrappers

There are two associated files, one for whitelisting and one for refusing. Edit the deny list using the following command:
sudo gedit /etc/hosts.deny

The above command will open the gedit editor with the file that refuses to load in it.
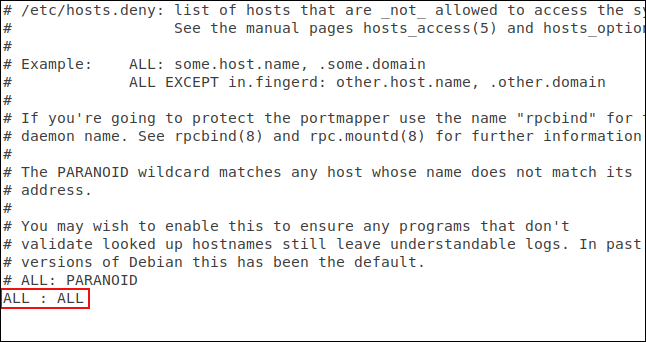
You need to add the line:
ALL : ALL
And save the file. This line will block all unauthorized access. Now we need to authorize the connections you want to accept. To do that, edit the file to allow:
sudo gedit /etc/hosts.allow

The above command will open the gedit editor with the file that allows downloading in it.

We have added the SSH daemon name, SSHD and the IP address of the computer that allows the connection to be made. Save the file and see if the restrictions and permissions are valid.
First, you will try to connect from a computer that is not in the hosts.allow file:

Connection refused. We will try to connect from a machine with IP address 192.168.4.23:

Connection accepted.
The example here only allows one machine to be able to connect. TCP wrappers are quite flexible, it supports host names, wildcards and subnet masks to accept connections from IP address ranges.
Deny connection request without password
Though not good, Linux system administrators can create user accounts without passwords. That means no passwords are required for remote connections from this account. These connections will be accepted but not authenticated.
The default setting for SSH accepts connection requests without a password. We can change it easily and make sure all those connections are authenticated.
You need to edit the SSH configuration file.
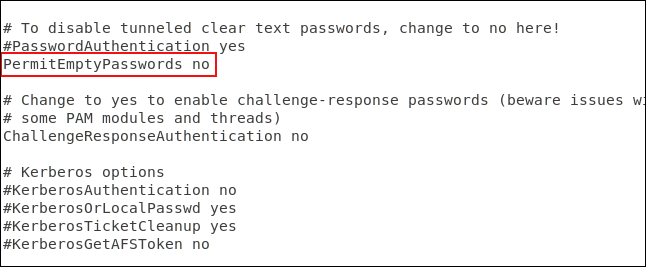
Scroll down in the file until you see the line with #PermitEmptyPasswords no . Delete # at the beginning of the line and save the file. Restart the SSH daemon.
Use SSH key instead of password
The SSH key provides a secure way to log in to the SSH server. Passwords can be cracked, guessed or used Brute-forced attack method. SSH keys are not easily attacked by these types of attacks.
When creating the SSH key, you create a key pair. One is the public key and the other is the private key. The public key is installed on the servers you want to connect. The private key is kept safe on your computer.
SSH key allows to create a connection without a password, more secure than a connection using password authentication.
When making a connection request, the remote computer uses a copy of the public key to create an encrypted message that is sent back to the computer. Because it is encrypted with a public key, the computer can decrypt it with a private key.
The computer then extracts some information from the message, encrypts it and sends it back to the server. If the server can decode it with a shared key copy. If the information in the message matches what the server sent you, the connection will be confirmed.
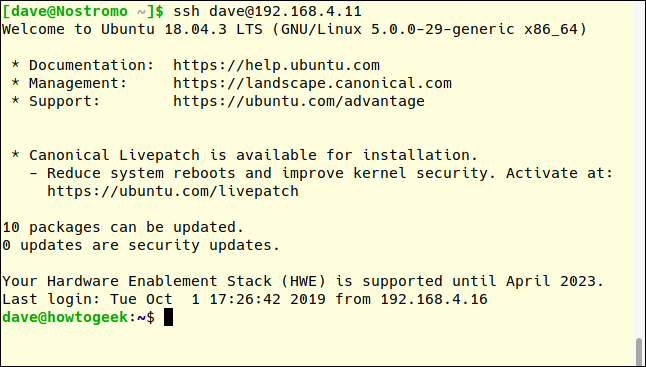
Here, the connection is made to the server at 192.168.4.11 by the user with the SSH key. Note they are not prompted to enter the password.
ssh dave@192.168.4.11
Disable password authentication completely
You can turn off password authentication completely if you use the SSH key. We need to edit the SSH configuration file.
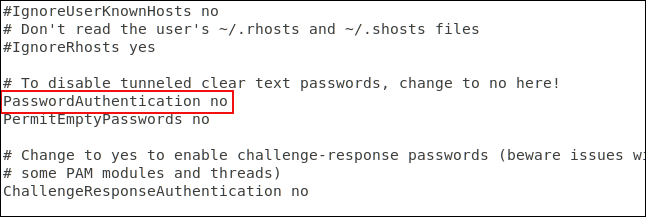
Scroll down the file until you see the line starting with #PasswordAuthentication yes . Delete # at the beginning of the line, change yes to no and save the file. Restart the SSH daemon.
Disable X11 forwarding
X11 Forwarding allows a remote user to run graphical applications from your server over an SSH session but is vulnerable to malicious use. It is better to disable it by editing the SSH configuration file.
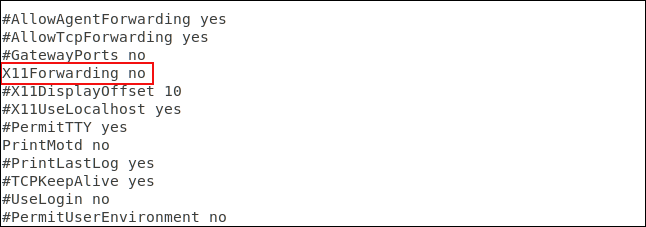
Scroll down the file until you see the line # X11Forwarding no , delete # at the beginning of the line and save the file. Restart the SSH daemon.
Set idle timeout value
If you set up an SSH connection with your computer and haven't been working on it for a while, this could pose a security risk.
You should therefore set a timeout limit. The SSH connection will be disconnected if there is no activity within the time limit. Once again, we need to edit the SSH configuration file.

Scroll down the file until you see the line starting with #ClientAliveInterval 0 . Remove the # at the beginning of the line, change the number 0 to the desired value. Usually people set to 300 seconds, which is 5 minutes. Save the file and restart the SSH daemon.
Set a limit on the number of times a password will be entered
Defining a limit on the number of assertions can help prevent password guessing and brute-force attacks. After the specified number of authentication requests, the user will be disconnected from the SSH server. By default, there is no limit to the number of password attempts you can make, but you can edit that in the SSH configuration file.
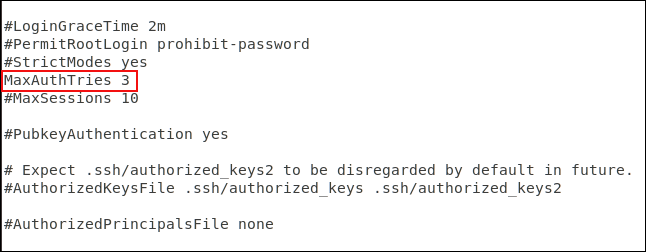
Scroll down the file until you see the line starting with #MaxAuthTries 0 . Removing the # at the beginning of the line changes the number to the desired value. You can set it to 3. Save the file when making changes and restart the SSH daemon.
You can check this by trying to connect and entering the wrong password.
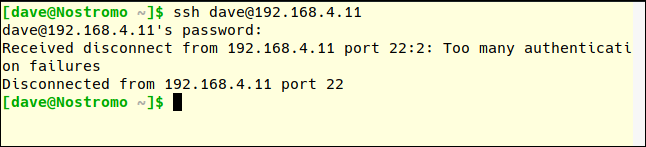
Note, the number of MaxAuthTries is more than the number of attempts the user is allowed. After two unsuccessful attempts, you are disconnected, which means that MaxAuthTries is set to 3.
Disable login as root
You are advised not to log in as root, only to use as a normal user on Linux and use sudo to perform the action that requires root access. Nor should you allow root access to the SSH server. Only normal users are allowed to connect. If an administrative level task is needed, they can also use sudo. If you must allow root users to log in, you can force them to use the SSH key.
Edit the configuration file to disable root login.
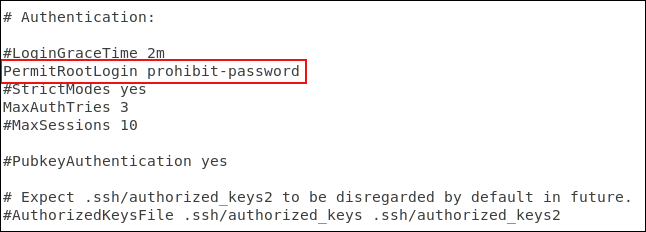
Scroll down the file until you see the line starting with #PermitRootLogin prohibit-password , delete # at the beginning of the line.
- If you want to prevent root from logging in, replace prohibit-password with no.
- If you allow the root to log in but force the SSH key to be left in the prohibit-password.
Save changes and restart the SSH daemon.
Last step
Of course, if you do not need SSH to run on your computer, turn it off with the following command:
sudo systemctl stop sshd sudo systemctl disable sshd
I wish you successful implementation!
Was this article helpful?
Your feedback helps us improve.
Related Articles
 8 ways to secure SSH server connections on Linux8 minutes read
 The best SFTP server and tools for secure file transfer10 minutes read
 Top best SCP Server software6 minutes read
 How to secure Linux Home Server7 minutes read
 How to connect Proxy Servers on Windows 10 to secure Internet access3 minutes read
 VPN and SSH: Which method is more secure?7 minutes read
Reader Comments 0
Sign in with email or Google to join the discussion.