Table of Contents
This updated guide explains how to Save a Printable List of Your Songs in Windows Media through clear steps, practical examples, and important checks that help prevent common errors.
Part 1 of 2:
Using a Simple Text Editor
-
 Open Windows Media Player. Windows Media Player is included as a standard app on any Windows computer.
- Type "WMP" into the taskbar search field to find Windows Media Player.
-
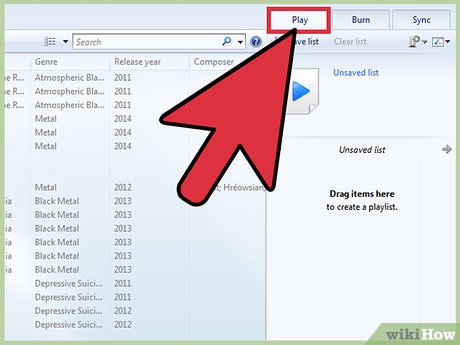 Click the "Play" tab. This is in the upper right-hand corner of your screen, next to the "Burn" and "Sync" options. The "Play" tab is where you'll assemble your playlist.
 -
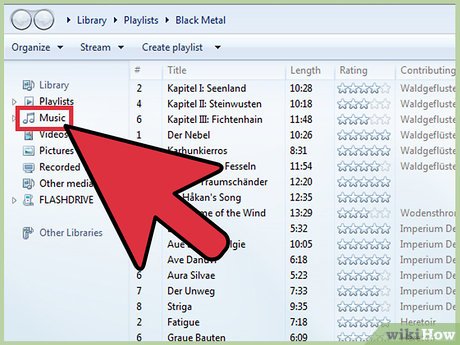 Click "Music" in the options tree. This is on the left side of the screen.
 -
 Select a song, then hold down Ctrl and tap A. This will select your entire library.
 -
 Click and drag your selected songs into the "Play" pane. This will add your library to your new playlist.
 -
 Click the "Save List" option. This is in the top left corner of your playlist's window. Clicking "Save List" will prompt you to enter a name for your playlist.
 -
 Enter a name for your playlist. When you're done, press ↵ Enter to save the playlist. It should appear under the "Playlists" section in the options tree.
 -
 Click the "Playlists" option. This will open your Playlists folder; you should see your new playlist in here.
 -
 Right-click your playlist and select "Open file location". This will take you to the folder in which the playlist's data file is saved.
 -
 Open the "Notepad" app. Notepad is a basic text editor found in the "Desktop Apps" folder; you can find it by typing "Notepad" into the search field in the taskbar.
- You can also open the Start menu, click "All Apps", and navigate to "Windows Accessories". Notepad is in the Windows Accessories folder.
-
 Click and drag your playlist file from its folder. You'll need to drop the file inside Notepad's editing interface.[1]XResearch source
- Snapping Notepad to one side of the screen and the playlist folder to the other is the easiest way to do this.
-
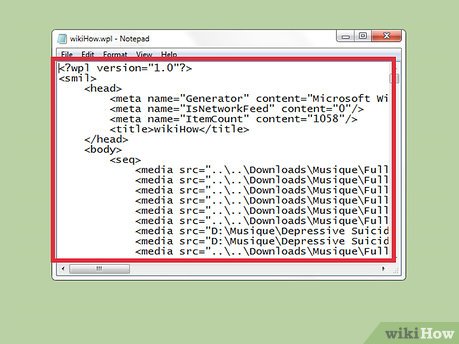 Drop the file in Notepad. You should see a long column of text appear. Notepad saves your songs in directory format, meaning that your music tags will look something like "destination folderMusic[Artist Name][Album][Song Name]".
 -
 Save your file. You can do this by clicking "File" in the top left corner of Notepad, clicking "Save As", naming your file, and clicking "OK". You have successfully saved a list of your songs!
Part 2 of 2:
Cleaning Up Your List with Find and Replace
-
 Copy the contents of your Notepad document. The easiest way to do this is by holding down Ctrl and tapping A to select everything in Notepad, then holding down Ctrl and tapping C.
 -
 Open a new Microsoft Word document. If you don't have MS Word installed on your computer, you can use Google Docs' free version of Word.
- Depending on your version of Word, you may have to click "Blank Document" to open a new document.
-
 Paste your Notepad contents into Word. Do this by holding down Ctrl, then tapping V.
 -
 Familiarize yourself with MS Word's "Find and Replace" feature. Holding down Ctrl and tapping H will activate this feature; you can then add text you wish to find to the "Find what" field and add the replacement text to the "Replace with" field. You can use this feature to remove the HTML tags from your song list, making it much easier to read.
 -
 Copy the media tags and destination folder information. To do this, highlight the "Ctrl + C. Make sure you highlight the line all the way up to and including the "" before an artist's name.
 -
 Open the "Find and Replace" feature. Make sure your mouse cursor is set at the beginning of your document to ensure that the Find and Replace feature formats your entire document.
 -
 Paste the media tag into the "Find" field. You can just add a space (Space) to the "Replace" field.
 -
 Click "Replace All". If Word asks you for permission to search from the beginning of the document, click "Yes".
- You'll need to repeat this process a few times if your sections of your music are in separate directories.
-
 Delete the file tags. File tags you'll see are. mp3,. mp4,. wav, and so on; these are at the end of your directory lines. Delete them by copying and pasting the ".[file type]"/>" text from the end of a directory line into the "Find" field and placing a space in the "Replace" field of Find and Replace.
- You'll need to repeat this process a few times if your files aren't all in one format.
- You should also consider replacing the "" separations with a double space. Doing so will separate your artist names, albums, and song names into distinct columns.
-
 Delete the HTML text at the beginning and end of your list. You'll see a set of HTML tags before the first artist's name appears at the beginning of the article; similarly, there is a set of HTML tags at the end. Select these and tap Delete to get rid of them. These should be the last chunks of non-plaintext writing.
 -
 Review your list. Now you can print your library list in a readable format!
FAQ
What is the easiest way to Save a Printable List of Your Songs in Windows Media?
Start with the requirements in this guide, then follow each step in order. Check the result after every major change so problems are easier to identify.
Can beginners follow these instructions?
Yes. The process is organized into practical steps, and you can repeat any step before moving forward.
What should I check if the method does not work?
Confirm your software or device version, permissions, settings, file format, and internet connection when the task depends on online services.
Related Articles
 22 Shortcuts to VLC for Windows and Mac8 minutes read
 Summary of Shortcuts in Windows Media Player5 minutes read
 Set Up VLC Media Player as the Default Multimedia Player on4 minutes read
 How to Download and Install Windows Media Player 12 on Windows 105 minutes read
 How to Reinstall Windows Media Player4 minutes read
 8 Tips to Make VLC the Best Open-source Media Player9 minutes read
Reader Comments 0
Sign in with email or Google to join the discussion.