How to reset and re-run the search index on Windows 10
By default, Windows will use the index when searching to provide faster search results. This article will show you how to reset and re-run the manual search index for accurate search results in Windows 10.
Table of Contents
By default, Windows will use the index when searching to provide faster search results. The search index only includes the selected user location. These locations can be filtered by file type (file extension), file attributes and file contents to be indexed.
The index uses the Windows Search service and runs as the Searchindexer.exe process in the background. The index will automatically run (rebuild) and update changes in selected locations since the last index is run again to increase the accuracy of the search results. By default, index speed is reduced due to user activity. If the computer is idling, then the index speed will return to the maximum speed for indexing faster.
If the result received is missing, invalid or incorrect, the index may not be updated. You can run the index yourself to force it to update.
This article will show you how to reset and re-run the manual search index for accurate search results in Windows 10.
You need to log in as an administrator to run the index again.
- Small tips to improve Windows Search Indexing
- Turn off Indexing Service to let the computer run faster
- How to search all files from the Windows 10 Start menu
1. Rerun the indexing index in Indexing Options
Step 1 . Open Control Panel, click on the Indexing Options icon and close the Control Panel.
Step 2 . Click on the Advanced button.

Step 3. On the Index Settings tab, click the Rebuild button under Troubleshooting.
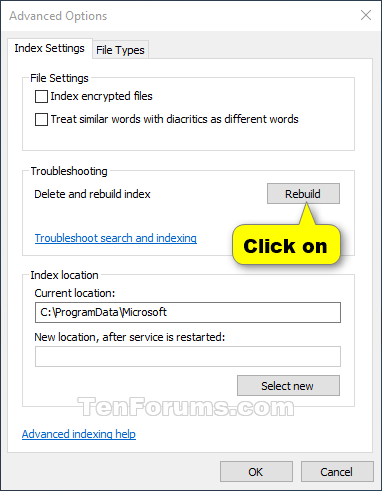
Step 4. Click OK to confirm.

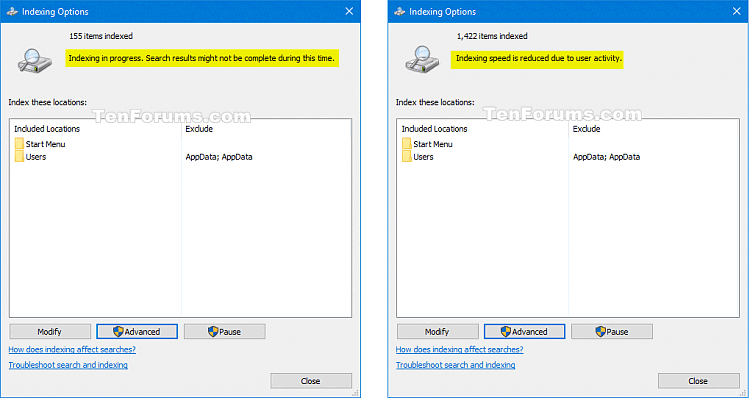
Step 5 . The index is now running again.
Note: The re-run of the index may take some time to complete. If necessary, you can click Pause to stop running the index.
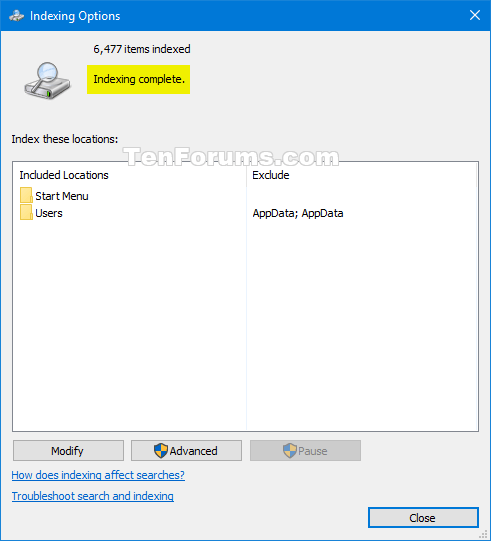
Step 6 . When done, click Close .
2. Rerun the search index using BAT file
Note : The .bat file below containing these commands will run the search index again.
Code:
@echo off net stop wsearch del "%ProgramData%MicrosoftSearchDataApplicationsWindowsWindows.edb" :wsearch net start wsearch IF NOT %ERRORLEVEL%==0 (goto :wsearch) ELSE goto :END :END
Step 1 . Download the .bat file according to the link below.
https://www.tenforums.com/attachments/tutorials/147615d1502120033-rebuild-search-index-windows-10-a-rebuild_search_index.bat
Step 2 . Save the .bat file to the desktop.
Step 3 . Unblock the .bat file.
Step 4 . Right-click on the .bat file and click Run as administrator .
Step 5 . When prompted by UAC, click on Yes to agree.
Step 6 . The search index will start running again in the background.
3. Reset and re-run the search index using .bat file
Note: The following .bat file containing these commands will reset the indexed location to default and re-run the search index.
Code:
@echo off net stop wsearch REG ADD "HKLMSOFTWAREMicrosoftWindows Search" /v SetupCompletedSuccessfully /t REG_DWORD /d 0 /f del "%ProgramData%MicrosoftSearchDataApplicationsWindowsWindows.edb" :wsearch net start wsearch IF NOT %ERRORLEVEL%==0 (goto :wsearch) ELSE goto :END :END
Step 1 . Download the .bat file according to the link below.
https://www.tenforums.com/attachments/tutorials/147614d1502120033-rebuild-search-index-windows-10-a-reset_and_rebuild_search_index.bat
In the next steps, do the same as from Step 2 to Step 6 in Method 2.
I wish you all success!
Was this article helpful?
Your feedback helps us improve.
Related Articles
 Index (INDEX) in SQL4 minutes read
 How to change the storage location of Search Index in Windows 103 minutes read
 How to reset Windows Search settings on Windows 114 minutes read
 Small tips to improve Windows Search Indexing3 minutes read
 How to Change Indexing Options in Windows 86 minutes read
 How to Add a Folder to the Windows 7 File Index5 minutes read
Reader Comments 0
Sign in with email or Google to join the discussion.