How to Remove Shortcut Virus on Windows
Method 1 of 2:
Using the UsbFix Antimalware Tool
-
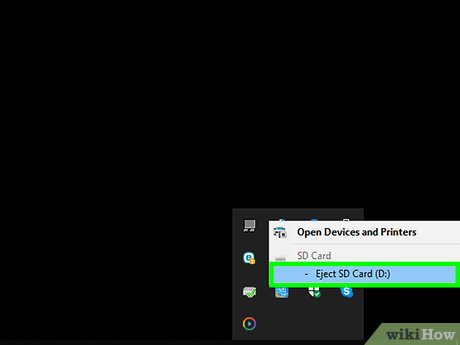
 Remove the drive from the computer and reboot. You won't want to connect the drive until you install a quick tool that prevents it from running the virus automatically.
 -
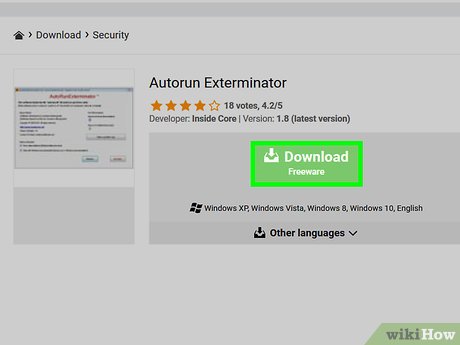
 Download and run Autorun Exterminator. You'll need this tool to prevent the virus from running automatically when you plug in your flash drive. Here's how to get it:
- Go to https://ccm.net/download/download-11613-autorun-exterminator and click the green Download button. If prompted, choose a folder to save the file to, then click Save.
- Open the Downloads folder (or the folder you selected).
- Right-click the file called AutoRunExterminator-1.8.zip and select Extract All'.
- Click Extract. This creates a new folder with the app inside.
- Double-click the new folder (called AutoRunExterminator-1.8) to open it.
- Double-click AutoRunExterminator.Exe. If prompted, click Yes or OK to allow the program to run.
-
 Connect the USB drive to your PC.
 -
 Download and run UsbFix. This is a free app that will destroy the virus and restore your files. Here's how to get it:
- Go to https://www.fosshub.com/UsbFix.html and click 'Windows Installer. It's under the "Download" header.
- Select your Downloads folder and click Save.
- Open the Downloads folder and double-click the file that starts with "UsbFix." You may have to click Yes to allow the app to run.
-
 Click Run an Analysis. It's near the bottom of the window.
 -
 Click Full Analysis. The tool will now scan your computer, including the flash drive, for viruses. This may take a while.
 -
 Follow the on-screen instructions to remove the virus. If a virus is found, the tool will remove it from your flash drive.[1]
- If the tool does not detect the virus or cannot remove it, use the "Using the Command Line" method.
-
 Remove the USB drive and reboot the computer.
 -
 Run a full virus scan on the computer. Once you're finished fixing the drive, see How to Remove a Virus to learn how to run a full virus scan on your computer and remove any other malware. It's important to make sure your computer is virus-free before you reconnect the flash drive.
- Your files should be visible on your drive now. If you don't see them, they've been buried in a folder. The folder may not have a name (or its name may be unfamiliar). Double-click each folder you see until you've found the one with your files inside.
- You can delete the AutorunExterminator whenever you wish by right-clicking its folder in the File Explorer and selecting Delete.
Method 2 of 2:
Using the Command Line
-
 Remove the drive from the computer and reboot. Since most shortcut viruses come with programs that will run automatically, you'll need to start your computer without it attached.
 -
 Download and run Autorun Exterminator. This tool prevents the virus from starting automatically when you plug in the flash drive. Here's how to get it:
- Go to https://ccm.net/download/download-11613-autorun-exterminator and click the green Download button. If prompted, choose a folder to save the file to, then click Save.
- Open the Downloads folder (or the folder you selected).
- Right-click the file called AutoRunExterminator-1.8.zip and select Extract All'.
- Click Extract. This creates a new folder with the app inside.
- Double-click the new folder (called AutoRunExterminator-1.8) to open it.
- Double-click AutoRunExterminator.Exe. If prompted, click Yes or OK to allow the program to run.
-
 Connect the USB drive to your PC.
 -
 Determine the drive letter of the USB drive. You can skip this step if you already know the drive letter (e.g., E:). Here's how to find the drive letter:
- Press ⊞ Win+E to open the File Explorer.
- Scroll down the left column to the "This PC" or "Computer" section.
- Find the drive letter next to the name of the flash drive.
-
 Open the Command Prompt as an administrator. The process varies depending on the version of Windows you are using:
- Windows 10 and 8: Press ⊞ Win+X to open the Power Users menu (or right-click the Start menu), then click Command Prompt (Admin) or Windows PowerShell (Admin). Click Yes if prompted to give permission.
- Windows 7 and older: Press ⊞ Win+R to open the Run bar, then type cmd into the box. Press Ctrl+⇧ Shift+↵ Enter to run it as an administrator, then enter your password (or confirm) to run the app.
-
 Type DRIVELETTER: and press ↵ Enter. Replace DRIVELETTER with the letter of your flash drive.
 -
 Type del *lnk and press ↵ Enter. This deletes the shortcuts from the drive.[2]
 -
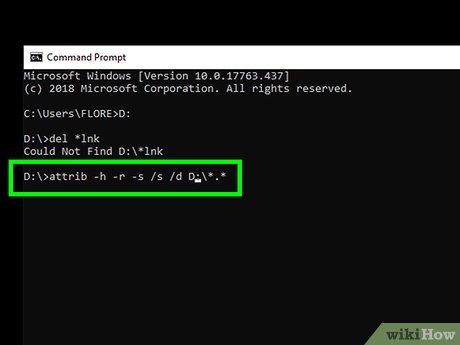
 Type attrib -h -r -s /s /d DRIVELETTER:*.* and press ↵ Enter. Replace DRIVELETTER with your USB drive's letter. This unhides the files, remove any read-only attributes, and remove the shortcuts. When the command is finished running, your files will be usable again.
- For example, if your USB drive's letter is E, type attrib -h -r -s /s /d E:*.* and press ↵ Enter.[3]
-
 Remove the flash drive from the computer. The next step is to scan your computer for malware and repair any found issues so that your drive is not re-infected.
 -
 Do a full virus scan in Windows. If you don't have your own anti-virus software installed, see How to Remove a Virus to learn how to run a full scan using the built-in tools for Windows. If any malware is found, follow the on-screen instructions to get rid of it.
 -
 Reboot your computer and reconnect your USB drive. Now that you're all in the clear, it's a good idea to format the flash drive just in case any issues remain. The remaining steps will walk you through this process.
- When you reboot the computer, AutoRunExterminator will not run automatically. You can delete the app whenever you wish by right-clicking its folder in the File Explorer and selecting Delete.
-
 Return to the File Explorer and double-click your USB drive. If you closed the window, press ⊞ Win+E to open it again. Your USB drive will be under "This PC" or "Computer" in the left column. You should see your files.
- If you don't see your files, they've been buried in a folder. The folder may not have a name (or its name may be unfamiliar). Double-click each folder you see until you've found the one with your files inside.
-
 Copy the recovered files to a safe location on your computer. You'll want to back up your existing files onto your computer so you don't lose them when formatting.
- One way to do this is to create a folder on your desktop (right-click the desktop, select New Folder, give it a name, and then press ↵ Enter) and drag the files to it. Don't proceed until these files are moved because you'll be formatting the flash drive.
-
 Right-click the flash drive's letter in the File Explorer. It's under "This PC" or "Computer." A menu will appear.
 -
 Click Format. This opens the formatting window.
 -
 Remove the "Quick Format" check mark and click Start. This completely erases and formats the flash drive, removing what's left of the virus. This process can take a while depending on your computer.[4]
 -
 Place the files back onto the flash drive after formatting. Your flash drive is now back to normal.
Share by
Kareem Winters
Update 04 March 2020


