How to remove '3D Objects' from This Pc on Windows 10
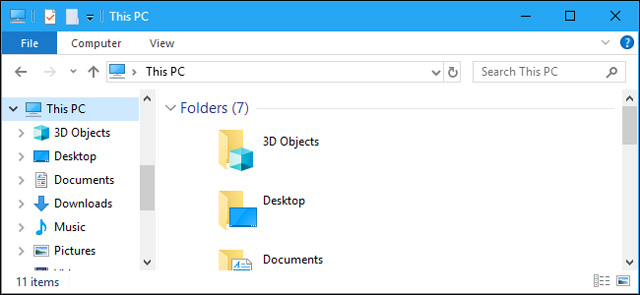
The Fall Creators Update update of Windows 10 will add a '3D Objects' folder in This PC. It even appears in the File Explorer sidebar. Microsoft is clearly trying to promote new 3D features of Paint 3D and other 3D features of Windows 10, but users can hide this folder if they wish.
The Fall Creators Update update of Windows 10 will add a '3D Objects' folder in This PC. It even appears in the File Explorer sidebar. Microsoft is clearly trying to promote new 3D features of Paint 3D and other 3D features of Windows 10, but users can hide this folder if they wish.
This operation will not delete the folder from the computer. You can still access the 3D Objects folder and its contents at C: UsersNAME3D Objects , NAME here is your Windows user account name. This tutorial simply removes it from the File Explorer sidebar. Users can also remove other folders from This PC , depending on each user's needs.
You will have to edit the registry to do this. Warning, Registry Editor is a powerful tool and abuse it can make the system unstable or even impossible. This is a pretty simple hack and as long as you follow the instructions correctly, there won't be any problems. If you haven't done any Registry Editor before, consider reading about how to use Registry Editor before you start. And be sure to back up the Registry before making changes.
- Free tools for backing up data securely for your computer
To start, open Registry Editor by clicking Start , typing " regedit " and pressing Enter .

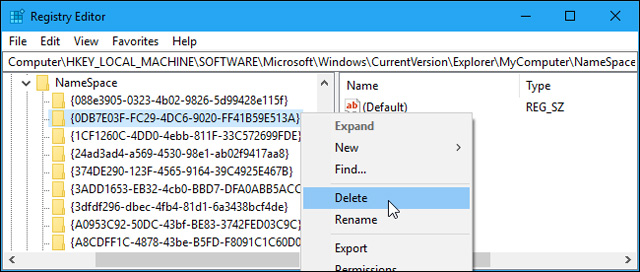
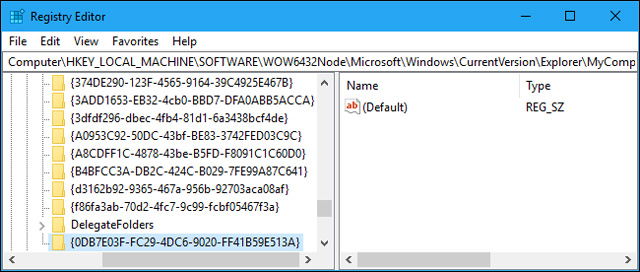
First, access the following key in the Registry Editor window. You can copy and paste the bottom line into the address bar or navigate with the left bar.
HKEY_LOCAL_MACHINESOFTWAREMicrosoftWindowsCurrentVersionExplorerMyComputerNameSpace

Find the subkey named {0DB7E03F-FC29-4DC6-9020-FF41B59E513A} under NameSpace in the left pane. Right click on it, select " Delete " and confirm the lock deletion message.
Next, go to the following key in the Registry Editor window. You can copy and paste the bottom line into the address bar or navigate with the left bar.
HKEY_LOCAL_MACHINESOFTWAREWow6432NodeMicrosoftWindowsCurrentVersionExplorerMyComputerNameSpace
(If you do not see the "Wow6432Node" key on your computer, then you are using a 32-bit version of Windows 10 and stopping here because you have completed the process of deleting the '3D Objects' folder. This means you are using a 64-bit version of Windows 10, continue with the tutorial.)
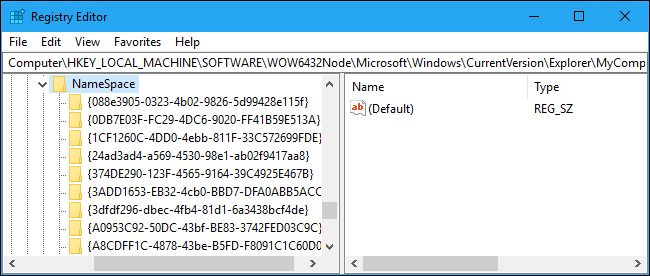
Again, find the subkey named {0DB7E03F-FC29-4DC6-9020-FF41B59E513A} under NameSpace in the left pane. Right click on it, select " Delete " and confirm deleting the key.

That's it, the "3D Objects" folder will disappear from This PC, both in the main view and in the File Explore sidebar. You do not need to restart the computer. However, if the 3D Objects folder does not disappear immediately for some reason, restart the computer to resolve the problem.
If you want to restore this folder, just recreate the deleted subkeys in the same place and name {0DB7E03F-FC29-4DC6-9020-FF41B59E513A}. You don't need to add anything inside these subkeys as long as they're in the right place and the right name, the 3D Objects folder will reappear.
Download the Registry hack one click

If you do not want to edit the registry, you can use Registry hack for one click. This hack includes separate versions for 64-bit and 32-bit versions of Windows. All four file hacking registry included in the following files.
- Remove '3D Objects' Folder Hacks
Just download and double click on one of the files you want to use, for example if you are using a 64-bit Windows version, use 64-bit hacks and 32-bit hacks for the 32-bit version.
These hacks only do the same thing as the above instructions. It will delete the 3D Objects folder by removing the key {0DB7E03F-FC29-4DC6-9020-FF41B59E513A} from the appropriate places and restore this folder by adding the key {0DB7E03F-FC29-4DC6-9020-FF41B59E513A} back to its place.
Users should only run registry hacks from trusted sources, but you can check by right-clicking on a .reg file and selecting " Edit " to view the content in Notepad.
I wish you all success!
Was this article helpful?
Your feedback helps us improve.
Related Articles
 How to Remove Unwanted Objects from Photos Using Adobe Express's Remove Objects5 minutes read
 Cleanup.pictures - Download the latest Cleanup.pictures here6 minutes read
 How to remove objects in photos on Google Photos2 minutes read
 Remove objects in photos with Photoshop's new AI-powered Remove Tool4 minutes read
 Instructions on removing objects from photos using ChatGPT2 minutes read
 How to delete the photo background without Photoshop using Remove.gb4 minutes read
Reader Comments 0
Sign in with email or Google to join the discussion.