Table of Contents
Quick answer
The Ruler in Word helps users align margins and format text more accurately. If you don't know how, this article will guide you through the process in detail on Word 2021, 2019, 2016, 2013, 2010, 2007, and 2003.
You can enable the Ruler in Word through the View tab or by using the keyboard shortcut Alt + W + R, making it easier to adjust margins and giving your writing a more professional feel.
Contents:
1. How to turn the Ruler bar on/off .
2. How to do it in Word 2013, 2016, 2019, and 2021. 3.
In Word 2010. 4.
In Word 2007. 5.
In Word 2003. 6.
How to do it on macOS .
1. How to turn the Ruler bar on/off
The Ruler in Microsoft Word is a useful tool that helps users align text accurately. When enabled, you can:
- Adjust the position of lines, spacing between letters and characters.
- Can replace the space key, very useful when you want to move to a further section without having to press the space key repeatedly.
How to do it:
Step 1: Turn off Vietnamese input (if you are using Vietnamese input software like Unikey).
Step 2: Use the shortcut Alt + W and then press R to turn on the Ruler.
To turn off the Ruler, simply repeat the Alt + W shortcut and then press R again.
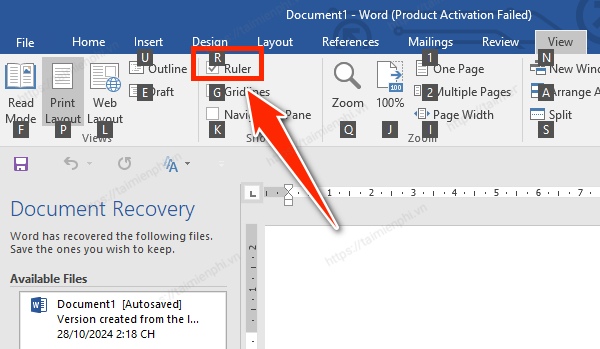 Display rulers in Word using keyboard shortcuts.
2. How to display the Ruler bar in Word 2021, 2019, 2016, and 2013
+ Download and install link for Office 2021
+ Download and install link for Office 2019
+ Download and install link for Office 2016
+ Download and install link for Office 2013
After downloading Word 2016 , 2021, 2019, 2016, and 2013, on the user interface, go to the View tab and check the Ruler box to complete the process.
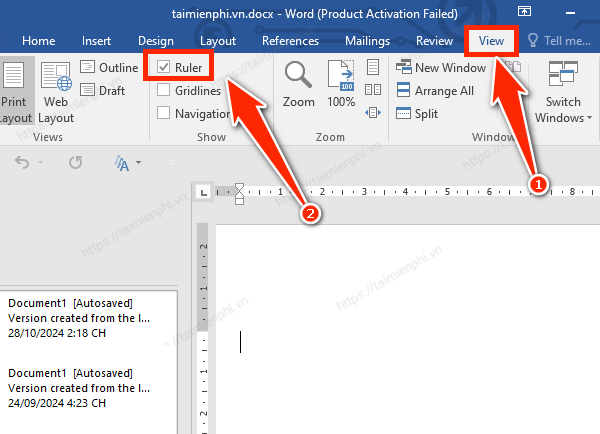 How to show margins in Word
3. For Word 2010
After downloading and installing Office 2010 , follow these instructions to display the ruler in Word:
Step 1: Open Microsoft Word 2010, select the View tab in the toolbar , and check the Ruler box to display the Ruler in Word.
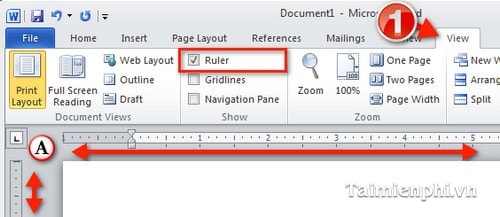
Step 2: After selecting Ruler, you can open Word Options and set the unit for the Ruler, such as inches, centimeters, etc.
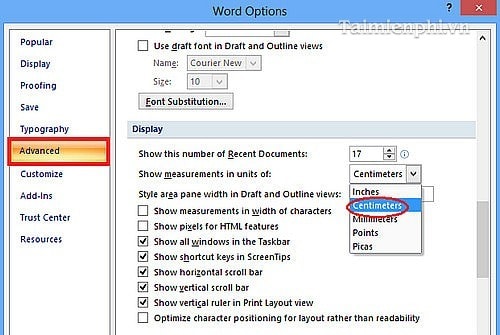
4. Displaying the Ruler in Word 2007
If you haven't downloaded and installed Office 2007 yet, you can download it directly here: Office 2007 Download Link .
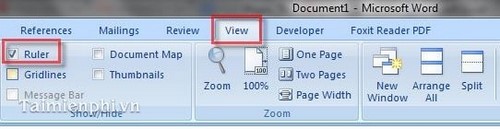
Method 1: Click on the View tab and select the Ruler icon as shown below:
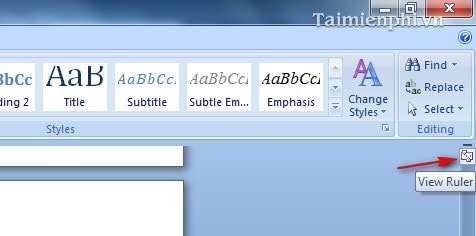
Method 2: Click the View Ruler button on the vertical scroll bar on the right side of the Word editing screen.
Method 3: If the above two methods only show a horizontal ruler and no vertical ruler, then do the following:
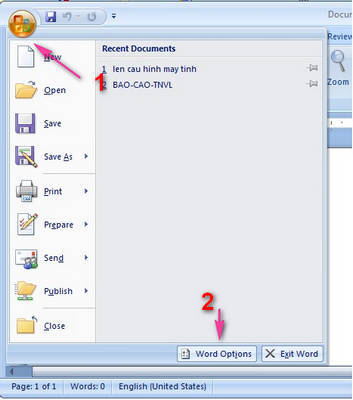
Click the Office Button in the upper left corner of the Word screen, then select Word Options (keyboard shortcut: press Alt + F then press the letter I ).
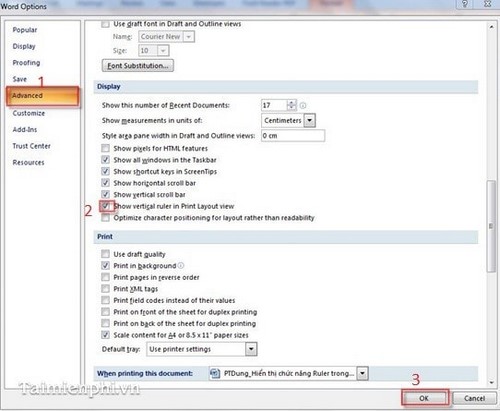
Next, select Advanced from the menu on the left. Scroll down in the right pane, find the Display group , check the box next to Show vertical ruler in Print Layout view , and click OK to complete.
5. Displaying the Ruler in Word 2003
You can download and install Office 2003 here if you don't already have Word 2003 on your computer.
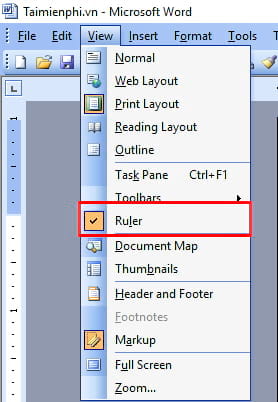
Step 1: To display the ruler, click the View menu , then select Ruler from the drop-down menu.
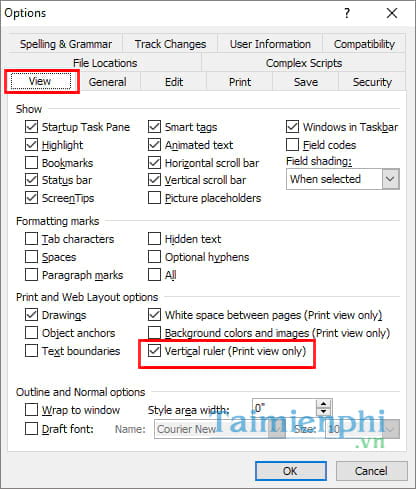
Step 2: If you want to display the ruler vertically in text view, click on Tools , then select Options … from the drop-down menu. In the Options window that appears, select View and check the box next to Vertical ruler (Print view only) in the Print and Web Layout options group . Click OK to complete.
6. How to display the ruler in macOS
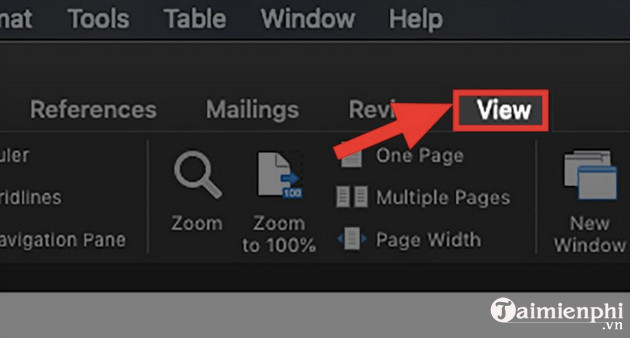
Step 1: Open the Word file => Select the View tab .
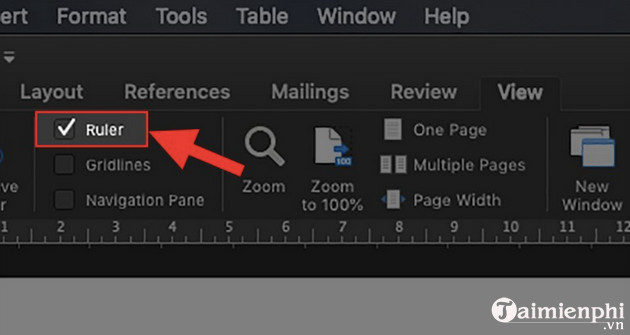
Step 2: Check the Ruler box to display the ruler in Word on macOS.
Similar to the ruler, the toolbar in Word can sometimes get hidden. And you can absolutely make it reappear. If you don't know how, check out how to quickly show the missing toolbar in Word .
Related Articles
 How to Display Ruler Ruler Bar in Micorosoft Word 2010, Word 20033 minutes read
 How to Use the Ruler Ruler Bar in Word: How to Use Word Ruler8 minutes read
 How to Add and Edit Shortcuts in Word 2013: How to Add Shortcuts5 minutes read
 How to Display the Ruler Bar in Word Versions4 minutes read
 Virtual Ruler: How to Display the Ruler on the Computer Screen7 minutes read
 Find the Hidden Ruler Bar in Word Very Quickly: Key Facts6 minutes read
Reader Comments 0
Sign in with email or Google to join the discussion.