Table of Contents
Converting a disk from MBR to GPT can make its full capacity available when it is larger than 2 TiB and removes MBR's four-primary-partition limit. AOMEI Partition Assistant can perform the conversion without first deleting the existing partitions, but no partition operation is risk-free. Make a verified backup before you begin and confirm that you have selected the correct physical disk.
Before converting the disk
- Identify the disk correctly: match its capacity, model, and disk number in Disk Management. Do not rely on a drive letter alone.
- Back up important files: a conversion can be interrupted by a failing drive, power loss, or an unexpected software error.
- Check drive health and power: resolve disk errors first, connect a laptop to AC power, and avoid restarting the PC during the operation.
- Determine whether it is a data disk or the Windows system disk: converting a data disk normally does not affect how the PC starts. A system disk also requires UEFI-compatible firmware and a correctly configured EFI system partition.
- Prepare for encryption: save the BitLocker recovery key and suspend protection before changing a protected system disk.
If you only need Windows' built-in, destructive conversion procedure for an empty drive, see how to convert an MBR disk to GPT in Windows. Its DiskPart method uses the clean command, which deletes the disk's partitions, so it is not a substitute for the non-destructive procedure below.
Convert MBR to GPT with AOMEI Partition Assistant
The screenshots show the AOMEI interface available when the original guide was created. Labels may differ slightly in a newer release. Review the current edition and licensing details on the AOMEI Partition Assistant product page before installing it.
-
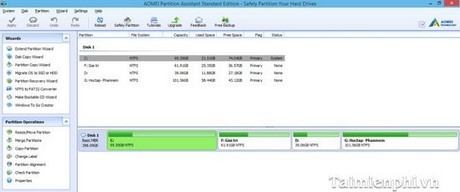
Install and open AOMEI Partition Assistant. In the disk map, locate the physical disk you intend to convert. Check the disk number and total capacity one more time.
-
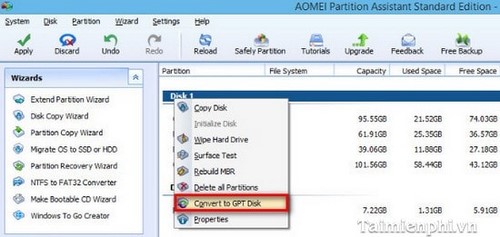
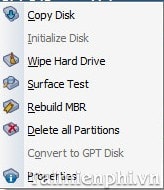
Right-click the MBR disk label—not an individual partition—and select Convert to GPT or Convert to GPT Disk.
-
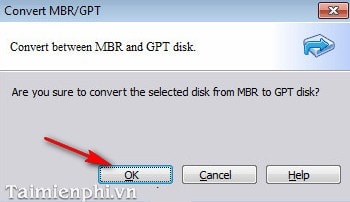
Read the confirmation dialog and choose OK only if it names the intended disk. At this point, AOMEI normally queues the change rather than applying it immediately.
-
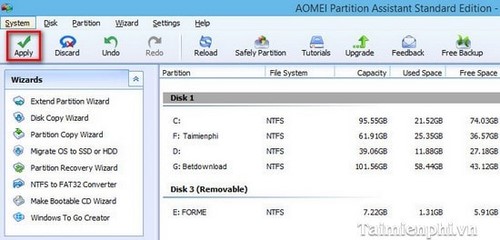
Review the pending operation. Click Apply, followed by Proceed if prompted. A system-disk conversion may require a restart into a pre-OS environment; allow the process to finish without turning off the computer.
-
After AOMEI reports success, reopen Disk Management and inspect the disk's properties to verify that its partition style is GUID Partition Table (GPT). Confirm that every expected volume is present and accessible before deleting your backup.
Extra steps for a Windows system disk
A converted Windows boot disk must start in UEFI mode. Before changing firmware settings, confirm that the motherboard supports UEFI; you can also review how to open and navigate BIOS or UEFI boot settings. After conversion, change the firmware boot mode from Legacy/CSM to UEFI if required, then boot Windows and check that the system and applications work normally.
If Windows does not start, do not initialize, format, or clean the disk. Restore the previous firmware setting, use Windows recovery media, or restore the verified backup. Resume BitLocker protection only after the computer boots successfully and the recovery key remains available.
Built-in alternative: Microsoft MBR2GPT
For an eligible Windows system disk, Microsoft's MBR2GPT tool is a built-in alternative. It validates the disk layout before converting it and does not require the existing data partitions to be deleted. It is intended for system disks, not arbitrary data disks.
Open an elevated Command Prompt, determine the correct disk number in Disk Management or with diskpart and list disk, exit DiskPart, and validate before converting. Replace 0 below only after verifying the disk number:
mbr2gpt /validate /disk:0 /allowFullOS
mbr2gpt /convert /disk:0 /allowFullOS
Do not run the conversion if validation fails. Read the reported error and correct the disk-layout, free-space, or partition requirement first. Once MBR2GPT succeeds, switch the firmware to UEFI before the next normal boot.
What to check after conversion
- Disk Management reports GPT for the intended disk.
- All expected partitions and files are present.
- Windows restarts successfully if the converted disk is the system disk.
- Any volume that previously extended beyond the usable MBR area can now be created or expanded using appropriate partitioning tools.
- Your backup remains untouched until you have tested both access to the files and at least one reboot.
The conversion changes the partition-table format; it does not repair a failing drive or make a computer faster by itself. Use it when you need GPT's capacity, partitioning, or UEFI-boot benefits, and approach it as a storage change that deserves a recoverable backup.
Related Articles
 Aomei Partition Assistant Standard Edition - Software for Managing Computer3 minutes read
 How to Convert MBR to GPT Disk with AOMEI Partition2 minutes read
 How to Partition Hard Drive without Losing Data on Windows 10, 117 minutes read
 How to Split the Hard Drive, Merge the Partition on Windows XP8 minutes read
 How to Create Windows to Go USB Using AOMEI Partition5 minutes read
 How to Partition a Hard Drive in Windows 11, 10, 8, and 7 Without Losing Data6 minutes read
Reader Comments 0
Sign in with email or Google to join the discussion.