How to create collages with Python
By building your own photo stitching tool, you don't need to worry about security risks. Here's how to create a photo collage app using Python..
Collages are a great way to preserve memories in a group of related photos. However, online photo collage apps often have potential security risks, while offline apps cost money and lack the features you need.

By building your own photo collage tool, you don't need to worry about those things. Here's how to create a photo collage app using Python .
Tkinter and PIL modules
To build a photo collage application you need the Tkinter and PIL modules. Tkinter allows you to create desktop applications. It provides a series of widgets that make GUI development easier.
Pillow library - a branch of Python Imaging Library (PIL) - provides image processing features, helping to edit, create, convert file formats and save images.
To install Tkinter and Pillow, open terminal and run:
pip install tk pillowSet up the GUI and edit photos
Start by importing the required modules. Create a class, ImageCollageApp and give it a name and size of the window. Define a canvas using tk.Canvas() , then set the parent element, width, height, and background color.
import tkinter as tk from tkinter import filedialog, simpledialog, messagebox from PIL import Image, ImageTk class ImageCollageApp: def __init__(self, root): self.root = root self.root.title("Image Collage Maker") self.images = [] self.image_refs = [] self.collage_size = (600, 500) self.collage_canvas = tk.Canvas( self.root, width=self.collage_size[0], height=self.collage_size[1], bg="white", ) self.collage_canvas.pack()Create two buttons: Add Image and Create Collage . Specify the parent element, the content to display, the command to run, and the font style. Arrange buttons by adding appropriate padding. Initialize drag_data to store information about the drag operation.
Initialize image_positions to store the image's position on the canvas. Define 3 event handlers to respond to image selection, drag and drop.
self.btn_add_image = tk.Button( self.root, text="Add Image", command=self.add_images, font=("Arial", 12, "bold"), ) self.btn_add_image.pack(pady=10) self.btn_create_collage = tk.Button( self.root, text="Create Collage", command=self.create_collage, font=("Arial", 12, "bold"), ) self.btn_create_collage.pack(pady=5) self.drag_data = {"x": 0, "y": 0, "item": None} self.image_positions = [] self.collage_canvas.bind("", self.on_press) self.collage_canvas.bind("", self.on_drag) self.collage_canvas.bind("", self.on_release)Define a method, on_press . Retrieve the most recent canvas item from the user's mouse click location and store it under the item key of the drag_data dictionary . Stores the x and y coordinates of the mouse click. You'll use it to calculate how far the user moves the mouse while dragging.
def on_press(self, event): self.drag_data["item"] = self.collage_canvas.find_closest(event.x, event.y)[0] self.drag_data["x"] = event.x self.drag_data["y"] = event.y
Define a method, on_drag . Calculate the horizontal and vertical distance the user hovered while dragging and update the image position accordingly. Save the updated image coordinates using the x and y keys of the drag_data dictionary .
def on_drag(self, event): delta_x = event.x - self.drag_data["x"] delta_y = event.y - self.drag_data["y"] self.collage_canvas.move(self.drag_data["item"], delta_x, delta_y) self.drag_data["x"] = event.x self.drag_data["y"] = event.yDefine a method, on_release . Removes the reference to the image the user is dragging along with its coordinates. Call update_image_positions to update the position of every image on the canvas after the user drags and drops it.
def on_release(self, event): self.drag_data["item"] = None self.drag_data["x"] = 0 self.drag_data["y"] = 0 self.update_image_positions()Define a method, update_image_positions . Clear the image_positions list and iterate it over all canvas items. For each item, find the coordinates and add them to the list.
def update_image_positions(self): self.image_positions.clear() for item in self.collage_canvas.find_all(): x, y = self.collage_canvas.coords(item) self.image_positions.append((x, y))Define a method, add_images . Create a dialog box that prompts the user to enter the number of photos you want to merge. If the user has provided a valid number, opens a file dialog box, allowing the user to select image files only. After the user has selected one or more images, open each image using Pillow's Image.open() method .
Call resize_image and create a Tkinter compatible PhotoImage . Add it to the image_refs list and call update_canvas .
def add_images(self): num_images = simpledialog.askinteger( "Number of Images", "Enter the number of images:" ) if num_images is not None: file_paths = filedialog.askopenfilenames( filetypes=[("Image files", "*.png;*.jpg;*.jpeg;*.gif")] ) if file_paths: for i in range(min(num_images, len(file_paths))): file_path = file_paths[i] image = Image.open(file_path) resized_image = self.resize_image(image) self.images.append(resized_image) self.image_refs.append(ImageTk.PhotoImage(resized_image)) self.update_canvas()Define the method, resize_image . Get the width and height of the image and calculate its aspect ratio. If more than one, set the new width to half the width of the collage. Calculate the corresponding new height while maintaining the aspect ratio.
If the aspect ratio is less than 1, set the new height to half of the composite image. Similarly, calculate the corresponding width. Use Pillow 's resize method to return the image resized using the calculated parameters.
def resize_image(self, image): img_width, img_height = image.size aspect_ratio = img_width / img_height if aspect_ratio > 1: new_width = self.collage_size[0] // 2 new_height = int(new_width / aspect_ratio) else: new_height = self.collage_size[1] // 2 new_width = int(new_height * aspect_ratio) return image.resize((new_width, new_height))Define a method, update_canvas . Delete the entire item and ask the user for the desired number of rows and columns via the file dialog box. Set the width and height to 1/2 the specified collage size. Clear the list of photo locations. Set the x and y offsets to 0, so you can continuously monitor position offsets to arrange images in rows and columns.
def update_canvas(self): self.collage_canvas.delete("all") rows = simpledialog.askinteger("Number of Rows", "Enter the number of rows:") cols = simpledialog.askinteger( "Number of Columns", "Enter the number of columns:" ) collage_width = self.collage_size[0] * cols // 2 collage_height = self.collage_size[1] * rows // 2 self.collage_canvas.config(width=collage_width, height=collage_height) self.image_positions.clear() x_offset, y_offset = 0, 0Iterate over the image_refs list and create an image on the canvas with a specific offset. Set the anchor to Northwest so you position the upper left corner at specific coordinates. Append the coordinates to the image_positions list .
Update x_offset to add half the width of the composite image, in preparation for placing the next image. If the number of images placed in the current row is a multiple of the specified column number, set x_offset to 0 . This indicates the starting point of a new row. Add half the height of the collage to set the y coordinate for the next row.
for i, image_ref in enumerate(self.image_refs): self.collage_canvas.create_image( x_offset, y_offset, anchor=tk.NW, image=image_ref ) self.image_positions.append((x_offset, y_offset)) x_offset += self.collage_size[0] // 2 if (i + 1) % cols == 0: x_offset = 0 y_offset += self.collage_size[1] // 2Create a collage and save it
Define a method, create_collage . If there are no photos in the collage, a warning appears. Collect the width and height of the collage. Create an Image Pillow with a white background. Loop through the list of images and paste each image into the background at the specified location.
Save the collage and display it using the default image viewer.
def create_collage(self): if len(self.images) == 0: messagebox.showwarning("Warning", "Please add images first!") return collage_width = self.collage_canvas.winfo_width() collage_height = self.collage_canvas.winfo_height() background = Image.new("RGB", (collage_width, collage_height), "white") for idx, image in enumerate(self.images): x_offset, y_offset = self.image_positions[idx] x_offset, y_offset = int(x_offset), int(y_offset) paste_box = ( x_offset, y_offset, x_offset + image.width, y_offset + image.height, ) background.paste(image, paste_box) background.save("collage_with_white_background.jpg") background.show()
Create an instance of Tkinter and class ImageCollageApp . The mainloop() function tells Python to loop Tkinter events and listen for events until you close the window.
if __name__ == "__main__": root = tk.Tk() app = ImageCollageApp(root) root.mainloop()Test different features of the photo collage app
When running this program, a window will appear with two buttons, Add Image and Create Collage . When clicking the Add Image button , a dialog box will appear asking for the number of images to merge. When you enter the number of photos as 5 and select them, another dialog box will appear. It asks for the row number followed by the column number.

When entering two rows and three columns, this window arranges the images in a grid structure.
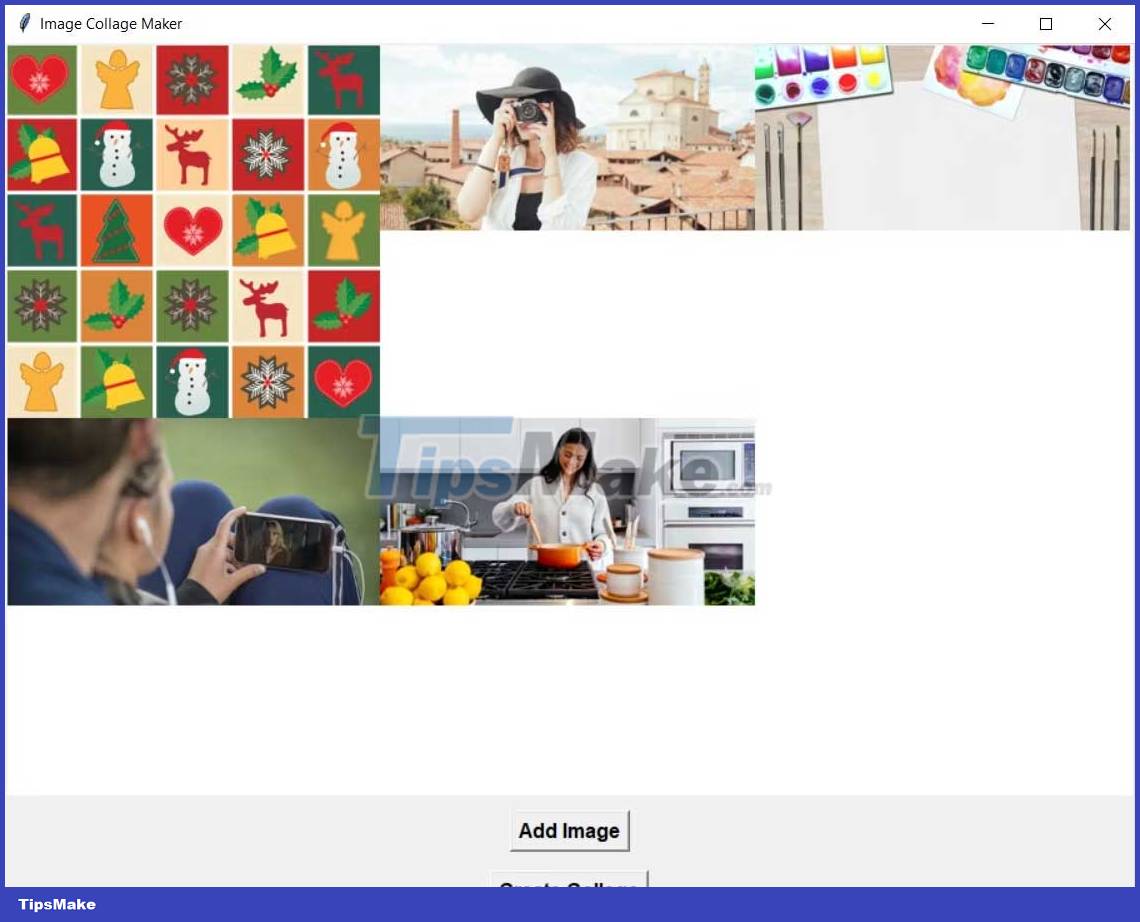
Preview window allows you to drag images as desired. When you click the Create Collage button , this program will save the image.
When viewing this image, you can confirm that the program has successfully merged the image.

Above is how to create a photo collage app using Python . Hope the article is useful to you.