Table of Contents
To live stream on YouTube from a phone, open the YouTube app, tap Create, choose Live, enter the stream details, and tap Go live. Your channel must first meet YouTube's mobile streaming requirements, including channel verification, at least 50 subscribers, no live-streaming restrictions in the previous 90 days, and an eligible mobile device. Activation of a first live stream may take up to 24 hours.
What you need before going live
- An updated YouTube app on a supported Android or iOS device.
- A verified channel with live streaming enabled.
- At least 50 channel subscribers for mobile live streaming.
- No active live-streaming restriction and none within the previous 90 days.
- A stable internet connection, adequate battery power, and permission to use the phone's camera and microphone.
YouTube can change eligibility or availability, so check the current mobile live-streaming requirements in YouTube Help if the Live option is missing. Channels with fewer than 1,000 subscribers may have viewer limits, and the archived stream may initially be private.
Prepare the phone and location
A few checks before the broadcast can prevent the most common failures:
- Charge the phone or connect it to a reliable power source.
- Turn on Do Not Disturb so calls and notifications do not interrupt the stream.
- Clean the camera lens and decide whether to stream in portrait or landscape orientation.
- Use soft, even light in front of the subject rather than a bright window behind them.
- Test the microphone. In a noisy room, move closer to the phone or use a compatible external mic.
- Run a connection test in the place where you will stream. Mobile data can be less stable than strong Wi-Fi.
For longer or more controlled productions, a computer and encoder may be a better fit. This OBS Studio and Wirecast comparison explains two common desktop approaches.
How to start a YouTube live stream on your phone
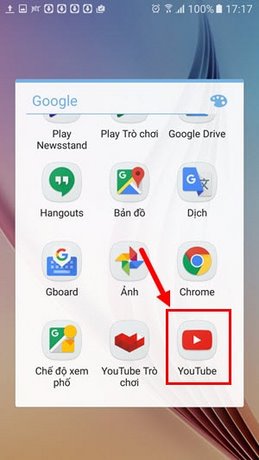
1. Open the YouTube app
Sign in to the channel that will host the broadcast. If you manage several channels under one account, confirm that the correct channel avatar and name are selected before continuing.
2. Tap Create, then Live
Tap the Create button, usually shown as a plus sign near the bottom of the app, and choose Live. Older versions of the app used a camera icon, so the supplied screenshots may not exactly match the current layout.
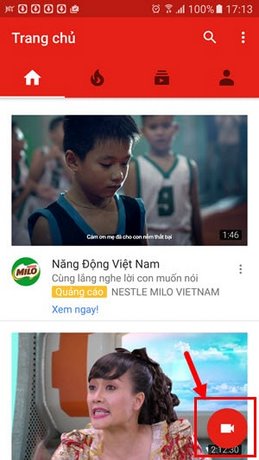
If this is your first broadcast, YouTube may ask you to enable streaming and wait for activation. Do not schedule an important event until the channel has successfully completed this setup.
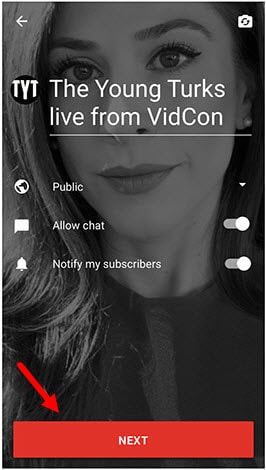
3. Enter the stream details
Add a specific title that tells viewers what they will see. Then review each setting:
- Visibility: Public streams can be found by anyone; unlisted streams require the link; private streams are limited to selected access.
- Audience: State whether the content is made for children. This setting affects features such as live chat.
- Schedule: Choose a future date and time if you are preparing an announced event.
- Live chat: Enable or limit chat and moderation features as appropriate.
- Monetization and age restrictions: Configure only the options available and appropriate for your channel and content.
- Thumbnail: Take a new photo or upload an existing image if the option is available.
4. Preview and start the broadcast
Check the camera framing, orientation, lighting, microphone level, title, and visibility one final time. If your app offers Practice mode, use it to rehearse privately. Otherwise, an unlisted test stream can help you evaluate video and audio before a public event.
When everything is ready, tap Go live. Watch the connection indicator and preview during the opening seconds. Avoid moving immediately between Wi-Fi and mobile data because the handoff can interrupt the broadcast.
5. Monitor viewers and live chat
During the stream, the screen may show elapsed time, viewer activity, chat, and other controls. If chat is busy, ask a trusted moderator to remove spam and handle disruptive messages. Do not read private information aloud simply because a viewer posts it publicly.
If you need to switch cameras, move the phone slowly and confirm the new framing. Sudden movement, digital zoom, and covering the microphone can reduce quality.
6. End and review the stream
Tap Finish and confirm the action. YouTube displays a recap and normally creates an archive on the channel. Review the archive's visibility, title, description, thumbnail, comments, and copyright checks before promoting it.
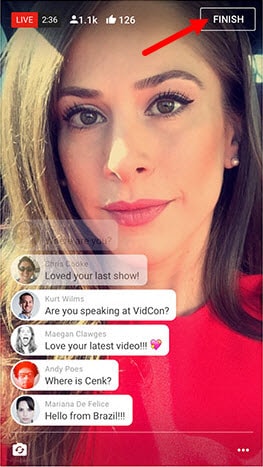
Depending on eligibility, the recap may also offer a Short highlight generated from the stream. Check the highlight before publishing it because the automatically selected segment may not include the most useful context.
How to start a scheduled mobile stream
- Open YouTube and tap Create > Live.
- Tap the calendar or schedule control.
- Select the scheduled stream you previously created.
- Review its details and tap Go live when ready.
Share the scheduled stream URL in advance so viewers can set a reminder. A clear description should include the subject, start time and time zone, expected duration, and any participation instructions.
Troubleshooting mobile live streaming
The Live option is missing
Update the YouTube app, verify the active channel, confirm the subscriber threshold, and check whether live streaming has been enabled. First-time activation may require a waiting period. Also review channel restrictions in YouTube Studio.
The stream disconnects or looks blurry
Move closer to the Wi-Fi router, stop other large uploads, close background apps, and avoid the edge of mobile coverage. If the connection remains unstable, reduce movement and choose a less demanding stream setup. Recording locally as a backup can preserve the event when live delivery is unreliable.
Viewers cannot hear you
Confirm that the YouTube app has microphone permission, remove a case that blocks the mic, disconnect an unused Bluetooth headset, and run a short test recording. Keep the phone near the speaker and away from fans, traffic, or loud music.
Chat is unavailable
Chat availability depends on audience, age, channel, and stream settings. Review whether the stream is marked as made for children and whether live chat was disabled or restricted during setup.
Practical tips for a better mobile broadcast
- Use a tripod or stable support instead of holding the phone for a long session.
- Prepare a short opening so new viewers immediately understand the topic.
- Pin or repeat essential context rather than answering the same question continuously.
- Avoid copyrighted background music that could affect the archive.
- Have a moderator and a backup contact method for important events.
- Review your archive and analytics to improve the next broadcast.
If you are comparing platforms or tools before committing to a workflow, see this overview of popular live-streaming apps.
Related Articles
 Guide Live Streaming, Streaming Live Video on YouTube Using9 minutes read
 How to Play Videos Directly on YouTube from Android Phones and iOS7 minutes read
 How to Play Live Video on YouTube?: Stream Live on YouTube7 minutes read
 Instructions on How to Live Video Stream to YouTube: Live Stream3 minutes read
 What Is Live Stream? How to Live Stream on Facebook and8 minutes read
 How to Fix Common Errors When Live Streaming Facebook with OBS5 minutes read
Reader Comments 0
Sign in with email or Google to join the discussion.