How to install Windows 10 IoT Core on Raspberry Pi 3
Windows 10 appears on many devices. Microsoft is also taking steps with the Internet of Things (IoT), and confirms its position as Windows 10 Internet of Things Core as a small but powerful version of the desktop environment.
So, you can use Windows 10 IoT Core for a test drive today. All you need is a Raspberry Pi 3, and follow the following instructions.
What is Windows 10 IoT Core?
'Windows IoT Core is a version of Windows 10, optimized for smaller devices, with or without screens, running on both ARM and x86 / x64 devices.'
Considered by some as 'spiritual successor' for Windows Embedded Compact, Windows 10 IoT Core provides a wide range of support for smart devices and IoT services.
Windows 10 IoT Core is part of Microsoft's $ 5 billion investment in IoT development, until 2022. As such, users can fully expect significant support and exciting development for the platform. this.
And you can use Windows 10 IoT Core to run some interesting projects on your Raspberry Pi.
Which application works on Windows 10 IoT Core?
Note for beginners: You will not use your Raspberry Pi 3 with Windows 10 IoT Core to run Microsoft Office or other "traditional" programs. These programs are not compatible with the ARM-based hardware of the Raspberry Pi.
However, Windows 10 IoT Core will run Universal Windows applications, as well as applications converted into Universal Windows applications. (You may encounter some problems here, because each application works differently).
The Windows 10 IoT Core platform is just a platform focused on Internet of Things applications and devices.
Can I install Windows 10 fully on Raspberry Pi 3?
Yes you can. But the real question is: "Why do you want to do this?"
At this point, ARM-based Windows 10 is operating on Raspberry Pi 3 devices. Unfortunately, it's a bit slow, but it shows the traditional Win32 programs running, in Windows 10 on the Raspberry Pi 3.
What you need to install Windows 10 IoT
Before embarking on installing Windows 10 IoT Core, check if you have the right device to follow this guide.
- The Raspberry Pi 3 (Raspberry Pi 2 will also work, but the Raspberry Pi Zero won't. Windows 10 IoT Core only supports ARMv7 or higher)
- MicroSD Class 10 8GB or larger with full SD adapter
- Ethernet cable
- HDMI cable
- MicroUSB 5V-2A power supply
- USB keyboard (optional)
You need an HDMI cable to connect Raspberry Pi to a compatible screen when checking the installation. USB keyboard is not required because the setup process will be complete without any interaction with it, but you will have American English to choose your default language and keyboard. If you need another language option, you need to connect a USB keyboard.
How to install Windows 10 IoT Core on Raspberry Pi 3?
First, you need to download the Dashboard of Windows 10 IoT Core.
Go to the Windows Dev Center IoT Downloads page. Choose Download the Windows 10 IoT Core Dashboard and install the application. The installer will download the rest of the dashboard package and will take a minute to complete, depending on your internet speed.
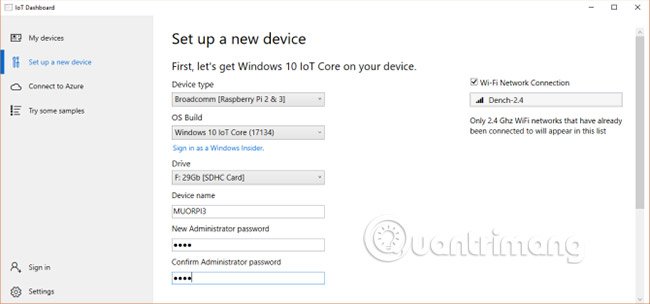
Now you need to set up your device. Select Set up a new device from the control panel that Dashboard IoT opens. If you don't see that option, select Set up a new device from the right column, then press the big blue button.
The device setup screen is quite easy to understand. Make sure you have the right type of Device (Broadcom [Raspberry Pi 2 & 3]) , set OS Build to Windows 10 Core IoT and you have the correct drive letter for your microSD card. Next, name the admin and password. When you're done, click Download and install .

This process takes a few minutes, but you can track progress in the Dashboard.
When the installation is complete, it's time to prepare the Raspberry Pi 3 for the next step.
How to set up Windows 10 IoT Core on Raspberry Pi 3?
Before the setup process, you need to do 4 things:
- Insert the microSD card into the Raspberry Pi 3.
- Connect the HDMI cable to your monitor.
- Connect an Ethernet cable (or USB Wi-Fi).
- Connect USB keyboard (optional).
Once you've done that, you're ready to turn on the Raspberry Pi 3 and start the Windows IoT Core 10 setup process. Install your microUSB power supply and start the Raspberry Pi boot process. The setup process is fast, as you would expect with a light operating system.
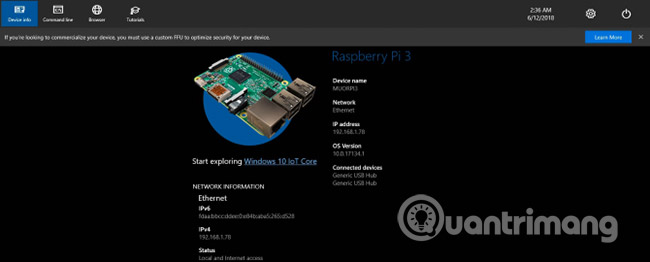
The first step is to select the language. The connected keyboard can navigate the menu using Tab, arrow keys and Enter to select. After that, you will go to the Windows 10 IoT Core device homepage.

There are 4 menu tabs: Device info, Command line, Browser and Tutorials. In addition, there is a Settings menu and a power button.
Raspberry Pi is not displayed in 'My Devices'
When your Raspberry Pi 3 is running Windows 10 IoT Core connected to the Internet, it will also appear in the My devices control panel in Windows IoT Dashboard.
If your device is not displayed, there are several ways you can try:
- Restart your Raspberry Pi 3.
- Check your Ethernet or USB Wi-Fi connection carefully.
- Make sure the exe can communicate via your firewall:
- Enter Network into the search bar of the Start menu . In the Status section , find the network type ( Domain / Private / Public ) to which your PC is connected.
- In the Search panel of the Settings panel (on the left side of Status), enter fire, then scroll down and select Allow an app through Windows Firewall .
- When the new control panel opens, click Change settings.
- Scroll down and find the exe. Select the appropriate network (ie the type of network you found in step 1).
Connect with Raspberry Pi 3 using Windows IoT Dashboard
When your device has Internet access, you can connect directly using Windows IoT Dashboard.
Just go to My devices , right-click on the Raspberry Pi 3 and select Open in Device Portal . This will open the Windows Device Portal.
Deploy a sample application for your Raspberry Pi 3
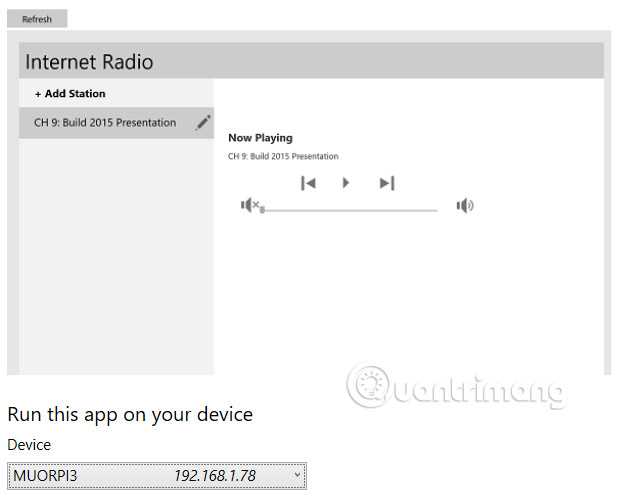
Next, try deploying one of the Microsoft IoT sample applications for your Raspberry Pi. Microsoft provides basic Hello World applications, an Internet Radio and IoT application Core Blockly, a block programming application.

In Windows IoT Dashboard, select Try some samples . Make your selection and then select your device from the menu.
Each template has an online tutorial, and there are many guides for developing Windows 10 IoT Core available to anyone, via the Look link at other projects and tutorials .
You can see how easy it is to deploy Windows 10 IoT Core to your Raspberry Pi. You can completely deploy any sample application in IoT Dashboard. It also has many free projects and tutorials for beginners, medium and advanced users.
Moreover, if you want to learn more about IoT application development and equipment, learning a programming language like C #, C ++ and / or XAML (Extensible Application Markup Language) is essential.
See more:
- Microsoft plans to bring AI into Raspberry Pi
- How to install an operating system for Raspberry Pi
- How to connect Raspberry Pi remotely to a Windows computer
You should read it
- ★ 10 operating systems you can run with Raspberry Pi
- ★ How to use Ubuntu Core on Raspberry Pi
- ★ Raspberry Pi 4 officially launched, quad-core Cortex-A72 1.5 GHz, maximum RAM of 4GB
- ★ What is Windows Core? Is it the future of Windows operating system?
- ★ Raspberry Pi 3 Model A +: 8-core chip, clocked at 1.4GHz, priced at $ 25