How to set up Wi-Fi and Bluetooth on Raspberry Pi 3
One of the problems with the first Raspberry Pi models is the lack of available connectivity. Ethernet is one thing, but if you want to connect to a wireless network, you need to use one of the USB ports and this is usually the port you might want to use for other purposes. This is similar to the case of Bluetooth.
While the Raspberry Pi Model B + and Raspberry Pi 2 have added USB ports, the best solution is still to integrate Bluetooth and Wi-Fi, which is finally received by users in Raspberry Pi 3, released on early 2016.
But how do you set up wireless and Bluetooth on Raspberry Pi 3?
How to set up Wi-Fi and Bluetooth on Raspberry Pi 3
- Wireless connection and Bluetooth on Raspberry Pi 3
- Configure wireless network on Raspberry Pi 3
- Bluetooth configuration on Raspberry Pi 3
- Connect with Bluetooth in the GUI
- When Bluetooth is not working
Wireless connection and Bluetooth on Raspberry Pi 3
The Raspberry Pi 3 comes with some great new features, in which new wireless and Bluetooth connectivity components are arguably the most impressive. Did you find out?
You will find it along the short edge of Pi, where the microSD card is inserted. This small white antenna will connect you to a wireless router, as well as allow you to connect a Bluetooth keyboard or other device to Pi.

However, this component is very delicate. Be careful when installing Raspberry Pi 3 into a case, because the location of the chip antenna can make it jammed. In addition, the thick and dark plastic shells can block signals to and from chip antennas, making the device inoperable.
Now it's time to set up!
Configure wireless network on Raspberry Pi 3
To start with the Raspberry Pi 3, you need to connect it to the router using an Ethernet cable, to receive updates and configure Wi-Fi. After connecting and booting, you can plug in the keyboard or connect via SSH or VNC to run the update in the terminal.
 sudo apt-get update
 sudo apt-get upgrade
After that, you have two options to set up wireless connection. It seems easier to boot into the GUI, but it's actually simpler to do so in the command line. You should have your own SSID name, if not, use:
sudo iwlist wlan0 scan
This will reveal the SSID in the "ESSID" line. Next, open wpa_supplicant.conf :
sudo nano /etc/wpa_supplicant/wpa_supplicant.conf
You will need to add or edit the following items:
 network = {
 ssid = "SSID"
 psk = "WIFI PASSWORD"
 }
Press CTRL + X to exit and save, press Y and Enter to confirm. The wireless connection will start working immediately. If not, use:
 sudo ifdown wlan0
 sudo ifup wlan0
to restart the wireless connection. You can also just enter:
sudo reboot
If you like using the GUI, right-click the Ethernet icon in the control panel (two computer screens) and select the wireless network option. Then all you need to do is select the correct SSID and add the password. You now have a Wi-Fi connection and can disconnect the Ethernet cable!
Bluetooth configuration on Raspberry Pi 3
To configure Bluetooth, you need to start with the update and upgrade commands as above. Next, install the Bluetooth package:
sudo apt-get install bluetooth-pi
If you like, you can install bluez, which will install bluetooth-pi with other tools, instead.
sudo apt-get install bluez bluez-firmware
At this stage, everything is set to activate Bluetooth from the command line.
To start configuring Pi's Bluetooth, run:
bluetoothctl
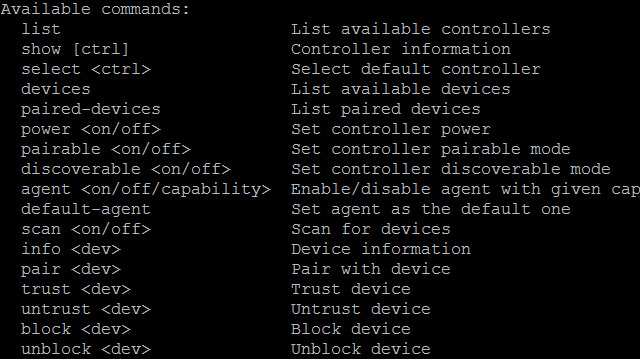
A variety of options are available with this. Enter help to view them.

In order for Bluetooth to work, it needs to be turned on, able to find and detect devices.
You need to use 3 commands to do this:
 power on
 agent on
 scan on

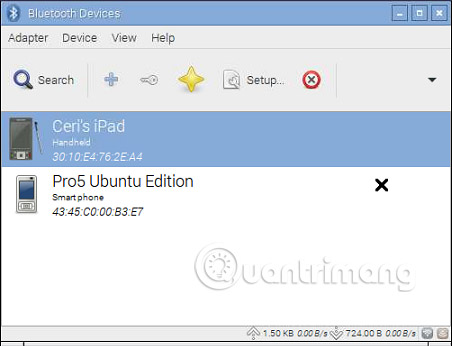
In this screen, you can see that the Raspberry Pi has detected an Ubuntu phone. A connection can be made by entering connect, followed by the MAC address. However, you do not need to connect. You can use Bluetooth scanning to detect connections for DIY smart home systems.
Connect with Bluetooth in the GUI
If you want to set up a Raspberry Pi Bluetooth connection in your X computer, you can, as long as the blueman software is installed.
sudo apt-get install blueman
You will need to restart Pi:
sudo reboot
Please note how users can communicate more with Pi. Previously this command would be:
sudo shutdown -r
and it still works.

Now that Pi has restarted and the desktop X environment has been loaded, open Menu> Preferences> Bluetooth Manager . Devices that can be detected in the neighborhood will be listed, so right-click and select Connect to start the pairing / trusting process.
Bluetooth is active!
When Bluetooth is not working
Although the setup process is very simple, it is unclear whether your hardware will work correctly. The author of the article encountered a faulty Raspberry Pi 3 (due to the manufacturer's fault or an error that occurred when the device was installed in this case), and found that even if the wireless network was setup completely works if the chip antenna is broken, but Bluetooth still seems to be working.

You can't know the weird and annoying situation when running sudo service bluetooth status (see above) and find that all looks good with Bluetooth, just to find a few commands in a messy, disorderly order. With wireless connectivity and Bluetooth not working properly, we'll basically have a very thorough parameter with Raspberry Pi 2! However, it is more ideal to run OSMC.
Do you use Raspberry Pi 3? Have you encountered any problems with Wi-Fi or Bluetooth, or are they all working well? Let us know in the comment section below!
See more:
- How to update your Raspberry Pi to the latest Raspbian operating system
- How to connect directly to a Raspberry Pi without Internet
- How to connect Raspberry Pi remotely to a Windows computer