Table of Contents
Everything You Need to Know About Overclocking the Raspberry Pi 400 is easier to approach with a clear overview and reliable steps. This guide organizes the essential information, highlights practical details, and explains what to check along the way.
Key Takeaways
- Learn how to install monitoring tools.
- Explore edit config.txt file to overclock.
- Understand stresstest pi 400 overclocked.
sudo apt update && sudo apt upgrade -yInstall Monitoring Tools
You'll want to install a few helpful tools before you overclock your Pi 400. First, install the Neofetch system information tool:
sudo apt install neofetchNext, install the Stressberry stresstest tool:
sudo apt install stress sudo pip3 install stressberryTo view current system information, run:
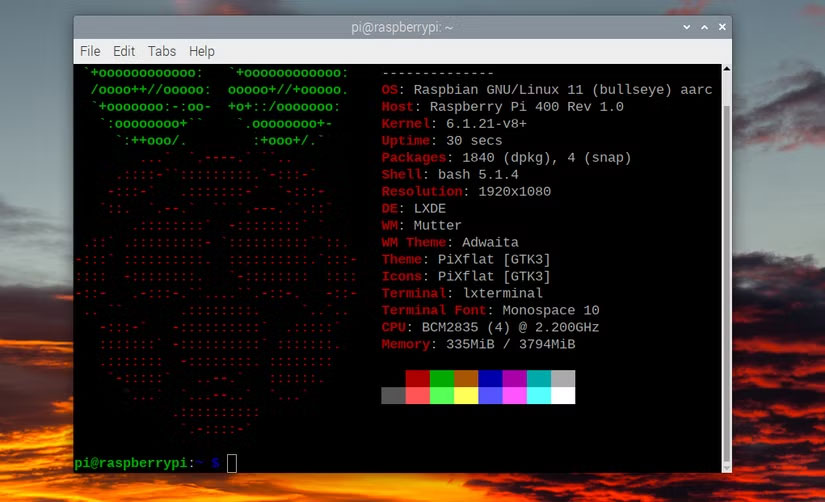
neofetchIt will show the default CPU speed as 1.8 GHz. Next, you will want to do an initial stress test at the default clock speed to compare to the overclocked results later. Run this command to test for 100 seconds using all 4 cores:
stressberry-run -n "My Test" -d 100 -i 30 -c 4 mytest1.datIt will run and each line will display the current CPU temperature and frequency (in MHz) after waiting for the base temperature to stabilize.
Edit Config.txt File to Overclock
Now let's change the CPU speed settings to start overclocking. Open the config.txt file in the nano text editor:
sudo nano /boot/config.txtScroll down to the section that starts with "#uncomment to overclock the arm" and delete the line below. Now add the following lines:
arm_freq=2000 gpu_freq=750 over_voltage=6Here we are setting the CPU clock speed to 2GHz, increasing the core voltage and also increasing the GPU speed as a bonus. Exit nano and save the settings by pressing Ctrl + X, then Y and Enter. Reboot the Pi 400: This helps you enable overclocking.
sudo rebootOnce it reboots, run the neofetch terminal command again; you should see a new CPU speed of 2.2 GHz.
Stresstest Pi 400 Overclocked
Run the same stresstest as before, using Stressberry:
stressberry-run -n "My Test" -d 100 -i 30 -c 4 mytest2.dat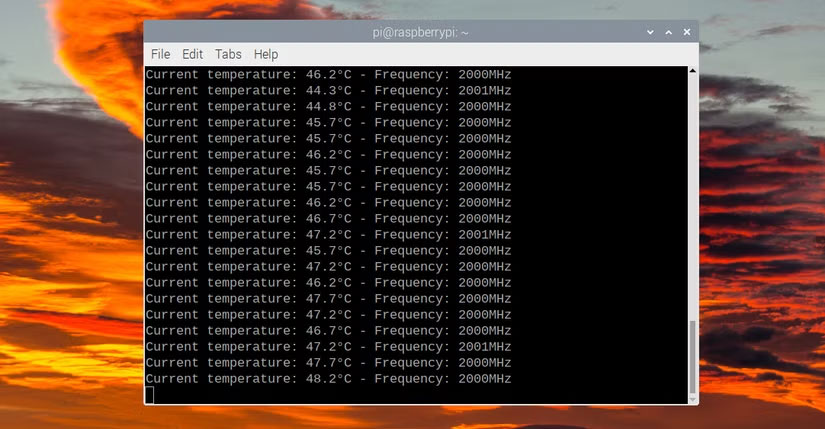
This time, you'll see the CPU hit an overclock of 2GHz. It'll also run at a higher temperature - in our tests, it maxed out at 48.2°C, which is well below the throttling level.
Overclock Pi 400 to Higher Speed
You will need to add the line force_turbo=1 to the config.txt file to increase the overvoltage value above 6 if you want to push the CPU speed of the Pi 400 even higher. Note that this will void the warranty.
For instance, to overclock the Pi 400 to 2.2 GHz, add these lines to the overclock section of config.txt:
force_turbo=1 arm_freq=2200 gpu_freq=750 over_voltage=8Save the file as before and reboot. The Pi 400 should boot fine at this overclock and you can run another stress test with Stressberry. In our tests we saw it running at a full 2.2GHz and temperatures reaching 54°C – still well below the tuning range.
Pushing the speed any higher is at your own risk, but YouTuber leepspvideo found that he could run the Pi 400 at 2.4GHz.
However, if overclocking to a certain level causes instability, you should try overclocking at a more modest level. In some cases, the Pi 400 may not even boot into the desktop, usually due to lack of power.
Final Thoughts
The most reliable way to handle everything you need to know about overclocking the Raspberry Pi 400 is to follow the process in order, verify each important setting, and test the result before moving on. Use the guidance above as a practical reference, then adjust the details for your device, software version, or specific goal.
FAQ
What should I know first about Everything You Need to Know About Overclocking the Raspberry Pi 400?
Built into a keyboard case, the Raspberry Pi 400 makes for a neat desktop PC.
How do I get the best results with Everything You Need to Know About Overclocking the Raspberry Pi 400?
Use current software or equipment, follow the steps in order, review the recommended settings, and test one change at a time so you can identify what improves the result.
What should I do if Everything You Need to Know About Overclocking the Raspberry Pi 400 doesn't work as expected?
Check compatibility, permissions, connectivity, and version-specific settings. Restart the relevant device or app, then repeat the process carefully before trying a more advanced fix.
Related Articles
 Everything You Need to Know About Overclocking Your Raspberry Pi 5 Explained9 minutes read
 Learn About Overclocking: Should or Shouldn't Overclock?12 minutes read
 How to Overclock Raspberry Pi 4: Step-by-Step Guide9 minutes read
 How to Overclock Raspberry Pi 3: Practical Guide9 minutes read
 How to Add an ADC to Raspberry Pi: What You Need to Know: Clear Instructions11 minutes read
 Raspberry Pi Zero vs Model a and B, How Are They Different?11 minutes read
Reader Comments 0
Sign in with email or Google to join the discussion.