Table of Contents
How Does Raspberry Pi Imager Work?
This guide provides a practical overview of Learn Pi Imager, How to Use Raspberry Pi Imager, including its main features, benefits, limitations, and important considerations.
How to install Raspberry Pi Imager
The Raspberry Pi Imager is free to install from the Raspberry Pi's official website. It is available for macOS, Windows, and Ubuntu systems.
Step 1. Go to the Raspberry Pi download page.
Step 2. Download the Raspberry Pi Imager installer for your Supported operating systems.
Step 3. Run the installer and follow the prompts to complete setup.
Built-in Raspberry Pi Imager image recording
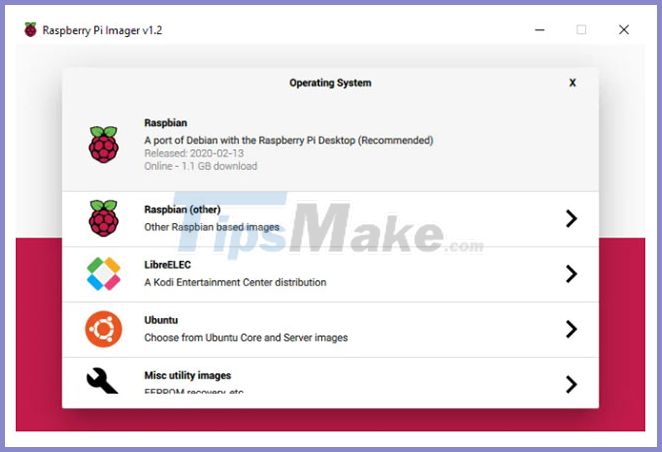
You can use the Raspberry Pi Imager to burn images to an SD card for the Raspberry Pi. The Raspberry Pi Imager comes with a number of operating systems to choose from, so you don't have to download anything individually. If you want to install a custom image, you can follow the instructions in the next step.
Step 1. Launch Raspberry Pi Imager.
Step 2. Click Choose OS . This feature partially replaces NOOBS, providing a few basic operating systems like Raspbian.
Step 3. Select an Supported operating systems from the list.
Step 4. Click Choose SD card .
Step 5. Choose from the list of SD cards you want to burn to.
Step 6. Click Write to start the image burning process.
Burn a custom image
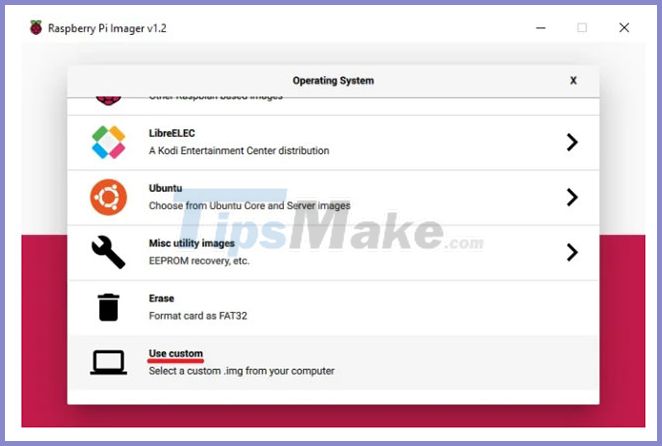
Custom Raspberry Pi image files (such as. zip. img. tar. gz, etc.) can be burned using the Raspberry Pi imager. You must download the image file from a third-party source. For example, to install RetroPie you need the image file from the download page on the RetroPie website.
Step 1. Launch Raspberry Pi Imager.
Step 2. Click Choose OS .
Step 3. Select Use custom to write an image that is not listed.
Step 4. Click Choose SD card .
Step 5. Choose from the list of SD cards you want to burn to.
Step 6. Click Write to start the image burning process.
The included operating systems
The Raspberry Pi Imager comes with a handful of operating systems. It does not replace NOOBS, but offers a few operating systems to choose from. You can even install LibreELEC, an open source Linux distribution for Kodi.
The available operating systems include
- Raspbian
- LibreELEC
- Ubuntu
Additional tools
In addition to the Supported operating systems, there are several tools available with the Raspberry Pi Imager in the Choose OS option. These tools include:
- EEPROM Recovery - Only for Raspberry Pi 4
- Erase tool - This tool is used to format the SD card to FAT32.
Raspberry Pi Imager Alternatives
If for some reason you don't want or can't use the Raspberry Pi Imager, you can choose to use an alternative app. Here are some options that many people have believed in over the years.
- balenaEtcher - The application runs on Windows, MacOS and Ubuntu.
- Win32 Disk Imager - Image creation software designed for Windows machines.
FAQ
What should I know about Learn Pi Imager, How to Use Raspberry Pi Imager?
Focus on the key features, requirements, limitations, and practical use cases explained in this guide.
How do I get the best results with Learn Pi Imager, How to Use Raspberry Pi Imager?
Follow the recommended steps, use current software or information, confirm compatibility, and review settings before major changes.
Are there any risks or limitations?
Potential limitations depend on compatibility, data quality, cost, privacy, support, and how the product or method is used.
Related Articles
 How to Use Raspberry Pi Imager to Install Raspberry Pi OS: Practical Guide11 minutes read
 How to Use the Advanced Options of Raspberry Pi Imager7 minutes read
 What Can Be Done with the 64-Bit Version of Raspberry Pi OS?7 minutes read
 5 Interesting Activities to Learn About Programming on Raspberry10 minutes read
 How to Add an ADC to Raspberry Pi: What You Need to Know: Clear Instructions11 minutes read
 Raspberry Pi Zero vs Model a and B, How Are They Different?11 minutes read
Reader Comments 0
Sign in with email or Google to join the discussion.