How to turn an old laptop screen into a magic mirror
Laptops cannot exist forever, but the screens inside them are possible. Even if the main computer is broken, you can extract the display panel and reuse it.
Table of Contents
Laptops cannot exist forever, but the screens inside them are possible. Even if the main computer is broken, you can extract the display panel and reuse it. Today's article will show you how to turn an old laptop and a Raspberry Pi into a magic mirror.
What you need
- Laptop broken. Please do not get a laptop that is still working well because there are many better things to do with a still active computer! (Free)
- Raspberry Pi 2 or 3 (preferably Pi 3 because it has Wi-Fi integration). ($ 30)
- Thick wood and a set of Kreg to create frames ($ 10)
- One-way acrylic mirror sheet ($ 20)
- Suitable power supply and display panel ($ 30 - $ 40)
Total cost: about $ 100.
Extract and restore the old screen
Before you begin, you should be aware that it is not always possible to try and rescue a control panel from a laptop, because you need to find a suitable control panel and power source. with it. Unlike an available monitor and simply plugging into an HDMI port, the LCD monitor or LED panel inside your laptop will have signals directly from the laptop's motherboard.
To use that control panel, you need a control panel made by a third party, converting the standard HDMI signal into a suitable one for that monitor. It is troublesome that this control panel must also match your control panel exactly. Once you have to pay an additional $ 30 - $ 40 for extra parts, it may be cheaper to buy a fully functional old monitor at the auction. Browse eBay's "soonest ending" lists, you'll see some 17-inch old office screens for under $ 15.
So in short, what do you take advantage of the old laptop screen for? Part of the motivation for this is to make good use of something that is about to be thrown into the trash, regardless of whether it is a bit more expensive. The avoidance of adding a mountain of electronic waste should be encouraged.
Do you still want to continue? If you can't find the instructions to disassemble your laptop's details on iFixit.com, just take a screwdriver or a manual knife and start separating the screen frame. From there, you can find mounting screws with hinges. Be more careful around locations with any ribbon cables, as you may need to reuse them later.
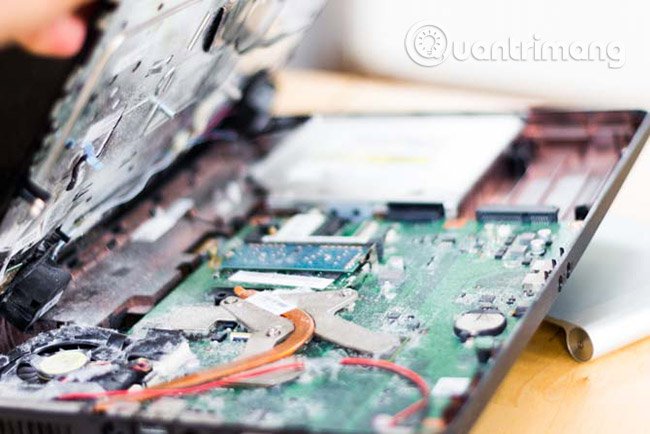
When you're done, rotate the control panel and locate the model sticker. All tables will have this sticker model.
This is a worthwhile thing. This sticker describes the control panel and allows you to search for the appropriate control panel. Enter the model number on eBay (in this case, B126XW02) plus the word 'controller'.
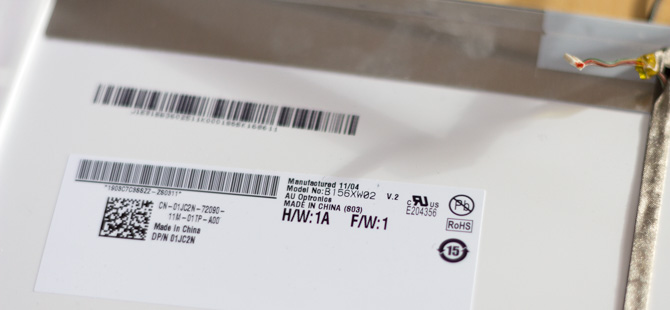
You can know a bit about the tables just by looking at the codes:
- B is a manufacturer - AU Optronics - although this is also clearly written below the model number. So it is not surprising here. You can also find the manufacturer's reference list and their code here.
- 156 : 15.6 inch screen size.
- XW : Resolution XWGA (1366 x 768).
- 02: Control panel version 2.
Expect to pay only $ 20 - $ 30 for a suitable console, one connected to an HDMI cable, the other attached to a cheaper VGA cable. If in doubt, take a photo of the label and send it to the seller, most sellers will be happy to inform you, if you purchased the right product or show you the correct one if you make a mistake. You will also need a power supply for the control panel. 12V-4A type is recommended, cost about $ 10.
When your dashboard is delivered, you will not only find a single control panel: It is possible that you will have a separate inverter (for LCD screens, which require a high voltage), a board with buttons to control the input, and can be a receiver board for remote control (optional). This is the main control panel:
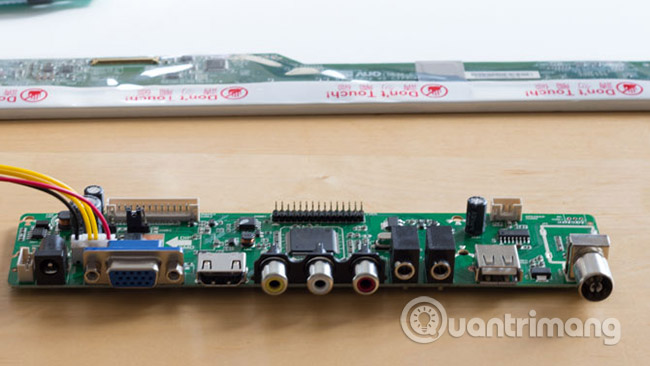
Since this is an LED, it does not need a separate inverter board. The ports must be clear and there are only a few separate ribbon cable connectors. You will find some pins labeled LVDS: This is where the flat cable connected to the LCD monitor will work, but not plugged in.

You can also find connector devices for control buttons and IR receivers. In this example, this single white cable connects both IR and KEY tables. Plug them in immediately and connect to the designated main control board. Connect using LVDS and power, you are ready to confirm everything is working, but do not unplug until the last step because it is quite delicate and easily damaged.
Create a new frame
The author used some 1.5 inch square planes and roughly cut the frame size to fit the screen, then used a router to cut out the frame. This is really a process of experimenting and drawing lessons.
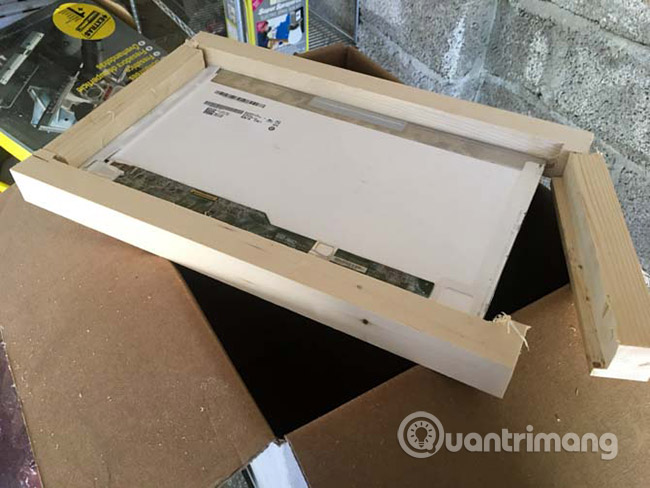
To create the edges of the frame, the author used a single hole, created with Kreg Jig. You should use Kreg Jig because it's simple and works quite well. If you don't have one, you should buy one (only about $ 40).
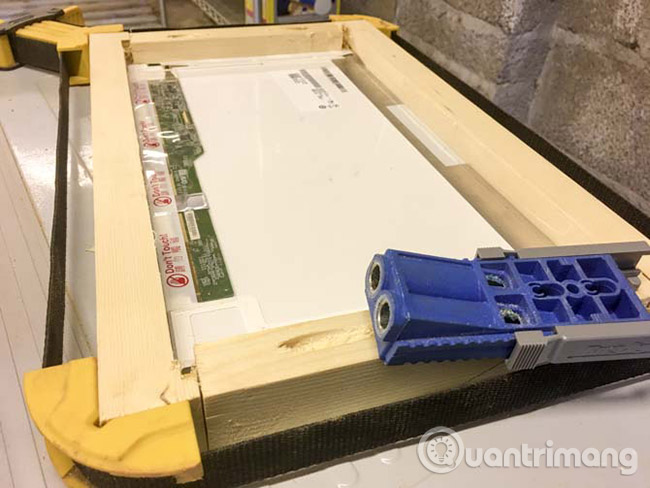
Finally, use polyurethane varnish to paint on the wood.
Mounting screens and mirrors
The final step is to install the mirror - 3mm plexiglass - with the screen behind it. After all, they fit well, so there's no need to fix anything. Additional double-sided tape can be used to attach the Raspberry Pi and other parts.
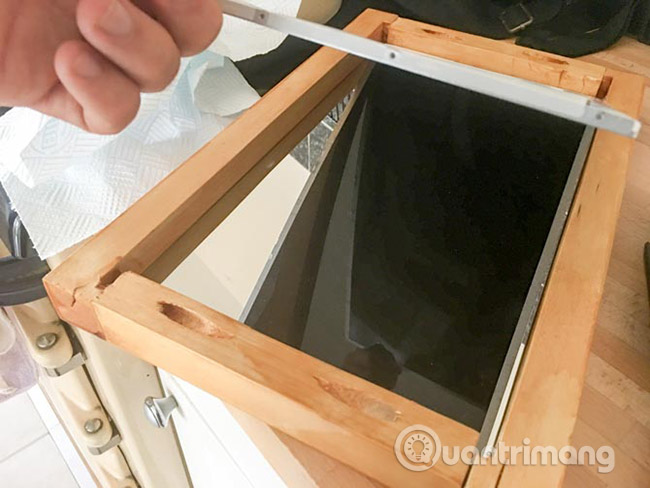
The project that the author conducted has been neglected for several months, so part of the screen has been cracked and inactive. However, the other half of the screen still works normally, so the author put a piece of black card into the frame, between the screen and plexiglass, to completely hide the broken area!
Install software MagicMirror2
To make things simple, use MichMich's popular open source Magic Mirror solution, with support for many plugins. You can encrypt your own unique web application.
Don't worry if you've never used Raspberry Pi before.
The installation is extremely simple. In the command line, enter:
bash -c "$ (curl -sL https://raw.githubusercontent.com/MichMich/MagicMirror/master/installers/raspberry.sh)"
and let it work. If this fails, you may not be using Raspberry Pi 2 or 3. At some point, it will ask you if you want to automatically start Magic Mirror, and you can do it. Once completed, it will boot directly into the default layout.
Once completed, log in from a remote machine using SSH and edit configuration files:
  cd MagicMirror / config /
  nano config.js
Don't be obsessed with code in this file. It is almost an empty space!
You start with a variety of default modules, and the syntax for adjusting their position and settings is quite obvious. Additional modules will provide their own example documents and configuration blocks. Just remember that each module configuration is surrounded by curly braces {} and requires a comma in the middle. If you have no commas or curly braces do not match, you will get an error.
Your first step is to configure the default weather module. To take advantage of OpenWeatherMap data, you need to register for API key (free) at https://openweathermap.org/ . For simple needs, free accounts are perfectly suited.
To rotate the screen 90 degrees, add the following to the end of /boot/config.txt:
display_rotate = 1
To stop the screensaver from starting after five minutes, follow the instructions from the Wiki MagicMirror (https://github.com/MichMich/MagicMirror/wiki/Configuring-the-Raspberry-Pi). Then, to enable MagicMirror to automatically restart, use this guide. They are easy to follow and need not explain much more.
Because the example screen only works on the right hand side, the author has set the modules quite low, only with the default time and weather forecast, at the top and bottom of the right side respectively.

The hardest part of this project is probably building frames, and you can do this well.
Good luck!
See more:
- How to connect Raspberry Pi remotely to a Windows computer
- How to install an operating system for Raspberry Pi
- 7 great ideas using Raspberry Pi as a server
Was this article helpful?
Your feedback helps us improve.
Related Articles
 Make your own smart mirror with Raspberry Pi 35 minutes read
 Smart mirrors integrate computer touch screens like in science fiction movies1 minutes read
 Instructions on how to turn off the Laptop screen5 minutes read
 How to turn your laptop screen into a simple TV at home9 minutes read
 Invite the application to turn the iPhone device into a second screen for your computer, which is free2 minutes read
 Deciphering the magic screen 'matchstick knows dancing' is surprisingly simple2 minutes read
Reader Comments 0
Sign in with email or Google to join the discussion.