How to Install Ubuntu in Windows
This wikiHow teaches you how to install and run Ubuntu Linux on your Windows computer's desktop. You'll use a free program called VirtualBox to do so; this will allow you to run Ubuntu without having to replace your current operating...
Table of Contents
Part 1 of 5:
Installing VirtualBox
-
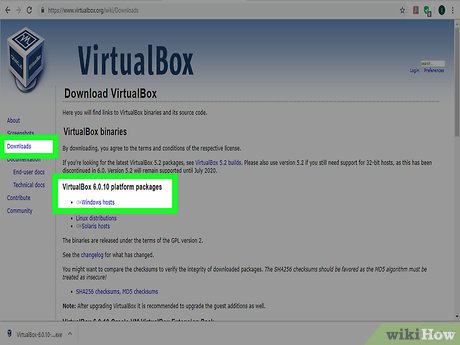 Download the VirtualBox installation file. Go to https://www.virtualbox.org/ in your computer's web browser, then do the following:
- Click Downloads on the left side of the page.
- Click the Windows hosts link under the "VirtualBox 5.2.16 platform packages" heading.
-
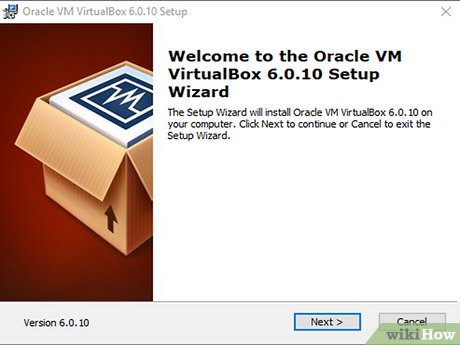 Double-click the VirtualBox setup file. Doing so will launch the VirtualBox installation window.
 -
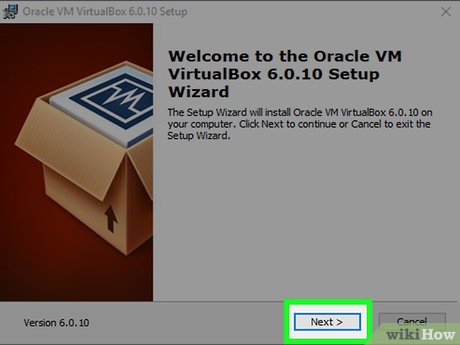 Click Next three times. The Next button is at the bottom of the window. After clicking it three times, you should arrive at a warning about networking.
 -
 Click Yes. It's at the bottom of the window.
 -
 Click Install. This option is at the bottom of the window.
 -
 Click Yes when prompted. Doing so confirms your settings and allows VirtualBox to begin installing.
 -
 Allow VirtualBox to install. It can take up to ten minutes to finish installing VirtualBox, so just allow the installer to run.
 -
 Uncheck the "Launch VirtualBox" box. Once VirtualBox finishes installing, this will appear in the middle of the window.
 -
 Click Finish when prompted. This option is at the bottom of the window. Clicking it completes the installation process.
Part 2 of 5:
Downloading the Ubuntu Installation File
-
 Open the Ubuntu website. Go to https://www.ubuntu.com/ in your computer's web browser. This is the official site for Ubuntu support and downloads.
 -
 Select Downloads. It's a tab in the upper-right side of the window. Placing your mouse cursor on this tab prompts a drop-down menu.
 -
 Click Desktop. You'll find this option in the Downloads drop-down menu.
 -
 Click Download. This green button is to the right of the current version of Ubuntu. Doing so prompts the Ubuntu disk image (ISO) file to begin downloading onto your computer.
- You may have to click Save or select a download location before the Ubuntu ISO will download.
-
 Wait for the download to complete. The Ubuntu ISO file is close to 2 gigabytes in size, so it may take a while to finish downloading; once it does, you can proceed with creating a new virtual machine for your Ubuntu installation.
Part 3 of 5:
Creating a New Virtual Machine
-
 Open VirtualBox. Click or double-click the Oracle VM VirtualBox app icon, which resembles a 3D blue-and-white box.
 -
 Click New. It's a blue icon in the upper-left side of the window. This prompts a pop-up window to open.
 -
 Enter a name for your virtual machine. Type in whatever you want to name the Ubuntu installation.
 -
 Click the "Type" drop-down box. It's below the "Name" text box. Clicking it prompts a drop-down menu.
 -
 Click Linux. This option is in the "Type" drop-down box.
 -
 Select Ubuntu if it isn't already selected. Upon selecting Linux, you should see "Ubuntu (64-bit)" appear in the "Version" section; if not, click the "Version" drop-down box and then click Ubuntu (64-bit) in the resulting drop-down menu.
- Since Ubuntu is the most common version of Linux, VirtualBox will usually default to Ubuntu when you select Linux as the operating system.
-
 Click Next. It's at the bottom of the window.
 -
 Select an amount of RAM to use. Click and drag the slider left or right to decrease or increase the amount of RAM you want to allow Ubuntu to use.
- The Ubuntu support site recommends using at least 2 gigabytes (2048 megabytes) of RAM.[1]
-
 Click Next. It's at the bottom of the window.
 -
 Create a virtual hard disk. This is just a folder which will act as Ubuntu's hard drive:
- Check the "Create a virtual hard disk now" box.
- Click Create.
- Click Next.
- Select a size for your virtual hard disk.
- When in doubt, use the recommended size that's set as the default on this page.
- Click Create.
Part 4 of 5:
Adding the Ubuntu ISO to VirtualBox
-
 Select your virtual machine. Click the name of your Ubuntu machine on the left side of the window.
 -
 Click Start. It's a green arrow-shaped icon at the top of the window. Doing so opens a pop-up menu.
 -
 Click the "Browse" icon. This folder-shaped icon is to the right of the text box in the middle of the menu. Clicking it opens a File Explorer window.
 -
 Select your Ubuntu ISO file. Go to the folder into which you downloaded the Ubuntu ISO from earlier, then click once the ISO file to select it.
 -
 Click Open. It's in the bottom-right corner of the window. Doing so sets the ISO file as the virtual machine's target.
 -
 Click Start. This is at the bottom of the menu. At this point, you're finally ready to begin installing Ubuntu.
Part 5 of 5:
Installing Ubuntu
-
 Select a language. Click the language you want to use in the left-hand sidebar.
 -
 Click Install Ubuntu. It's a button on the far-right side of the window.
 -
 Click Continue twice. This option will be at the bottom of the window.
 -
 Click Install Now. It's in the bottom-right corner of the window.
 -
 Click Continue when prompted. This confirms that you want to install Ubuntu without creating a separate partition for it (since you're using VirtualBox, this won't harm your computer).
 -
 Select a time zone. Click a point near your current city, then click Continue.
 -
 Create your user account. Type your name into the "Your name" text box, then enter a password into the "Choose a password" and "Confirm your password" text boxes.
 -
 Click Continue. It's at the bottom of the window. Doing so prompts Ubuntu to begin installing to VirtualBox.
 -
 Allow Ubuntu to install. Ubuntu may take anywhere from a few minutes to well over half an hour to install.
 -
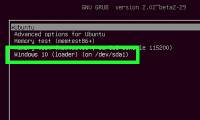
 Click Restart Now when prompted. Doing so will cause Ubuntu to restart inside of the VirtualBox window. Once it finishes restarting, you're free to use Ubuntu as you please.
- If prompted to "remove the installation media and press ENTER", just press ↵ Enter until Ubuntu restarts again.
Was this article helpful?
Your feedback helps us improve.
Related Articles
 How to install Ubuntu in parallel with Windows using USB9 minutes read
 How to install Ubuntu 26.04 LTS on a PC or laptop9 minutes read
 How to Install Ubuntu Linux Without CD (Windows)13 minutes read
 How to Install Windows from Ubuntu10 minutes read
 Ways to install Ubuntu on Windows, run in parallel or run separately12 minutes read
 Install and use 7 ZIP on Ubuntu Linux6 minutes read
Reader Comments 0
Sign in with email or Google to join the discussion.