Table of Contents
This guide explains how to create Your Own Linux Distribution Using Yocto, with clear steps, practical tips, and important checks before you begin.
Create a Linux distribution using Yocto
1. Required hardware and Supported operating systems
- Minimum 4GB of RAM (Higher is better)
- Latest Ubuntu OS (20.04 LTS) or any other Linux OS:
- Fedora
- openSUSE
- CentOS
- Debian
- Hard drive with minimum 100GB free space (Larger size will ensure better performance). Yocto can be quite resource intensive, depending on your final product.
If you are a macOS or Windows user, use virtualization software like VMware or Virtualbox to run a Linux distribution. Alternatively, you can choose multiboot.
2. Host setup
First, install the required dependencies in the host system. For this article, the example is using the Ubuntu distribution. If you are running another distro, please check out the Yocto Project Quick Start tutorial and see what dependencies to install at:
https://www.yoctoproject.org/docs/2.4/yocto-project-qs/yocto-project-qs.html
Launch Terminal and execute the following commands:
sudo apt update sudo apt-get install wget git-core unzip make gcc g ++ build-essential subversion sed autoconf automake texi2html texinfo coreutils diffstat python-pysqlite2 docbook-utils libsdl1.2-dev libxml-parser-perl libgl1-mesa-dev libglu1- mesa-dev xsltproc desktop-file-utils chrpath groff libtool xterm gawk fop

3. Copy Yocto Poky
With the dependencies installed, you can proceed to download Yocto. You will be copying the Yocto repository from the Yocto Project website. Execute the command below, this will download the latest release (branch 'sumo'). Let's create a directory in the Home directory to build the Yocto project in an easy to access and consistent way.
mkdir ~ / yocto mkdir ~ / yocto / Project-One / cd ~ / Yocto / Project-One / git clone -b sumo git: //git.yoctoproject.org/poky.git

If you get an error like 'git command not found', it means you don't have git installed in your system. Execute the command below to install it.
sudo apt install git
4. Initialize the build environment
To get started with Yocto, you need to initialize the 'build environment'. Execute the commands below. The first one will change the directory to the directory you just copied. The second command will initialize the build environment.
cd ~ / Yocto / Project-One / poky source oe-init-build-env build

When the initialization is complete, you will have a build directory and a configuration file. The build directory is where all system builds take place and stores the image files after the process is completed. In fact, after initializing, Terminal will automatically point to the build directory. You can see that in the image above.
5. Configuration
When you execute the ls command in the / build directory, you will see a / conf directory containing all the configuration files. Navigate into this directory with the command below:
$ cd ~ / Yocto / Project-One / poky / build / conf / $ ls

By executing the ls command on the conf directory, you will see the local. conf file. This file specifies the details of the target machine and the SDK for the desired target architecture.
Open this file for editing with the following command:
$ sudo nano local.conf
From the image below, the target build is 'qemux86-64'.

Now proceed to uncomment the following lines (uncomment the # sign).
DL_DIR? = "$ {TOPDIR} / downloads" SSTATE_DIR? = "$ {TOPDIR} / sstate-cache" TMPDIR? = "$ {TOPDIR} / tmp" PACKAGE_CLASSES? = "Package_rpm" SDKMACHINE? = "I686" EXTRA_IMAGE_FEATURES? = "debug-tweaks"

Before continuing with the compilation process, add the following lines at the end of the local. conf file.
BB_NUMBER_THREADS = "X" PARALLEL_MAKE = "-j X"
Replace X with twice the number of processor / CPU in your computer. If you have 4 processors, then you would have statements like this:
BB_NUMBER_THREADS = '8' PARALLEL_MAKE = '-j 8'
To see the number of CPUs in the computer, execute the following command:
lscpu
6. Compile and build process
To start building the image, execute the command below in your / build directory.
bitbake core-image-sato
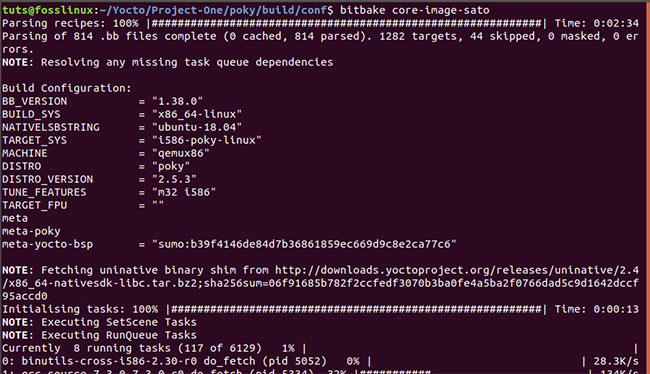
This command will start downloading and compiling packages for the target system. Please do not execute the above bitbake command with root privileges as it will cause an error.
For the first time build, this can take several hours (even more than 2 hours). Sometimes bitbake can fail. Do not panic! Please execute the above command again. The error can be caused by a particular site that is down or missing resources.
The resulting binary images are stored in the / build directory in poky / build / tmp / deploy / images / qemux86.
FAQ
What should I know about Create Your Own Linux Distribution Using Yocto?
Focus on the key features, requirements, limitations, and practical use cases explained in this guide.
How do I get the best results with Create Your Own Linux Distribution Using Yocto?
Follow the recommended steps, use current software or information, confirm compatibility, and review settings before major changes.
Are there any risks or limitations?
Potential limitations depend on compatibility, data quality, cost, privacy, support, and how the product or method is used.
Related Articles
 Create Your Own Linux Distribution with Ubuntu Imager7 minutes read
 Slax: How to Build Your Own Linux Distribution9 minutes read
 8 Easy Tools to Create Your Own Linux Distro6 minutes read
 Reasons to Try the Bodhi Linux Distribution: Explained8 minutes read
 These 4 Linux Distributions Are a Bad Idea: Avoid Them at All Costs7 minutes read
 7 Best Linux Distributions Based on Red Hat7 minutes read
Reader Comments 0
Sign in with email or Google to join the discussion.