How to Install Subversion on Mac OS X
Subversion, sometimes called SVN, is an open-source system that remembers every change made to your files and directories. It can be helpful if you'd like to track how your documents have changed over time or to recover an older version of...
Table of Contents
Part 1 of 2:
Install From a Binary Package
-
 Navigate to http://subversion.apache.org/packages.html#osx. There you will find a number of binaries that you can download, each having various requirements. Pick the one most appropriate for your needs.
 -
 Unzip the .pkg file. It should create a Subversion installer on your desktop. Double click that file, and follow the installation steps as directed.
 -
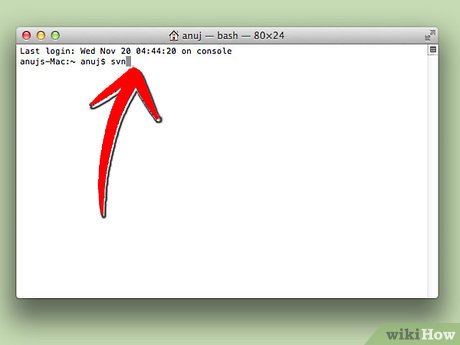
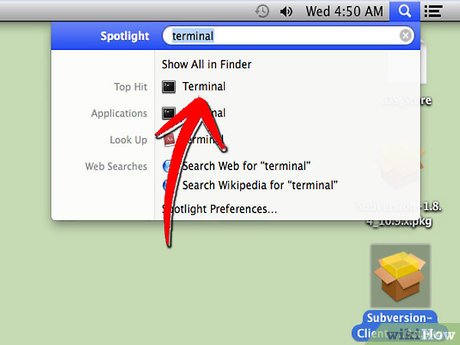 Open the Terminal, located in the Utilities folder. Alternately, search in Spotlight for Terminal. Enter the following at the [username]$ prompt:
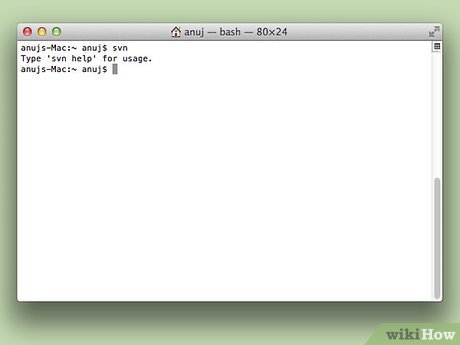
- svn [enter]
- If that returns "Type 'svn help' for usage," then svn is working correctly.

- If /usr/local/bin is not in your path, edit your .profile and add a line like the following:

- export PATH=$PATH:/usr/local/bin
- Open another Terminal window and try again with: svn [enter]
- svn [enter]
Part 2 of 2:
Set Up Your Subversion Environment
-
 Set up an SVN server. You will need this to distribute a Subversion project.
 -
 Launch Terminal, then create a directory called svnroot in your account directory, as follows: mkdir svnroot
- Type: svnadmin create /Users/[your username]/svnroot

- That creates your server!

- Type: svnadmin create /Users/[your username]/svnroot
-
 Use the svn server with Terminal. You can checkout in the terminal with this command: svn checkout file:///Users/[your username]/svnroot
- For remote access, enable "ssh access" (in System Preferences/Sharing) and checkout with: svn checkout svn+ssh://my.domain.com/Users/[your username]/svnroot

- For remote access, enable "ssh access" (in System Preferences/Sharing) and checkout with: svn checkout svn+ssh://my.domain.com/Users/[your username]/svnroot
-
 Set up a Subversion client. For example, svnX supports all current versions of Mac OS X from 10.5 to 10.8. You can get it at http://code.google.com.
 -
 After the download, start SVNx and you will see two windows named Working Copies and Repositories. Under Repositories, add the URL und Login Data from the SVN Server.
- Open the window; if you get an error, check the LogIn.

- Switch to the Terminal and type: svn import -m "your Import message" /my/local/project/path /my/remote/svn/repository This command adds all files from the local Project to the SVN Server.

- Add the path of your SVN repository (from the SVN server) to the list in the Working Copy window in SVNx.

- Open the window; if you get an error, check the LogIn.
-
 In SVNx open your working copy. When you're working on this Project, you will see your modifications here.
 -
 Test it. Make a small modification on your working copy, then refresh the the Working Copy window.
- SVNx displays all files with modifications. Press the Commit button to add it to the SVN Server Repository.
-
 If you prefer to work on the Subversion repository directly from the Finder, consider using either SCPlugin or SVN Scripts for Finder.
Was this article helpful?
Your feedback helps us improve.
Related Articles
 How to install an SSD for PC4 minutes read
 How to install Windows 8.1 from USB7 minutes read
 Install Windows XP from a USB Flash drive5 minutes read
 How to install Windows 10 from USB with ISO file6 minutes read
 Things you need to know about how to install Windows today6 minutes read
 Install Win 7 from your hard drive, no need for USB, install Win disk6 minutes read
Reader Comments 0
Sign in with email or Google to join the discussion.