How to Back Up a Mac Without Time Machine
This wikiHow teaches you how to create a backup of your Mac's hard drive contents without using Time Machine. Buy an external hard drive. Since you'll be using the external hard drive to back up your entire Mac hard drive, the drive should...
Table of Contents
Part 1 of 2:
Preparing to Back Up
-
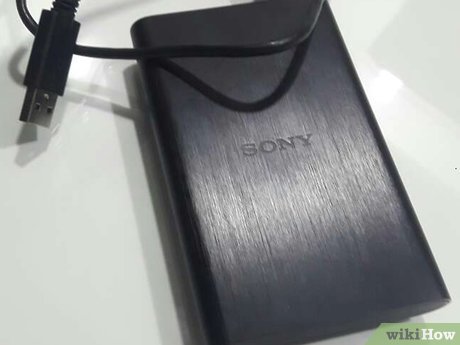 Buy an external hard drive. Since you'll be using the external hard drive to back up your entire Mac hard drive, the drive should be bigger than your Mac's drive (e.g., if the Mac's drive is 256 GB, get at least a 500 GB external drive).[1]
- It's often not much more expensive to buy a 1 terabyte (1024 gigabyte) external hard drive than it is to buy a 500 gigabyte external hard drive, so consider spending the extra $20 or so to get more storage.
- You'll generally want to buy an external hard drive that both has enough space for you and comes from a reliable manufacturer such as Western Digital or Seagate.
-
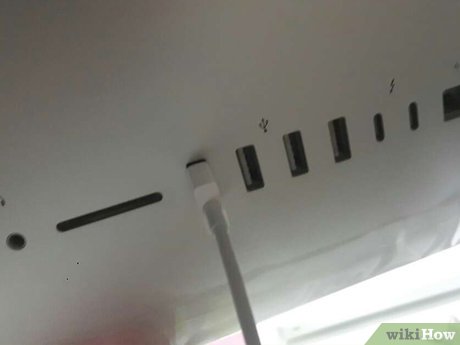 Plug your external hard drive into your Mac. Attach the USB end of the hard drive's cable to one of your Mac's USB ports, then attach the other end to the hard drive.
- Most modern Macs have USB-C (also known as Thunderbolt) ports rather than traditional USB 3.0 ports. If this is the case for you, you may need to buy a USB 3.0 to USB-C adapter for your Mac before you can attach your external hard drive.
EXPERT TIPChiara Corsaro is the General Manager and Apple Certified Mac & iOS Technician for macVolks, Inc., an Apple Authorized Service Provider located in the San Francisco Bay Area. macVolks, Inc. was founded in 1990, is accredited by the Better Business Bureau (BBB) with an A+ rating, and is part of the Apple Consultants Network (ACN).
Chiara Corsaro
General Manager of macVolks, Inc. Chiara Corsaro
General Manager of macVolks, Inc.If you don't have an external hard drive... You can still back up your files to a CD, DVD, or USB flash drive. You can also use a cloud backup option like iCloud, Google Drive, Dropbox, or Carbonite, or you can even email your files to yourself if you have a webmail account.
-
 Format your external hard drive. Formatting allows the hard drive to work on your Mac's operating system; failing to format the drive means that you won't be able to use it.
- Make sure to select Mac OS Extended (Journaled) as the File System value.
-
 Turn off FileVault. FileVault makes it impossible to clone your Mac's hard drive, so you'll need to disable FileVault if you ever had it enabled.
 -
 Prompt your Mac to restart. Click the Apple menu, click Restart... in the drop-down menu, and click Restart Now when prompted. Your Mac will begin to restart.
-
 Press and hold ⌘ Command+R. You'll need to do this immediately after clicking Restart Now and hold them until the recovery screen appears.
 -
 Wait for the Recovery icon to appear. It resembles a spinning globe. Once the icon appears, you can release the ⌘ Command and R keys. Your Mac will continue loading the Recovery screen; when it finishes, you can proceed to the next part.
Part 2 of 2:
Backing up Your Mac
-
 Click Disk Utility. It's in the middle of the Recovery window.
 -
 Click Continue. This option is in the bottom-right corner of the window. Doing so opens the Disk Utility window.
 -
 Select your external hard drive. Click your external hard drive's name or letter in the left-hand side of the window.
 -
 Click Edit. This menu item is in the upper-left corner of the screen. A drop-down menu will appear.
 -
 Click Restore…. It's in the drop-down menu. This will open a pop-up window.
 -
 Select your Mac's hard drive. Click the "Restore from" drop-down box, then click your Mac's hard drive's name in the resulting drop-down menu.
 -
 Click Restore. It's a blue button on the right side of the window. This will prompt your Mac's hard drive's contents to begin copying over to your external hard drive.
 -
 Wait for the copying to finish. When prompted, you're free to restart your Mac and begin using it like usual.
 -
 Eject your external hard drive. This will ensure that the information stored on the drive doesn't accidentally get corrupted.
Was this article helpful?
Your feedback helps us improve.
Related Articles
 Can iCloud Drive be used to back up Time Machine data on a Mac? Why?4 minutes read
 Should I use Time Machine or iCloud Drive to back up my Mac?9 minutes read
 Scientists confirm: People can go through, travel time3 minutes read
 How to Use Time Machine on a Mac7 minutes read
 How to delete old Time Machine backups on Mac3 minutes read
 Change the Time Machine backup time interval3 minutes read
Reader Comments 0
Sign in with email or Google to join the discussion.