Configuring Terminal Services Gateway of Windows Server 2008 (Part 2)
In the first part of this series, we did the basic installation for Terminal Services and Terminal Services registration and configured the Terminal Services subscription mode. In this section, we will introduce the installation and configuration of TS Gateway and RDP client. It will then create a connection and check it works like that
 Configuring Terminal Services Gateway of Windows Server 2008 (Part 1)
Thomas Shinder
In the first part of this series, we did the basic installation for Terminal Services and Terminal Services registration and configured the Terminal Services subscription mode. In this section, we will introduce the installation and configuration of TS Gateway and RDP client. Then create a connection and check how it works.
Install Terminal Services Gateway Service on Terminal Services Gateway
Now we turn our attention to Terminal Services Gateway. This is the computer that external clients will connect to initially when creating their Terminal Services client connections.
Follow the steps below to install Terminal Services Gateway on Terminal Services Gateway.
-
Open Server Manager on the Terminal Services Gateway computer. Click the Roles button in the left pane of the console, then click the Add Role link in the right pane.
-
Click Next on the Before You Begin page.
-
On the Select Server Roles page, check the Terminal Services checkbox
-
On the Terminal Services page, click Next .
-
On the Select Role Services page, check the TS Gateway checkbox . You will then see an Add Roles Wizard dialog box asking if you want to Add roles services and features required for TS Gateway . Click the Add Required Role Services button.

Figure 1
-
Click Next on the Select Role Services page
-
In the Choose a Server Authentication Certificate page for SSL Encryption , select the option Choose a certificate for SSL encryption later . Selecting this option is because we have not yet created a certificate for the TS Gateway to use the SSL connection between itself and RDP clients. We will require a certificate later and then configure the TS Gateway to use the certificate. Click Next .
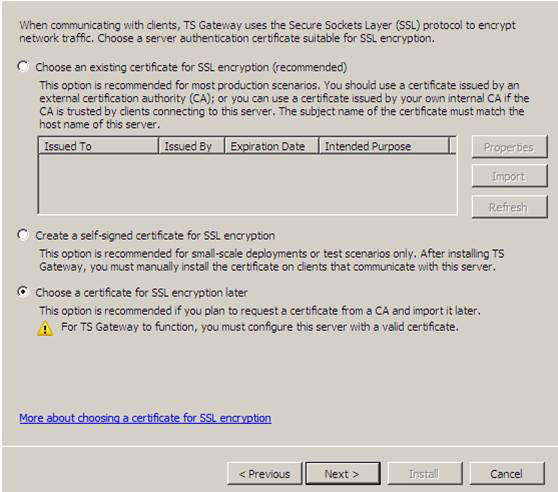
Figure 2
-
In the Create Authorization Policies for TS Gateway page, select the Later option. Selecting this option is because we want to include you in the TS Gateway console and show you how to configure authentication policies in this console. Click Next.
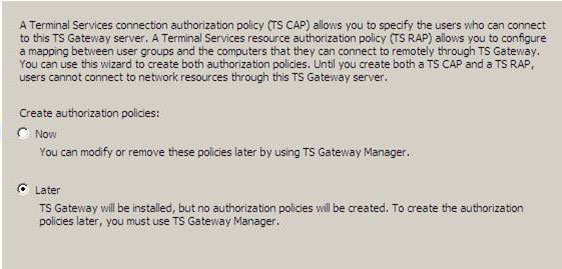
Figure 3
-
Click Next on the Network Policy and Access Services page
-
On the Select Role Services page, check the Network Policy Server checkbox, and then click Next .
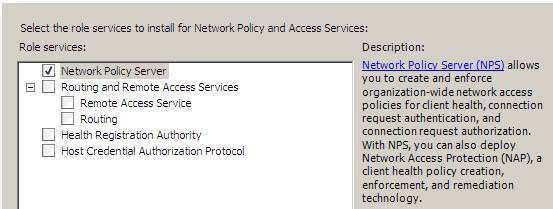
Figure 4
-
On the Web Server page (IIS) , click Next
-
On the Select Role Services page, accept the default role services selected by the utility. There are a number of services needed to run the TS Gateway service. Click Next .
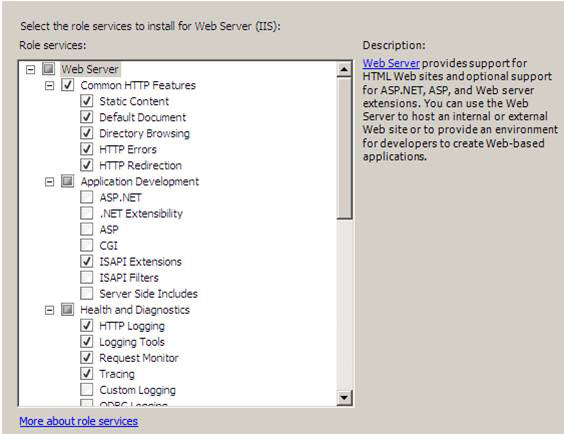
Figure 5
-
Review all information on Confirm Installation Selections and click Install .
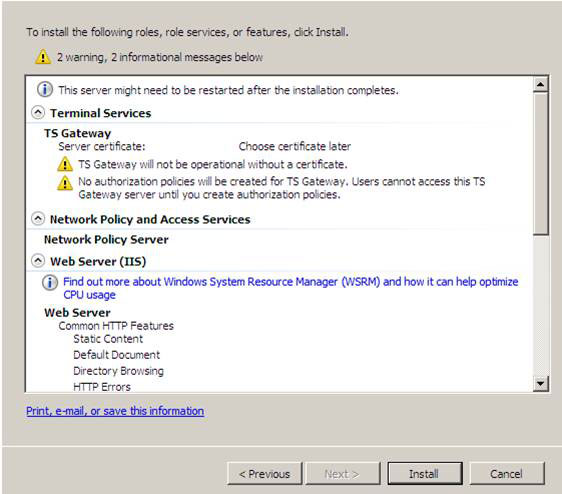
Figure 6
- Click Close on the Installation Results page to show that the installation was successful.
Now we can request a certificate that the Web site on the TS Gateway can use to establish SSL connections with the RDP client.
Follow the steps below to request a certificate for the TS Gateway machine:
-
From the Administrative Tools menu, click Internet Information Services (IIS) Manager .
-
In the Internet Information Services (IIS) Manager console, click the server name in the left pane of the console. Double-click the Server Certificates icon in the middle of this interface.
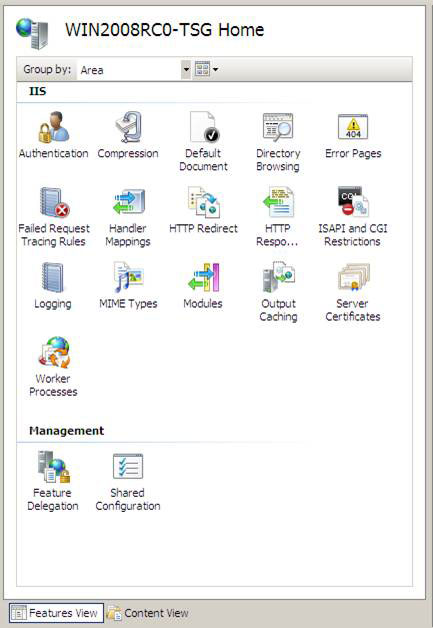
Figure 7
-
In the left part of the console, click on the Create Domain Certificate link.
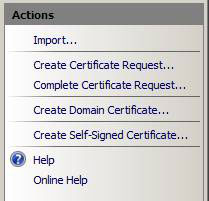
Figure 8
-
On the Distinguished Name Properties page, enter the information specified in this page. The most important item is Common name. The name you enter here must be the same name that the Terminal Services client has been configured to use to communicate with the TS Gateway computer. This is also the name that shared DNS servers will be configured to provide a generic address to allow access to TS Gateway. In most cases, this part will be a router or an external interface of a NAT device, or perhaps the external interface of an advanced firewall such as Microsoft ISA Firewall. Click Next .
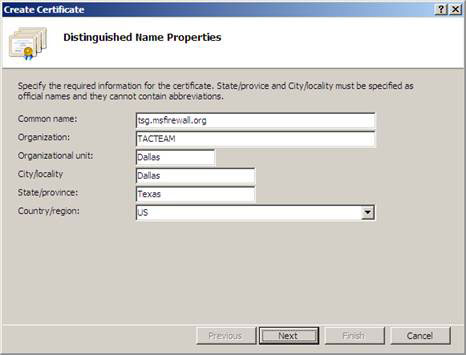
Figure 9
-
On the Online Certification Authority page , click the Select button . In the Select Certification Authority dialog box , select the Enterprise CA name to which you want to collect the certificate. Remember that we can obtain this domain certificate and automatically install it because we are using an Enterprise CA. If you are using a standalone CA, you will have to use the Web enrollment site and that will only be possible after you have created an offline request, then you must manually install the computer's certificate. Click OK after selecting Enterprise CA.
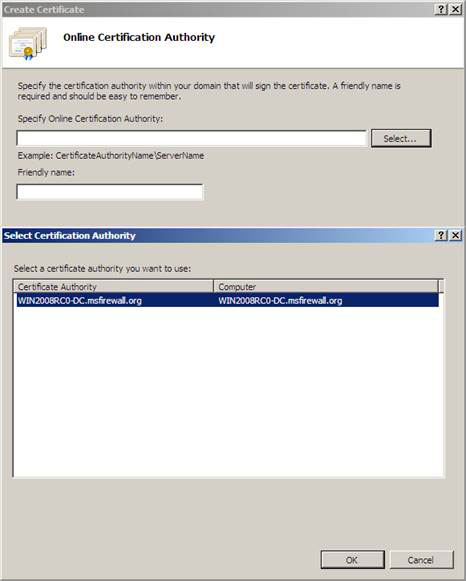
Figure 10
-
Enter a Friendly name name on the Online Certification Authority page. In this example we will name a certificate as TSG Cert . Click Finish.

Figure 11
-
After receiving a certificate, you will see the certificate-related information in the middle pane of the console. If you double-click the certificate, you will see the Certificate dialog, which is the dialog box that displays the generic name in the Issued to field and informs You that there is a private key that corresponds to this certificate . This is very important because the certificate will not work if you do not have a private key. Click OK to close the Certificate dialog box .

Figure 12
With the certificate installed in your computer's certificate store, you can assign the TS Gateway to use this certificate.
Follow the steps below to configure the TS Gateway to use that certificate:
-
In the Administrative Tools console, click on the Terminal Services entry, then click TS Gateway .
-
In the TS Gateway Manager , click on the name of the TS Gateway computer in the left pane of the console. The middle pane provides a lot of useful information about the configuration steps that need to be completed to finish the installation. Click the View or modify certificate properties link.
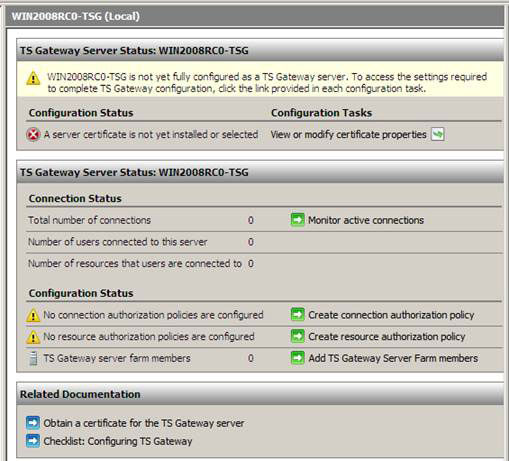
Figure 13
-
In the Properties dialog box for the TS Gateway, on the SSL Certificate tab, the Select feature has an existing certificate for SSL encryption to be enabled and then click the Browse Certificates button . This will bring up the Install Certificate dialog box. Click the certificate, in this case tsg.msfirewall.org , and then click the Install button .

Figure 14
-
The SSL Certificate tab will display information about the certificate that the TS Gateway will use to establish SSL connections. Click OK .
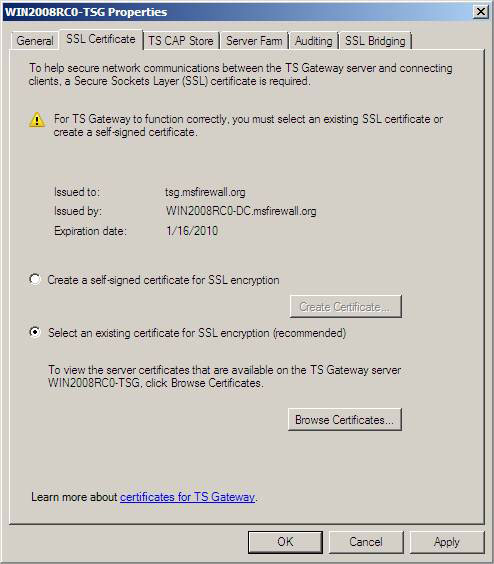
Figure 15
-
The content of the middle pane changes a bit, reflecting that the certificate is now installed on the TS Gateway. However, at this point we will see the Configuration Status section to create both the connection authentication policy and the resource authentication policy.
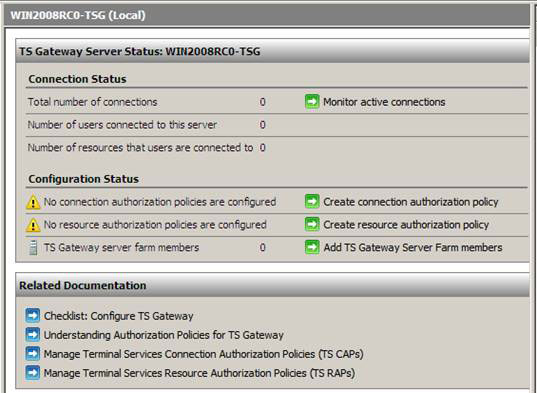
Figure 16
CAP is an abbreviation for Connection Authorization Policy, which allows you to control who can connect to the Terminal Server through the Terminal Services Gateway.
Follow the steps below to create a connection authentication policy:
-
In the left pane of the console, click the Connection Authorization Policies button located under the Policies . In the right pane of the interface, click the arrow to the right of Create New Policy and then click Wizard .
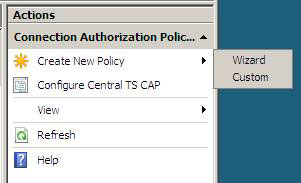
Figure 17
-
On the Authorization Policies page, select Create only a TS CAP . Click Next .
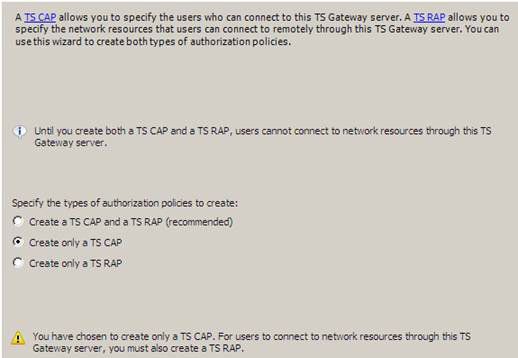
Figure 18
-
On the Connection Authorization Policy page, enter a name for CAP. In this example we will name CAP as General CAP . Click Next .
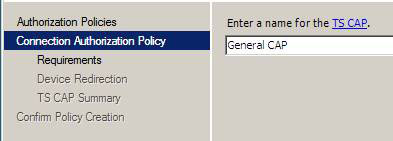
Figure 19
-
On the Requirements page, check the Password checkbox . If you plan to use smart card authentication, then choose the Smartcard option. Now you need to configure which groups can access the Terminal Server through TS Gateway. To do so, click the Add Group button. In the Select Groups dialog box, enter the name of the group you want to allow access and click Check Names . In this example, we enter Domain Users and then click OK .
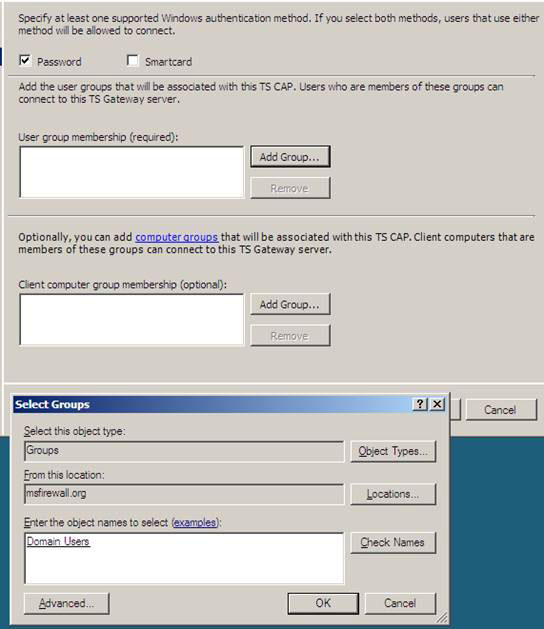
Figure 20
- Notice on the Requirements page that you can choose the option to create computer groups and allow access to specific computers only. We will not configure this option in this example. Click Next .
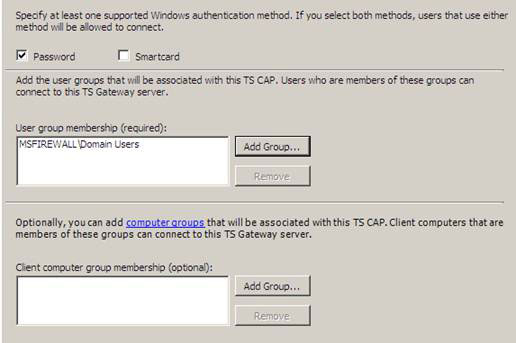
Figure 21
-
On the Device Redirection page, select the option Enable device redirection for all client devices. Note that if you want a better security environment, consider choosing the Disable device redirection option for the following client device types then select Drives and Clipboard . For better security you can also choose Disable device redirection for all except devices for smart devices . Click Next .
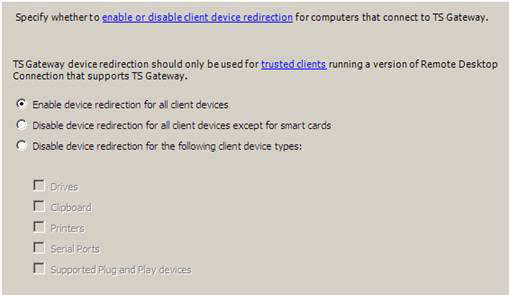
Figure 22
-
On the Summary of TS CAP Settings page , read the results of your selections, then click Finish .
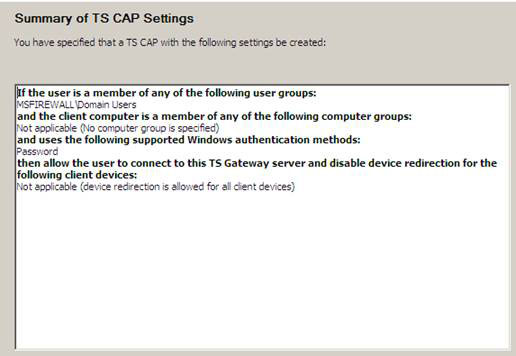
Figure 23
- Click Close on the Confirm Policy Creation page
RAP stands for Resource Authorization Policy, which is the policy we need to create. RAP is used to control which Terminal Server can be accessed via Terminal Services Gateway.
Follow the steps below to create a RAP:
-
Click the Resource Authorization Policies button in the left pane of the TS Gateway Manager console. In the right pane of the interface, click the arrow to the right of the Create New Policy link and then click Wizard .
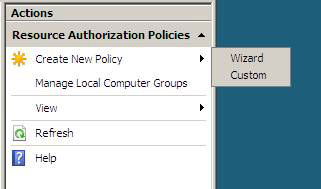
Figure 24
-
On the Authorization Policies page, select the Create only a TS RAP option.
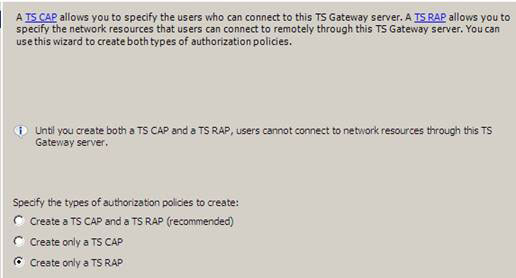
Figure 25
-
On the Resource Authorization Policy page, name RAP in the Enter a name box for the TS RAP . In this example we will name RAP as General RAP . Click Next .
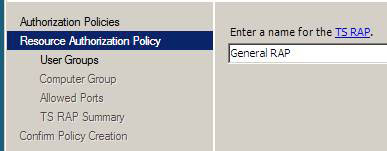
Figure 26
-
In the User Groups page, select the user groups RAP will apply. This will allow you to make more informed adjustments about which users have access to Terminal Servers. Some groups may be allowed to access Terminal Server A and some may want to access Terminal Server B. RAP allows you to implement this type of control. In this example, click the Add Group button and add the Domain Users group. Click Next .
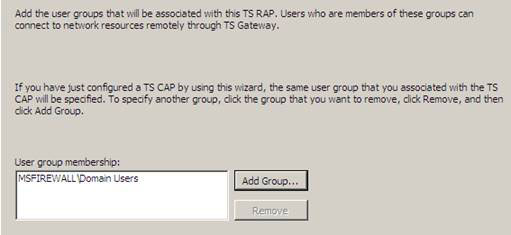
Figure 27
-
On the Computer Group page, you have an option to define which Terminal Servers can be accessed through this RAP. You also have the option of selecting a group of Active Directory defined computers, or you can create a TS Gateway management group. In this example, since there is only one Terminal Server, we choose the simplest option, Allow users to connect to any network resource (computer). This option will allow users to connect to all Terminal Servers in the network. Click Next.
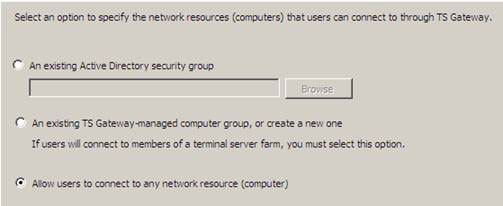
Figure 28
-
On the TS Rap summary page, confirm your settings and click Finish .
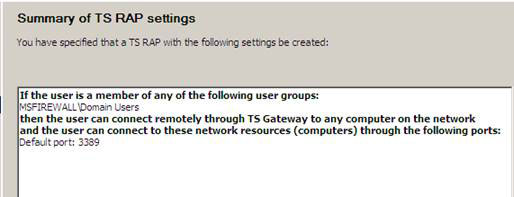
Figure 29
-
Click Close on the Confirm Policy Creation page
-
Click on the server name in the left pane of the console. You will then see that there are no more issues that we need to manage in the middle pane. Now TS Gateway is ready to manage new incoming connections to the Terminal Server in the network.
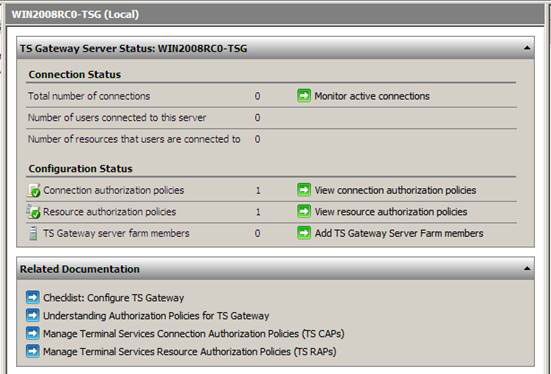
Figure 30
If you're at home, Terminal Server and TS Gateway are now configured and ready to perform some other tasks. The final step here is to configure the RDP client on the Vista computer. We need to configure the Terminal Server name of the client to be connected and the name of the Terminal Services Gateway computer that will be used for the Terminal Server.
Note :
We have configured the Vista client with an HOSTS file item tsg.msfirewall.org so that it will identify the Terminal Services Gateway name for the IP address of the external interface of the NAT device on the front of the network.
Follow the steps below to configure RDP client on Windows Vista:
-
On the Vista computer, click the Start button, then click Accessories . Double-click Remote Desktop Connection .
-
In the Remote Desktop Connection dialog box , in the General tab, enter the computer name of the Terminal Server in the Computer text box . Enter the user name in the User name text box. If you want the client to save this important information, check the Allow me to save credentials checkbox .
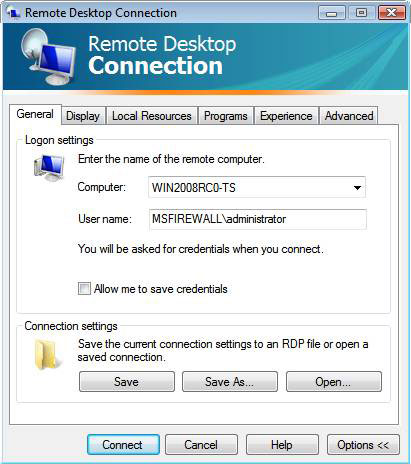
Figure 31
-
Click the Advanced tab. In Server authentication , Warn me must be selected. Click the Settings button in the Connect from anywhere Connect from anywhere section.
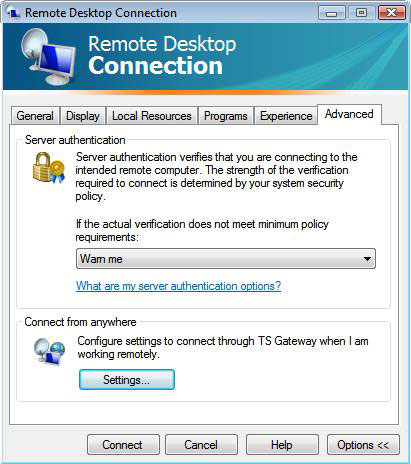
Figure 32
-
In the TS Gateway Server Settings dialog box , select the Use these TS Gateway server settings option . Enter the name of the TS Gateway in the Server name box. With the Logon method , select Ask for password (NTLM) . Note that the Automatically detect TS Gateway server settings option will allow you to configure the RDP client to pull its settings through Group Policy. Click OK .
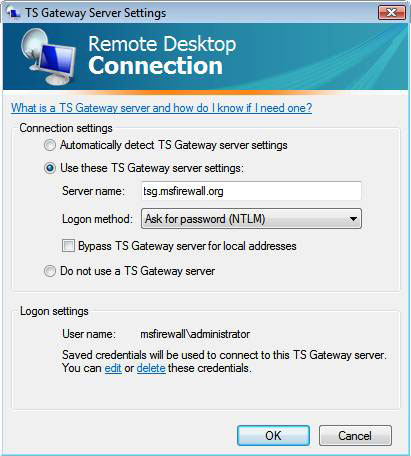
Figure 33
-
Click on the General tab, then click Connect .

Figure 3 * 4
-
A Windows Security dialog box will appear. Enter your password then click OK .
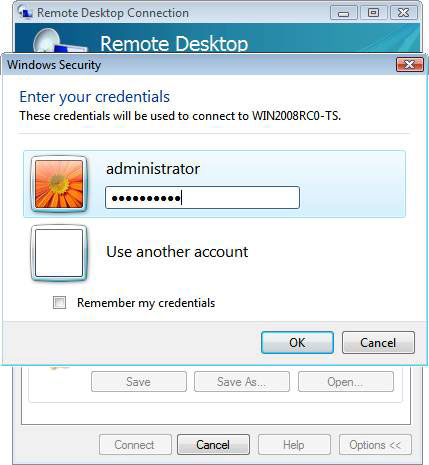
Figure 35
-
The Terminal Services session will open and you can see the desktop and running applications for your account in the Terminal Services session.

Figure 36
-
Go to the TS Gateway and click on the Monitoring button in the left pane of the Terminal Services Gateway console. Here you can see information about Terminal Services sessions going through TS Gateway.
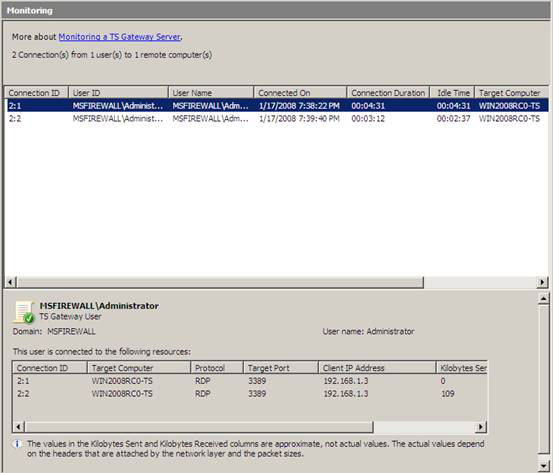
Figure 37
In the second part of this series, we installed and configured the TS Gateway and RDP clients. Then connect to the TS Gateway and Terminal Server via TS Gateway. We have also seen that the TS Gateway node test provides a lot of useful information about who is connecting to the Terminal Server through the TS Gateway.
- Configuring Terminal Services Gateway of Windows Server 2008 (Part 1)
- Configure Windows Server 2008 to remotely access SSL VPN Server (Part 2)
- Installing, configuring, and testing Exchange 2007 CCR on Mailbox Server (Part 2)
- Instructions for fixing 502 Bad Gateway error
- Configuring the Lightweight Directory Service service - Part 2
- HOW TO INSTALL ISA SERVER ENTERPRISE 2000 - Part II
- Installing, configuring, and testing Exchange 2007 CCR on Mailbox Server (Part 3)
- Configuring Exchange Client Access with ISA 2006 (Part 2)
- Deploy QoS on Windows Server 2012 (Part 1)
- How to fix 502 bad gateway error
- How to Convert a Doc File to a Docx File
- How to Download Microsoft Word
- How to Insert Fillable Fields on Word on PC or Mac
- How to Copy and Paste in Microsoft Word
- How to Protect a PDF File from Copying
- How to Type in Korean on a Computer
- How to Recover Word Documents
- How to Reinstall Wireless Drivers
- How to Connect a Wireless Mouse
- How to Trim a Video on PC or Mac
-
 Create an AI voiceover for poems and inspiring stories.
-
Instructions on creating a Froggy Jumps game on Educaplay
-
How to make a piano game using Scratch
-
Instructions on how to add ChatGPT to Google Sheets
-
How to rotate any page horizontally in Word
-
How to install SPSS on a MacBook: A step-by-step guide.
 Create an AI voiceover for poems and inspiring stories.
 Instructions on creating a Froggy Jumps game on Educaplay
 How to make a piano game using Scratch
 Instructions on how to add ChatGPT to Google Sheets
 How to rotate any page horizontally in Word
 How to install SPSS on a MacBook: A step-by-step guide.