How to install Owncloud server on Windows 10 (WSL)
Owncloud server is an open source cloud storage solution with multimedia playback and file sharing capabilities.
- Installing Owncloud server on Windows 10 via Ubuntu
- Step 1: Activate Windows subsystem for Linux (WSL)
- Step 2: Install Ubuntu 18.04 Linux application
- Step 3: Install Apache, MySql / MariaDB plus PHP on Windows 10
- Step 4: Check the installation of Windows 10 Apache
- Step 5: Download Owncloud server through the repository on the command line
- Step 6: Create Owncloud configuration file for Apache
- Step 7: Create symbolic link (symlink) for Owncloud
- Step 8: Install additional modules
- Step 9: Create MySQL or MariaDB database for Owncloud
- Step 10: Install, set up and configure Owncloud server on Windows 10
- Step 11: Login to Owncloud server
Owncloud server is an open source cloud storage solution with multimedia playback and file sharing capabilities. Owncloud server can be installed on the Linux platform without problems, providing consistent performance and stability for the system. However, users familiar with Windows operating systems will want to install Owncloud server with Windows' IIS web server or third-party software such as XAMMP or WAMP server.
In this guide, TipsMake.com will not use any of them to install Owncloud server on Windows 10, as well as any kind of virtual machine software like Virtualbox or VMware. Instead of the traditional method, the article will use Windows subsystem for Linux (WSL) for better performance and stability. The Linux environment application that the article will use is Ubuntu. The latest version of Owncloud while this tutorial is Owncloud 10.1.0. Let's learn how to do it!
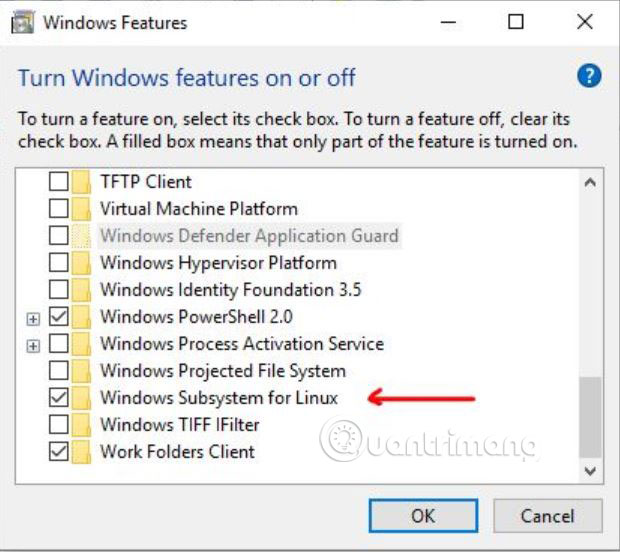
Step 1: Activate Windows subsystem for Linux (WSL)
To enable Windows subsystem for Linux on Windows 10, go to the Search box , enter Turn Windows feature on or off , click when it appears and turn on the WSL (Windows subsystem for Linux) feature: For more information about This, please refer to the article: Running Linux on Windows 10 without a virtual machine, here are 18 things you should know.
Step 2: Install Ubuntu 18.04 Linux application
From the Windows 10 search box or from the program list, look for Microsoft Store. When the Microsoft Store opens, search for Ubuntu 18 to download and install. After installation, click the Launch button , reopen the command screen or bash Ubuntu, from which you can use all Ubuntu commands, except for some direct commands on Windows 10.

Step 3: Install Apache, MySql / MariaDB plus PHP on Windows 10
Before installing Owncloud 10.1.0. We need to set up a web server environment that is basically LAMP setup. This is the command you need to execute to install Apache, PHP and MariaDB. Copy and paste the command below by right-clicking and then pressing Enter .
sudo apt-get install apache2 mariadb-server libapache2-mod-php7.2 sudo apt-get install php7.2-gd php7.2-json php7.2-mysql php7.2-curl php7.2-mbstring sudo apt-get install php7.2-intl php-imagick php7.2-xml php7.2-zip
Step 4: Check the installation of Windows 10 Apache
To check if the Apache server is working, visit the Windows 10 browser and enter http:/// localhost /, http://127.0.0.1/ or the IP address of your Windows 10 local computer. You can find the IP address by typing ifconfig. When you enter the IP address, the Apache test page will open. That means everything is fine and it's time to move on to the next step.

Step 5: Download Owncloud server through the repository on the command line
You can download Owncloud archive directly from its website but here, for example, is using the command line, so it would be reasonable to use the command line tool to download the Owncloud server file.
sudo -i wget -nv https://download.owncloud.org/download/repositories/production/Ubuntu_18.04/ Release.key -O Release.key apt-key add - < Release.key echo 'deb http://download.owncloud.org/download/repositories /production/Ubuntu_18.04/ /' > /etc/apt/sources.list.d/owncloud.list apt-get update apt-get install owncloud-files
The above commands will automatically download and extract Owncloud files in the Apache directory .
Step 6: Create Owncloud configuration file for Apache
Now, create a configuration file Owncloud using the following command:
nano /etc/apache2/sites-available/owncloud.conf
And then add the following lines to the configuration file to point the Apache root directory to Owncloud.
Alias /owncloud "/var/www/owncloud/" Options +FollowSymlinks AllowOverride All Dav off SetEnv HOME /var/www/owncloud SetEnv HTTP_HOME /var/www/owncloud
After adding the above lines, press Ctrl + O to write the file, then press Ctrl + X to save and exit.

Step 7: Create symbolic link (symlink) for Owncloud
To 'tell' Apache about Owncloud configuration, we will create a reference or symbolic link with the following command:
ln -s /etc/apache2/sites-available/owncloud.conf /etc/apache2/sites-enabled/owncloud.conf
Step 8: Install additional modules
Adding these additional modules to Owncloud works better:
a2enmod headers a2enmod env a2enmod dir a2enmod mime a2enmod unique_id
After adding modules, restart the Apache server with the command:
sudo service apache2 restart
Step 9: Create MySQL or MariaDB database for Owncloud
First of all, stop and restart MySQL / MariaDB:
sudo /etc/init.d/mysql stop sudo /etc/init.d/mysql start
Now, create a MySQL user and database for Owncloud:
sudo mysql
The example is creating a database with the name 'owncloud'. You can use some other names if you want.
CREATE DATABASE owncloud;
Now, create a user with a password and also assign all the rights of the database created above to that user. Here, the example is creating a user whose name and password is h2smedia. You can use your own username and password:
GRANT ALL ON owncloud.* to 'h2smedia'@'localhost' IDENTIFIED BY 'enter_your_password';
Flush privilege activity:
FLUSH PRIVILEGES;
Exit MySQL with the command:
exit

Step 10: Install, set up and configure Owncloud server on Windows 10
After repeating all the above steps, visit the browser and enter http:/// localhost /, http://127.0.0.1/ or the IP address of your Windows 10 local computer. Like what you did while checking whether Apache worked or not in this article.
However, this time you will see the configuration and setup screen of Owncloud server instead of the Apache screen.
Create an admin account for Windows 10 to install Owncloud. Just enter any user name and password for the same account you want to specify as an admin account.
Immediately after the admin account, you will see the storage option and the database. Click on it and select the MySQL / MariaDB tab . Then add the MySQL database details created above, ie the username and password for the database is owncloud in this case.
Finally, when you have provided all information to Owncloud, scroll down and click the Finish Setup button.

Step 11: Login to Owncloud server
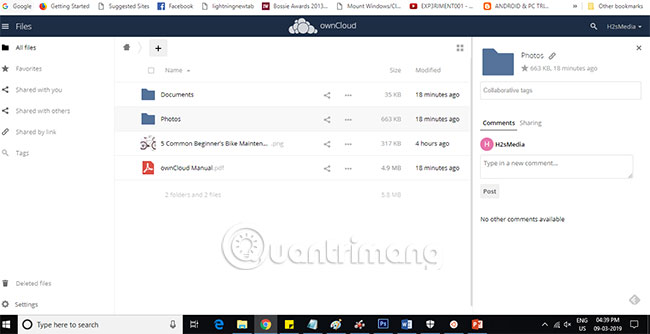
After you click the Finish Setup button, Owncloud will take a few seconds to authenticate all the details provided and then give you a login page.
Log in to Owncloud server using the admin account you created above.
As you know, Owncloud also provides a client application that can be used on different operating systems to synchronize files between PC / smartphone and Owncloud server.
In the first screen that appears, click an operating system where you want to download the Owncloud client application.

In this way, readers can easily install Owncloud server on Windows 10 to achieve high performance and stability, without using any XAMMP or WAMP software.
Hope you are succesful.
- How to install Nextcloud server on Windows 10
- How to install ownCloud on Windows
- How to install ownCloud on Linux
- Instructions for installing Windows Server 2016 on Windows 10
- Instructions for installing Windows Server 2012 step by step
- How to install IIS in Windows Server 2012
- Steps to install Windows Server 2022 on a virtual machine
- How to install a VPN on Windows Server 2019
- How to install and use IIS on Windows Server 2019
- How to install software for clients from Windows Server 2012 R2 using Group Policy
- How to Install Arch Linux in Windows Subsystem for Linux
- 6 Reasons You Should Try Windows Subsystem for Linux (WSL)
- How to completely uninstall WSL on Windows 10/11
- You Don't Need Microsoft Windows Subsystem for Linux (WSL): Here's Why!
- 5 reasons to use Linux desktop instead of WSL
- Windows Subsystem for Linux (WSL) is now free to download from the Microsoft Store Windows 11
- How to install Windows Subsystem for Linux (WSL) on Windows 11
- How to reset WSL user password
- Linux GUI applications can run on Windows 10
- How to update from WSL to WSL 2 in Windows 10
 How to turn Raspberry Pi into a personal cloud server
 How to install ownCloud on Windows
 Awesome Self-hosted options replace Dropbox
-
 Free Tools
- CSS Minifier and Compressor
- HTML Minifier
- JavaScript Minifier
- Json Minifier
- SQL Queries Minifier
- XML Minifier
- Password Generator
- uuid Generator
- Hash Generator
- Lorem Ipsum Generator
- QR Code Generator
- QR Code Scanner
- Barcode Generator
- Meta Tag Generator
- Slug Generator
- Placeholder Image Generator
- HTML Table Generator
- Markdown Table Generator
-
System
-
Mac OS X
-
Hardware
-
Game
-
Tech info
-
Technology
-
Science
-
Life
-
Application
-
Electric
-
Program
-
Mobile