How to fix Windows 10 image with DISM
If the Windows image is corrupted, you can use the Deployment Imaging and Servicing Management (DISM) tool to update the file and fix the problem.
Table of Contents
For example, you can use DISM to fix Windows 10 Component store error (Windows core feature stores all operating system-related system files grouped by component and as hard links) when the command sfc / scannow cannot repair corrupted or modified files due to the corrupted Component store.
The DISM / Cleanup-Image tool saves its log files to the following file locations.
C:WindowsLogsCBSCBS.log C:WindowsLogsDISMdism.log
This article will guide you how to perform Inbox Corruption Repair with DISM / Cleanup-Image tool to fix Component store error on Windows 10.
Note: You must be logged in as an administrator to be able to perform Inbox Corruption Repair with the Deployment Imaging and Servicing Management (DISM) tool.
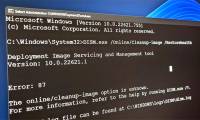
1. Run the DISM / Cleanup-Image tool from the Command Prompt
Step 1. Open Command Prompt as admin.
Step 2. Perform Step 3, Step 4, Step 5 (recommended), Step 6 or Step 7 below for the DISM command you want to use.
Step 3 . Use the / CheckHealth command
You only use the / CheckHealth command to check that the flagged image is corrupted due to an unsuccessful and repairable process. This is a quick way to see if the file is corrupted or not. This command does not correct errors or create records. And quick run time command.
In the Command Prompt, copy and paste the command below, then press Enter and go to Step 8.
Dism /Online /Cleanup-Image /CheckHealth

Step 4. Use the / ScanHealth command
Use the / ScanHealth command to scan the image for Component store errors. Nor does this command fix any errors. It only checks component store errors and writes errors to the log file. This command may take 5 to 10 minutes to complete.
In the Command Prompt, copy and paste the command below, then press Enter and go to Step 8.
Dism /Online /Cleanup-Image /ScanHealth

Step 5 . Use the / RestoreHealth command
Use the / RestoreHealth command to scan the image for Component Store errors, automatically repair them, and write them to a log file. This command may take 10 to 15 minutes or even several hours to complete depending on the level of error.
You need an internet connection to run this command. If the order didn't succeed, you can follow Step 6 or Step 7 below.
In the Command Prompt, copy and paste the command below, then press Enter and go to Step 8.
Dism /Online /Cleanup-Image /RestoreHealth

Step 6 . Use the command / RestoreHealth / Source: wim
Use the command / RestoreHealth / Source: wim to locate the install.wim file which is the source of a good file version that can be used to fix errors. This process can take 10 to 15 minutes, even hours to complete depending on the level of error.
This command may be useful if Step 5 above cannot repair the Windows image. The install.wim file will be in the Sources folder of the mounted Windows 10 ISO file. If there is an install.esd file instead of the install.wim file, perform Step 7 instead of this step.
Locate the Windows 10 ISO file with install.wim in the sources directory of the mounted ISO file and the index number for the Windows 10 version using the command below in the Command Prompt as admin:
dism /get-wiminfo /wimfile::sourcesinstall.wim
Replace Drive Letter with the actual drive letter of the mounted ISO file.
In the Command Prompt, type the command below you want to use, then press Enter and go to Step 8.
Dism /Online /Cleanup-Image /RestoreHealth /Source:wim:Full Path to install.wim file:
Or to prevent DISM from using Windows Update for online images:
Dism /Online /Cleanup-Image /RestoreHealth /Source:wim:Full Path to install.wim file: /limitaccess
Note : in the above command is the index number of your system version of Windows 10.

Step 7. Use the command / RestoreHealth / Source: esd
Use the / RestoreHealth / Source: esd command to locate the install.esd file as the source of a good file version that can be used to fix errors. This process may take more than a dozen minutes to several hours depending on the level of error.
Locate the Windows 10 ISO file with install.esd in the sources directory of the mounted ISO file and the index number for the Windows 10 version using the command below in the Command Prompt as admin:
dism /get-wiminfo /wimfile::sourcesinstall.esd
Replace Drive Letter with the actual drive letter of the mounted ISO file.
In the Command Prompt type the following command and press Enter , then go to Step 8.
Dism /Online /Cleanup-Image /RestoreHealth /Source:esd:Full Path to install.esd file:
Or to prevent DISM from using Windows Update for online images:
Dism /Online /Cleanup-Image /RestoreHealth /Source:esd:Full Path to install.esd file: /limitaccess
in the above command is the index number of the version of Windows 10 on your system.

Step 8 . If you follow Step 5, Step 6 or Step 7, you should restart the computer.
2. Run the DISM / Cleanup-Image tool in PowerShell
Step 1 . Open PowerShell as admin.
Step 2 . Execute Step 3, Step 4, Step 5, Step 6, or Step 7 to execute the DISM command you want to use.
Step 3 . Use the / CheckHealth command
In PowerShell, enter the following command, press Enter and go to Step 8.
Repair-WindowsImage -Online -CheckHealth

Step 4 . Use the / ScanHealth command
In PowerShell, enter the following command and press Enter , go to Step 8.
Repair-WindowsImage -Online -ScanHealth
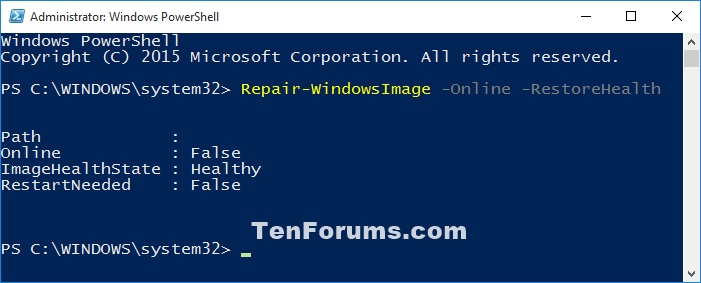
Step 5 . Use the / RestoreHealth command
In PowerShell, enter the following command and press Enter , go to Step 8.
Repair-WindowsImage -Online -RestoreHealth
Step 6 . Use the command / RestoreHealth / Source: wim
Similarly, you need to identify the ISO Window 10 file with install.esd and find the index number for Windows 10 version.
Paste the following command into PowerShell:
Repair-WindowsImage -Online -RestoreHealth -Source "Full Path to install.wim file:"
Or to prevent DISM from using Windows Update for online images.
Repair-WindowsImage -Online -RestoreHealth -Source "Full Path to install.wim file:" -LimitAccess
Replace in the above command with a real index number.
Step 7 . Use the command / RestoreHealth / Source: esd
Paste the following command into PowerShell and press Enter .
Repair-WindowsImage -Online -RestoreHealth -Source "Full Path to install.esd file:"
Or to prevent DISM from using Windows Update for online images.
Repair-WindowsImage -Online -RestoreHealth -Source "Full Path to install.esd file:" -LimitAccess
Step 8 . Restart the computer after performing Steps 5, 6, and Step 7.
I wish you successful implementation!
Was this article helpful?
Your feedback helps us improve.
Related Articles
 How to use DISM to copy and restore images FFU6 minutes read
 4 ways to fix DISM error 87 on Windows 10/114 minutes read
 Instructions for using DISM to fix Windows 11 errors3 minutes read
 Difference between CHKDSK, SFC and DISM in Windows 105 minutes read
 How to convert ESD files to WIM using DISM on Windows 107 minutes read
 4 tips to fix hidden Windows errors and quickly recover corrupted files.5 minutes read
Reader Comments 0
Sign in with email or Google to join the discussion.