Table of Contents
A blurry laptop screen and a fixed white spot are usually different problems. If text and app windows look uniformly fuzzy, check the display resolution, Windows scaling, app compatibility, and graphics driver. If one bright patch or pixel stays in the same place, especially when the image changes, the panel is more likely to have a hardware fault.
First, identify what is actually blurry
These quick tests prevent unnecessary driver changes or repairs:
- Take a screenshot. View it on another device. If the blur appears in the screenshot, the cause is probably an app, scaling, rendering, or source-image issue. If the screenshot is sharp elsewhere, inspect the display hardware and its settings.
- Open several apps. If only one is blurry, fix that app. If everything is blurry, start with resolution, scaling, and drivers.
- Connect an external monitor or TV. A sharp external image points toward the laptop panel or its cable. Blur on both displays points toward software or the graphics system.
- Show solid red, green, blue, white, and black screens. A mark that never moves may be a stuck pixel, pressure spot, backlight issue, or panel damage. TipsMake's screen color test can help.
Use the display's recommended resolution
Open Settings > System > Display. Under Display resolution, choose the value marked Recommended. LCD panels look sharpest at their native resolution; a lower non-native resolution may be stretched and appear soft.
If multiple displays are connected, select the affected display first. Confirm that Windows has not duplicated a low-resolution mode from another monitor. TipsMake's screen-resolution guide explains the setting in more detail.
Check Windows scaling without forcing 100%
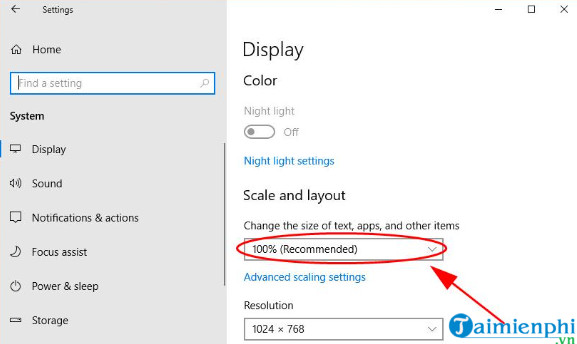
On the same Display page, set Scale to the recommended percentage. A high-resolution laptop may correctly recommend 125%, 150%, or more; forcing 100% can make text uncomfortably small and does not automatically make apps sharper.
Sign out and back in after a scale change if an older desktop app does not redraw correctly. Avoid arbitrary custom scaling until you have tested the recommended option.
The following screenshots show the Windows 10 interface. Current Windows 11 builds place resolution and scaling together under Settings > System > Display.
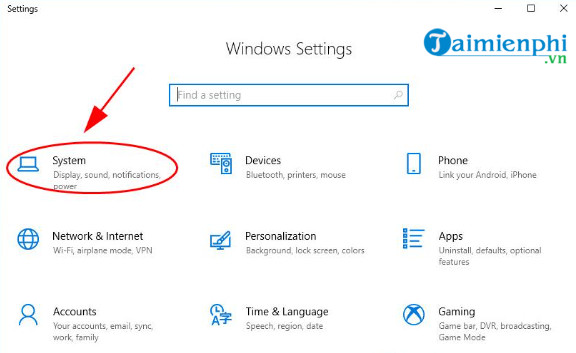
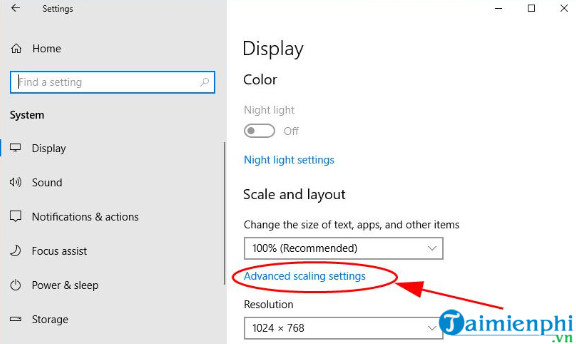
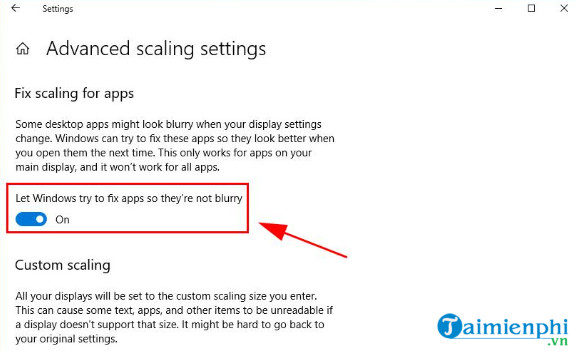
Windows 10 may offer Let Windows try to fix apps so they're not blurry under Advanced scaling settings. Turn it on, then reopen the affected app. That exact switch may not appear on every Windows 11 version.
Fix one blurry desktop app
If the desktop and other apps are sharp:
- Install the latest supported version of the app.
- Close and reopen it after changing the display scale or moving it between monitors with different scaling.
- Right-click the app shortcut, select Properties > Compatibility > Change high DPI settings, and test Override high DPI scaling behavior only if the developer recommends it.
- Try the available scaling options one at a time. Reset the override if text becomes smaller, clipped, or less sharp.
Old apps that are not DPI-aware may remain imperfect on high-density screens. Browser or document zoom changes page content, while Windows Scale changes the interface; use the control that matches the problem.
Tune blurry text with ClearType
Search Windows for Adjust ClearType text. Make sure ClearType is enabled, then choose the clearest text sample on each page of the wizard. This affects text rendering rather than photographs, videos, or a bright hardware spot.
Also check the app's own font smoothing and zoom. A compressed image, low-resolution video, or remote desktop session cannot be restored simply by changing Windows scaling.
Check cables only when a separate monitor is affected
The original advice to inspect a USB cable does not apply to most built-in laptop displays. For an external monitor, however, reseat the HDMI, DisplayPort, or USB-C cable at both ends. Try a known-good cable and another supported port without exceeding the monitor's resolution or refresh-rate limits.
If the external image flickers or shows artifacts, test at the monitor's recommended resolution and a standard refresh rate before replacing hardware.
Update the supported graphics driver
A driver problem is more likely if the blur began after an update, the recommended resolution is missing, or both the laptop panel and external display are affected.
- Install pending Windows updates and restart.
- Identify the laptop's exact model and download its supported graphics package from the manufacturer's support page.
- For switchable-graphics laptops, update the integrated GPU and, when required, the discrete GPU.
- If the problem started immediately after a driver update, open Device Manager, view the display adapter's properties, and use Roll Back Driver when available.
Do not uninstall every display adapter or use a generic driver-updater program as the first step. A clean reinstall is appropriate only after you have a compatible replacement package ready.
Legacy Windows 10, 8, and 7 screenshots
The screens below are retained for older systems. Windows 10's Display page includes Scale and layout settings.
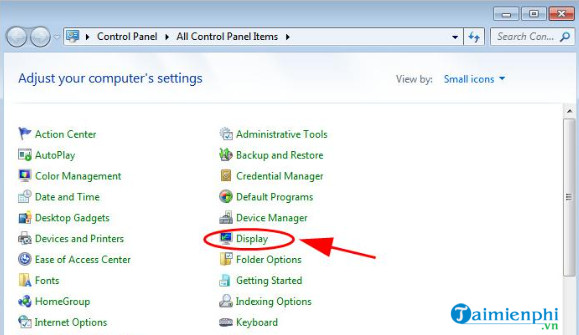
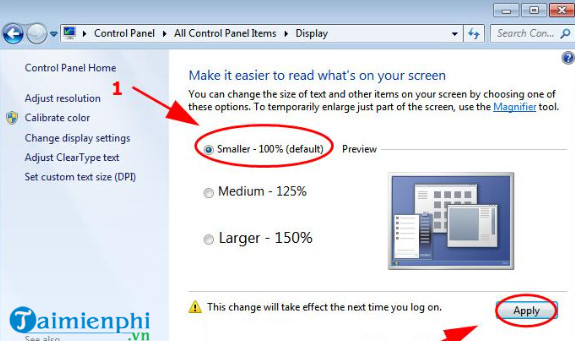
Windows 8 and Windows 7 used Control Panel display-size choices. These systems are no longer suitable for normal internet-connected use without a supported security plan.
What a fixed white or bright spot can mean
| Appearance | Likely category | Next step |
|---|---|---|
| One red, green, blue, or bright pixel | Stuck or defective pixel | Run solid-color tests and check the maker's pixel warranty |
| A diffuse bright patch | Pressure damage, backlight layers, or panel fault | Stop pressing the screen and seek hardware assessment |
| Glow mainly near dark-screen corners | Viewing-angle effect or uneven backlight | Compare straight-on at normal brightness; document severe unevenness |
| Milky area that changes when the lid moves | Panel or display-cable fault | Back up data and arrange service |
| White screen over the entire panel | Different fault involving signal, cable, or panel electronics | Test an external display and follow hardware diagnostics |
Do not press, rub, tap, or heat the panel in an attempt to remove a bright spot; that can spread the damage. Avoid rapidly flashing untrusted “pixel repair” pages if you are sensitive to flashing light. Read TipsMake's focused guide to bright spots and blotchy laptop screens and use the laptop screen testing checklist to document the fault.
When to arrange repair
Seek service when a spot is growing, the panel has lines or flicker, the image changes as the lid moves, physical damage is visible, or the display is blurred before Windows loads. Photograph the defect against several solid colors and check the manufacturer's warranty terms; pixel thresholds and coverage vary by model and region.
Back up important files before repair. If an external monitor remains clear, it can be a temporary workaround, but it does not correct a damaged laptop panel or cable.
Related Articles
 What Causes a Laptop Screen to Be Dark or Blurry?7 minutes read
 How to Detect Dead Spots on the Desktop Screen6 minutes read
 Cause the Laptop Screen Is Blotchy and How to Fix It5 minutes read
 Laptop Screen Error Is Blank - Causes and Solutions9 minutes read
 Causes and How to Fix Dark, Dim Laptop Screen7 minutes read
 Why Is the Laptop Screen White? How to Fix It: Causes and Fixes7 minutes read
Reader Comments 0
Sign in with email or Google to join the discussion.