Table of Contents
This updated guide explains how to Enable IP Routing through clear steps, practical examples, and important checks that help prevent common errors.
Method 1 of 3:
How to Enable IP Routing in Windows NT
-
 Start the registry editor, which is a tool that allows you to make changes to Windows programs. Open the start menu, and type REGEDT32. EXE into the search box. Hit enter, and select the correct name from the list. You can also click "Run," and type REGEDT32. EXE to open it.
 -
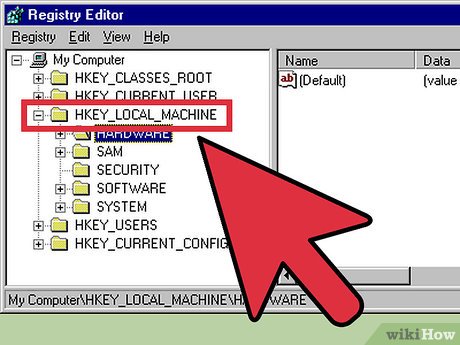 Find the registry key that reads: HKEY_LOCAL_MACHINESYSTEMCurrentControlSetServicesTcpipParameters, and then choose "Add Value."
 -
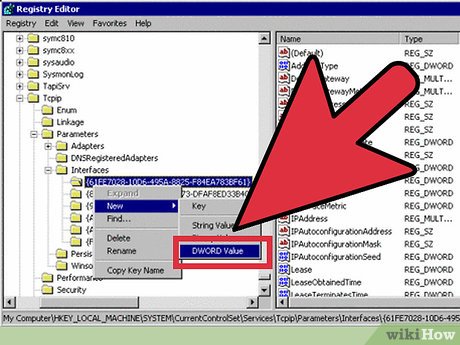 Enter the following values into the corresponding locations in order to enable IP routing through Windows NT:
- Value Name: IpEnableRouter
- Data Type: REG_DWORD
- Value: 1
-
 Exit the program, and then restart your computer and Windows NT.
Method 2 of 3:
How to Enable IP Routing in Windows XP, Vista, and Windows 7
-
 Start the registry editor. Select the start menu, and enter REGEDIT. EXE into either the "Run" program or the search box. The run program will be available for Windows XP operating systems and the search box will be used for Vista and Windows 7 operating systems.
 -
 Find the sub key that reads: HKEY_LOCAL_MACHINESYSTEMCurrentControlSetServicesTcpipParameters. Scroll down or by use the search option to locate it. Make sure that you select the right one, especially if you haven't backed up your registry recently.
 -
 Set the registry values into the corresponding section to enable IP routing in Windows XP:
- Value Name: IpEnableRouter
- Value Type: REG_DWORD
- Value Data: 1. This will enable transmission control protocol and IP forwarding, also called TCP/IP forwarding, for all of the connections installed on your computer. TCP/IP forwarding is essentially the same thing as IP routing.
-
 Exit the registry editor to complete IP routing in Windows XP and other Windows operating systems.
Method 3 of 3:
Another Easier Method for Windows 7
-
 Go to Run type "services. msc" without quotes
 -
 Search the service "Routing and Remote Access", it will be disable by default.
 -
 To enable it right click it and then select properties and change the "Startup Type" to
- "Manual" if you may need to start it when you require or
- "Automatic" to start it whenever computer boots on else
- "Automatic delayed" if you want it to initiate a little bit later after the other services in your computer are started at boot time.
-
 Now apply and press ok
 -
 Now right click the Routing and Remote access service and press start and let the progress bar complete.
 -
 Now go to run and type "cmd" to get command prompt and type "ipconfig /all". and you should see this line "IP Routing Enabled........: Yes" which will be the third line. This means Routing has been enabled.
- You can disable by changing the startup type to disabled and check "ipconfig /all" to see the status.
-
 Note: The services method was tried in Win 7 Ultimate Other versions may not have that service listed This also works on Windows Server 2012 R2 Datacenter
FAQ
What is the easiest way to Enable IP Routing?
Start with the requirements in this guide, then follow each step in order. Check the result after every major change so problems are easier to identify.
Can beginners follow these instructions?
Yes. The process is organized into practical steps, and you can repeat any step before moving forward.
What should I check if the method does not work?
Confirm your software or device version, permissions, settings, file format, and internet connection when the task depends on online services.
Related Articles
 Anonymous Browsing: How to Browse Anonymously with Garlic Routing6 minutes read
 Set Up Static Routing Between the Router and Another Network Explained6 minutes read
 Windows Server 2008: Configure Windows 2008 Server IP Routing9 minutes read
 Routing and Filtering Network Traffic -- Part 140 minutes read
 How to Configuring Ripng Routing Protocol for Ipv64 minutes read
 Select the Connection to Use Through the Routing Table4 minutes read
Reader Comments 0
Sign in with email or Google to join the discussion.