How to Set up a Computer Network
This wikiHow teaches you how to set up a computer network for a group of Windows or Mac computers. You can set up a wireless network for a few computers, or you can use a wired connection if you're adding a large number of computers to a....
Method 1 of 4:
Using a Wireless Network on Windows
-
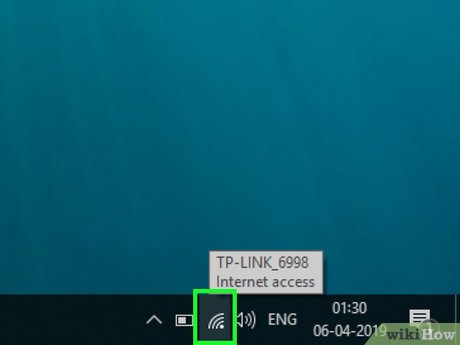 Click the Wi-Fi symbol. It's in the lower-right corner of the screen. A pop-up window will appear.
- If Wi-Fi is currently disabled, click the Wi-Fi button in the lower-left side of the pop-up window before proceeding.
- In some cases, you'll need to click the ^ icon in the lower-right side of the screen to see the Wi-Fi icon.
-
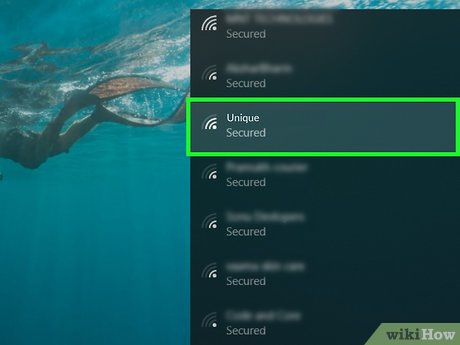 Select a network. Click the network to which you want to connect each of your network computers.
 -
 Click Connect. It's in the lower-right side of the network's name box.
 -
 Enter the network's password. Type in the network's password when prompted.
 -
 Click Next. It's below the network. As long as the password is correct, doing so will connect you to the network.
 -
 Connect other computers in the network to the Internet. For each computer that you want to use in your network, repeat the Wi-Fi connection process. Once each computer is connected to the Wi-Fi network, you can proceed with setting up file sharing.
 -
 Open Start. Click the Windows logo in the bottom-left corner of the screen.
-
 Type in control panel. Doing so will search your computer for the Control Panel app.
 -
 Click Control Panel. It's a blue rectangle icon at the top of the Start menu.
 -
 Click Network and Sharing Center. This option resembles a set of blue monitors.
- If you see "Category" in the upper-right side of the page, first click the Network and Internet heading on the main Control Panel page.
-
 Click Change advanced sharing settings. It's a link in the upper-left side of the page.
 -
 Check the "Turn on network discovery" box. This will ensure that your computer can interact with other computers that are plugged into the Internet source.
- You can also enable the "Turn on file and printer sharing" option and the "Allow Windows to manage homegroup connections" option if they aren't automatically selected.
-
 Click Save changes. It's at the bottom of the page.
 -
 Enable network discovery on the other network computers. Once each computer in the networked group has network discovery enabled in Control Panel, your wired network will be ready to use.
Method 2 of 4:
Using a Wireless Network on Mac
-
 Click the Wi-Fi symbol. It's in the top-right side of the screen. A drop-down menu will appear.
- If your Wi-Fi isn't enabled, click and then click Turn Wi-Fi On near the top of the menu instead.

- If your Wi-Fi isn't enabled, click
-
 Select a network. Click the Wi-Fi network to which you want to connect each computer in your network.
 -
 Enter the network's password. Type the password for the network into the "Password" field.
 -
 Click Join. It's at the bottom of the window. Doing so will connect your computer to the Internet.
 -
 Connect other network computers to the Internet. For each computer that you want to use in your network, repeat the Wi-Fi connection process. Once each computer is connected to the Wi-Fi network, you can proceed with setting up file sharing.
 -
 Open the Apple menu. Click the Apple logo in the top-left corner of the screen. A drop-down menu will appear.
-
 Click System Preferences…. It's near the top of the drop-down menu.
 -
 Click Sharing. You'll find this blue folder-shaped icon in the middle of the System Preferences window.
 -
 Check the "File Sharing" box. It's on the left side of the page. This will ensure that you can share files from your computer to other computers on the network.
- You can check any other file sharing options that you want to use for your network here as well.
-
 Close the System Preferences window. Your changes will be saved; the current computer is now set up for network sharing.
 -
 Enable file sharing on the other network computers. Each computer that's connected to your Internet source will need file sharing to be enabled. Once you've completed this process, your wireless network will be ready to use.
Method 3 of 4:
Using a Wired Network on Windows
-
 Make sure that you have the necessary hardware. You'll need an Internet source (e.g., a router) into which you can plug each individual computer, as well as Ethernet cables to connect the computers to the Internet source.
- Most standard routers only come with a few Ethernet ports, but you can buy network hubs that support upward of 10 connections.
- Make sure that you know the approximate distance from each computer to the Internet source. You'll need Ethernet cables that can span this distance.
-
 Set up the Internet source. Plug one end of an Ethernet cable into the "Internet" port on the back of the modem, then connect the other end of the cable to the "Internet" or "Ethernet" port on your Internet source.
- You'll also need to plug in the Internet source's power cable before proceeding.
-
 Plug each computer into the Internet source. Attach one end of an Ethernet cable to the square Ethernet port on your computer, then attach the other end of the cable to the Internet source.
- Typically speaking, you'll use desktop computers for a network, which means the Ethernet ports will be on the back of each CPU box.
-
 Open Start. Click the Windows logo in the bottom-left corner of the screen.
-
 Type in control panel. Doing so will search your computer for the Control Panel app.
 -
 Click Control Panel. It's a blue rectangle icon at the top of the Start menu.
 -
 Click Network and Sharing Center. This option resembles a set of blue monitors.
- If you see "Category" in the upper-right side of the page, first click the Network and Internet heading on the main Control Panel page.
-
 Click Change advanced sharing settings. It's a link in the upper-left side of the page.
 -
 Check the "Turn on network discovery" box. This will ensure that your computer can interact with other computers that are plugged into the Internet source.
- You can also enable the "Turn on file and printer sharing" option and the "Allow Windows to manage homegroup connections" option if they aren't automatically selected.
-
 Click Save changes. It's at the bottom of the page.
 -
 Enable network discovery on the other network computers. Once each computer in the networked group has network discovery enabled in Control Panel, your wired network will be ready to use.
Method 4 of 4:
Using a Wired Network on Mac
-
 Make sure that you have the necessary hardware. You'll need an Internet source (e.g., a router) into which you can plug each individual computer, as well as Ethernet cables to connect the computers to the Internet source.
- Most standard routers only come with a few Ethernet ports, but you can buy network hubs that support upward of 10 connections.
- Make sure that you know the approximate distance from each computer to the Internet source. You'll need Ethernet cables that can span this distance.
-
 Set up the Internet source. Plug one end of an Ethernet cable into the "Internet" port on the back of the modem, then connect the other end of the cable to the "Internet" or "Ethernet" port on your Internet source.
- You'll also need to plug in the Internet source's power cable before proceeding.
-
 Plug each computer into the Internet source. Attach one end of an Ethernet cable to the square Ethernet port on your computer, then attach the other end of the cable to the Internet source.
- Typically speaking, you'll use iMac computers for a network. This means that you'll find the Ethernet port on the back of the iMac's monitor.
- If you're using Mac laptops for your network, you'll need to buy a USB-C network adapter for your computer and then plug it into one of the USB-C slots on the side of your Mac, since Mac laptops no longer include Ethernet ports.
-
 Open the Apple menu. Click the Apple logo in the top-left corner of the screen. A drop-down menu will appear.
-
 Click System Preferences…. It's near the top of the drop-down menu.
 -
 Click Sharing. You'll find this blue folder-shaped icon in the middle of the System Preferences window.
 -
 Check the "File Sharing" box. It's on the left side of the page. This will ensure that you can share files from your computer to other computers on the network.
- You can check any other file sharing options that you want to use for your network here as well.
-
 Close the System Preferences window. Your changes will be saved; the current computer is now set up for network sharing.
 -
 Enable file sharing on the other network computers. Each computer that's connected to your Internet source will need file sharing to be enabled. Once you've completed this process, your wired network will be ready to use.