How to use Mojave's Dark Mode on Mac right now?
One of the most interesting and latest features in macOS Mojave is a special display mode called Dark Mode. Dark Mode brings changes to the interface of the application, making your eyes more comfortable, especially in low light environments.
One of the most interesting and latest features in macOS Mojave is a special display mode called Dark Mode. Dark Mode brings changes to the interface of the application, making your eyes more comfortable, especially in low light environments. However, Apple has not yet widely supported this Dark Mode, you have to wait until the third quarter of this year (2018) when the operating system is provided to the public, you can use it.
See also: macOS Mojave's Dark Mode makes Windows 10 embarrassed
However, you can still use this mode now with a little bit of computer tricks. This article will show you how to get this Dark Mode on your Mac.
Note : This trick requires users to download a special file, then change the computer in the Recovery console . If you are worried or do not like to change the system with untested files, you can stop here.
Dark Mode
Dark Mode is a dark color theme that is applied to part or whole system or for specific applications in macOS Sierra and higher version. When activated in this mode, the screen will turn into matte black, reducing eye strain for users. This makes it easier to use the device in the dark, especially at night.
The following method works on macOS Sierra or a higher version. This method will apply Dark Mode to root applications such as Safari, Finder, Text Edit, etc., and when done will need to apply to each individual application. When the application is closed, Dark Mode is activated, Dark Mode on that application is also disabled.
To use Dark Mode on a Mac, follow these steps:
Step 1. Turn off the SIP (System Integrity Protection) feature. This is a permanent change, but you can still revert. Follow these steps to turn off SIP:
See also: Why shouldn't you disable the System Integrity Protection feature on the Mac?
1. Turn off the Mac.
2. Press and hold Command + R to enter Recovery .
3. Turn on the Mac again and access Recovery .
4. After the Load Recovery , click on "Utilities -> Terminal " in the menu bar.
5. Type the following command into Terminal when it opens:
csrutil disable
and press Return .
6. Close Terminal and restart the Mac.
Step 2 . Download this DarkMode.zip file to your Mac.
Step 3 . Open the Finder and go to the Downloads folder, find " DarkMode.zip " and select it with your mouse.
Step 4 . Press Command + C to copy the file.
Step 5 . With the Finder as the active window, click ' Go -> Go to Folder ' in the Menu bar. Enter ' ~ / Library / Services ' in the Go to Folder window and click the Go button.
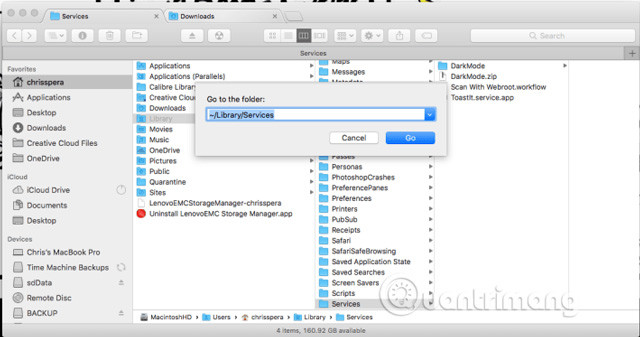
Step 6 . Press Command + V to paste a copy of Darkmode.zip into the Services folder.
Step 7 . Double click on the ZIP file. It will unzip inside Services and create a folder called DarkMode.
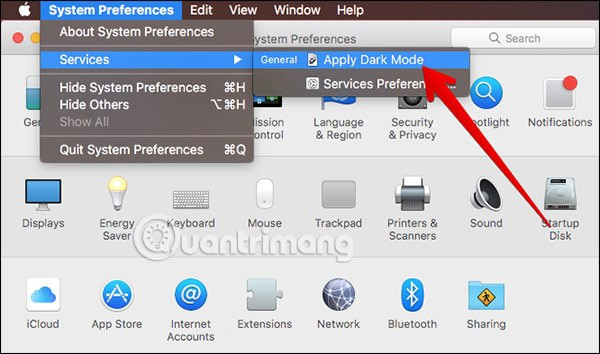
Step 8. Open the System application that wants to use Dark Mode.
Step 9 . In the Menu Program of the application, click on Service and then select ' Apply Dark Mode '. The standard color palette for that application will change.
I wish you all success!
See more:
- How to install the Dark Mode interface for all Windows 10 screens
- How to enable Dark Mode on Youtube
- Instructions for activating Dark Mode on macOS Sierra
- What is the dark mode (dark mode)? Benefits and harms that dark background mode brings?
- Why doesn't Dark Mode help improve battery life on your laptop?
- Experience the main Dark Mode mode on Android 9 Pie
- How to turn on Dark Mode on Chrome
- How to enable Dark Mode in Ubuntu 20.04 LTS
- How to turn on Dark Mode on Google Keep and Google Calendar
- How to activate Dark Mode on Windows 10?
- Android Q will have Dark Mode (Dark Mode) throughout the system
- Why you shouldn't use Dark Mode on your phone?
- How to turn on Dark Mode for Firefox
- Windows 11 adds dark mode to the Run dialog box along with a series of small improvements
- Change these settings on your iPhone for stunning nighttime photos!
- How does 'Night Mode' on smartphones work?
- How to enable dark mode (Night Mode) on Xbox
- These are the best night shots with the iPhone that Apple has just announced
- Samsung Galaxy S10 users are about to enjoy some of the unique features that are only available on the Note 10
- 10 latest features of macOS Mojave
- Instructions for activating Dark Mode on macOS Sierra
- How to turn on the dark background interface on iPhone applications
- Instructions on how to enable Night Mode on Android Nougat
-
 How to enable motion sickness reduction mode on iPhone
-
How to turn off vibration in silent mode on iPhone
-
How to enable and disable the temporary message deletion feature on Instagram.
-
What is Plan Mode in Cursor? How to use Plan Mode in Cursor?
-
What is airplane mode? How to turn on airplane mode on iOS and Android.
-
What is Safe Mode? How to quickly enter Safe Mode in Windows 10.
 How to enable motion sickness reduction mode on iPhone
 How to turn off vibration in silent mode on iPhone
 How to enable and disable the temporary message deletion feature on Instagram.
 What is Plan Mode in Cursor? How to use Plan Mode in Cursor?
 What is airplane mode? How to turn on airplane mode on iOS and Android.
 What is Safe Mode? How to quickly enter Safe Mode in Windows 10.