How to Digitize Analog Music Using Free Software
People digitize their analog music to play on devices and as backups to protect their record collections from excessive wear and tear.
- 1. Analog audio setup
- 2. Record music into DAW
- 3. Edit music before exporting
- 4. Export digital audio files
- Create new project
- Select audio input source
- Add stereo audio track
- Check recording levels
- Record audio
- Split audio into tracks
- Arrange start and end points
- Add noise reduction to audio
- Normalize files to maximize volume
- Audio output
People digitize their analog music to play on devices and as backups to protect their record collections from excessive wear and tear. Here's how to do it using two popular freeware solutions: GarageBand and Audacity.
1. Analog audio setup
To digitize analog music, you'll need to transfer the music to your computer via your computer's built-in sound card or an external audio interface. Once your device is connected, open your favorite Digital Audio Workstation (DAW) software and follow these steps:
Create new project
Apple users may want to use the excellent GarageBand software available on all iOS and Mac machines – GarageBand is a great DAW for beginners. So for GarageBand, go to New Project > Empty Project .
Windows and Linux users can opt for Audacity. While it may seem outdated compared to GarageBand and is limited to acoustic instruments, it is ideal for digitizing analog audio. A new project will automatically open upon launch.
Select audio input source
In GarageBand, select the audio track type for the mic or line input in the pop-up window. Next, select Input 1 + 2 from the drop-down menu for the stereo audio track.

In Audacity, select the Audio Setup button on the toolbar, hover over Recording Device , and select your audio input source.

Add stereo audio track
For GarageBand, click Create in the pop-up window and the stereo track will automatically be added to the arrangement window. For Audacity, right-click anywhere in the arrangement window and select Add Stereo Track .
2. Record music into DAW
The recording process is the same whether you're digitizing school notes, a single track, or an entire side of a cassette tape or recording. Be sure to test each time you start a new project to increase your chances of getting it right the first time.
Check recording levels
Start playing your audio. In GarageBand, if your input source is configured correctly, the meter in the top right panel will move with the audio level. Hold the volume button to the middle of zero and make sure the meter is not "clipping."
Clipping occurs when the audio is distorted and the light turns orange as the meter approaches the right side. If this happens, reduce the recording level on the input device (recorder or audio interface) until the audio level is consistently green and yellow.
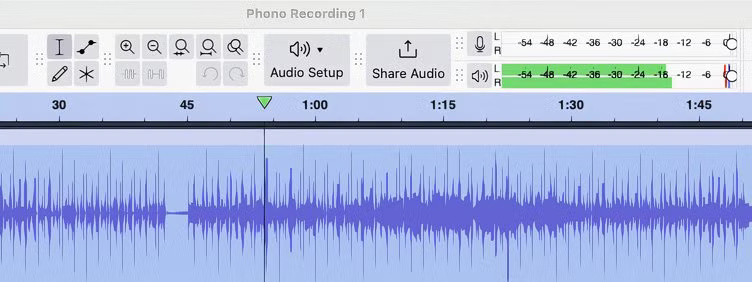
For Audacity, as your audio plays, the meter in the upper right of the window will change from green to yellow to red as the level increases. As the audio plays, adjust the volume of your input device until the meter is consistently green and yellow at minus 6dB.
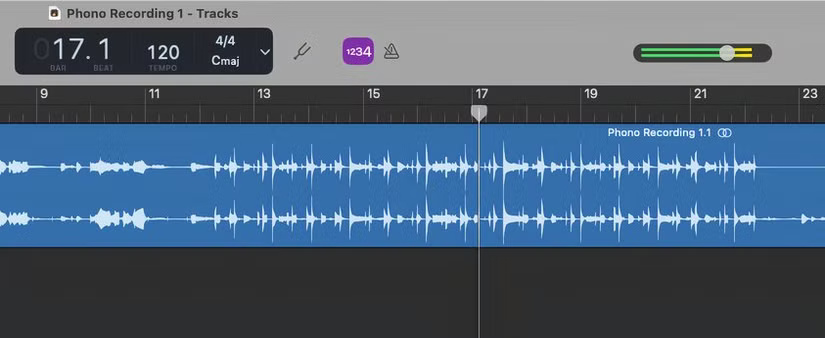
Record audio
To record audio in Audacity or GarageBand, click the red Record button at the top of the window and start playing your audio. The recording will be visualized as two sound waves representing a stereo signal as the audio plays. When the recording is complete, click the stop button and save your project.
If clipping occurs, delete the audio track, lower the input level, and start again.
3. Edit music before exporting
Before exporting the audio, you must split it into separate tracks and arrange each track to remove unwanted gaps at the start and end points. You can also edit the audio to improve the quality.
Split audio into tracks
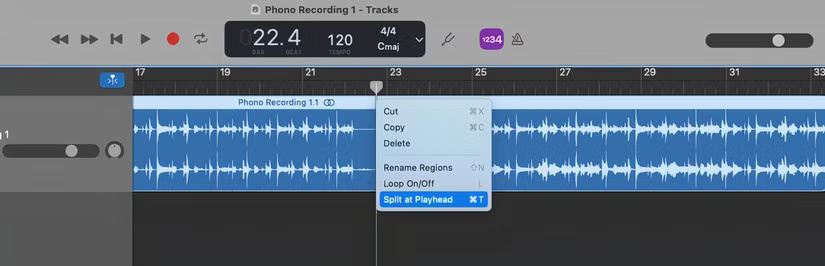
In GarageBand, drag your cursor to the end of each song (the sound wave that narrows between songs), right-click, and select Split at Playhead .
In Audacity, click on the track to place the cursor at the split point, then right-click and select Split Clip .

Arrange start and end points
In GarageBand, use the zoom slider in the upper right corner of the window to zoom in on the audio track between songs. You can then click and drag the start and end points to trim the tracks, leaving no gaps, eliminating noise and hiss between songs.
For Audacity, go to View in the top menu and select Zoom > Zoom In (or click the magnifying glass icon). Then, click and drag the start and end points of each track to trim out the parts that don't have audio.
Add noise reduction to audio
In GarageBand, press B to open Smart Controls. Track settings are at the bottom of the arrangement window; check the box labeled Noise Gate and move the slider to the right to increase noise reduction.

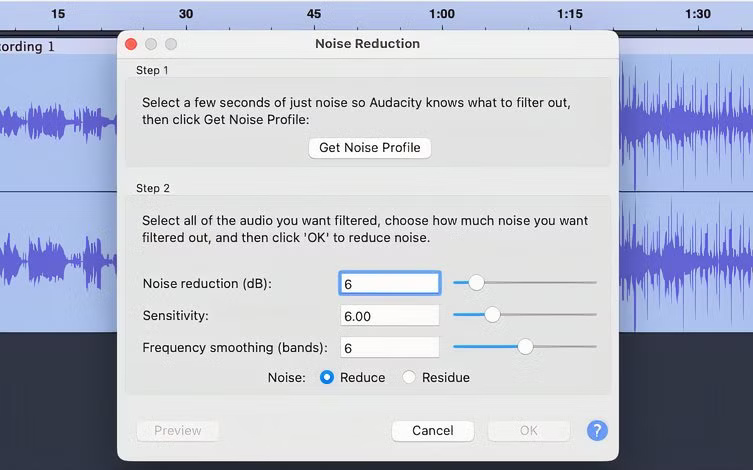
In Audacity, select your track, click Effect in the top menu, then choose Noise Removal and Repair > Noise Reduction . You can then experiment with the settings in the pop-up window, but use this effect sparingly.
4. Export digital audio files
Finally, you're ready to export your audio files. Be sure to name them during the export process to avoid confusion when searching for files and organizing them into playlists.
Normalize files to maximize volume
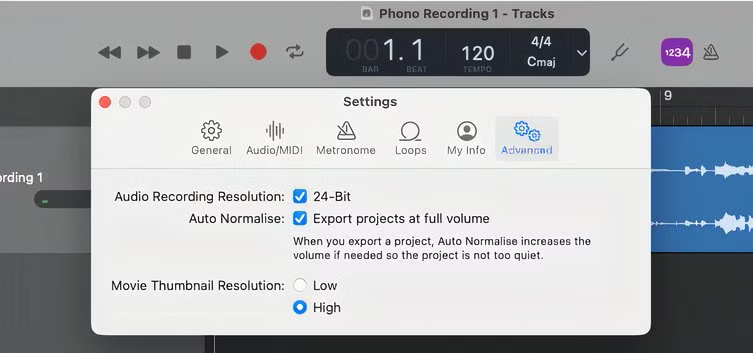
In GarageBand, select GarageBand > Settings from the top menu. In the Advanced tab , make sure the Auto Normalize box is checked to export your projects at maximum volume.
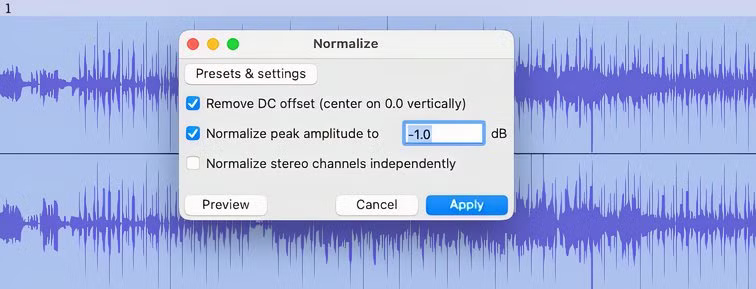
In Audacity, select your audio track, click Effect in the top menu, then select Volume and Compression > Normalize . Click Apply to enable this feature.
Audio output
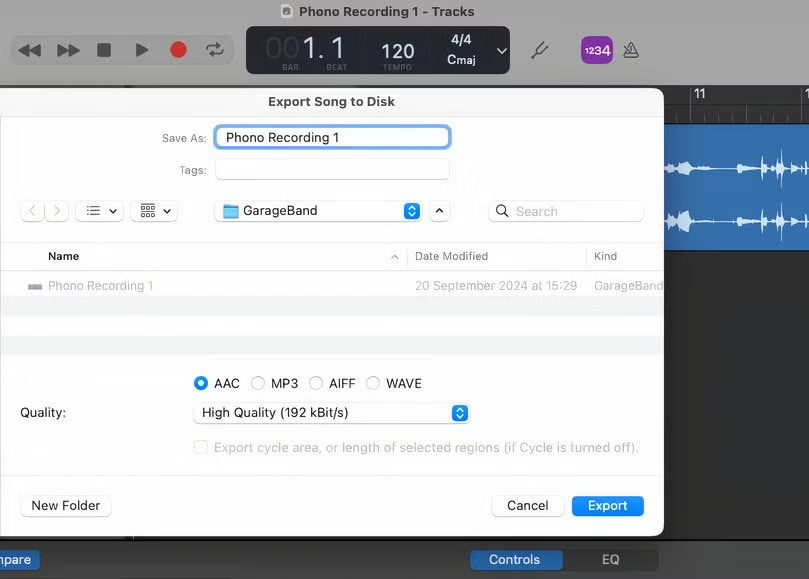
In the top menu in GarageBand, click Share > Export Song to Disk, select your preferred digital format and audio quality in kBit/s in the pop-up window. Then, click Export to save it to the folder of your choice.
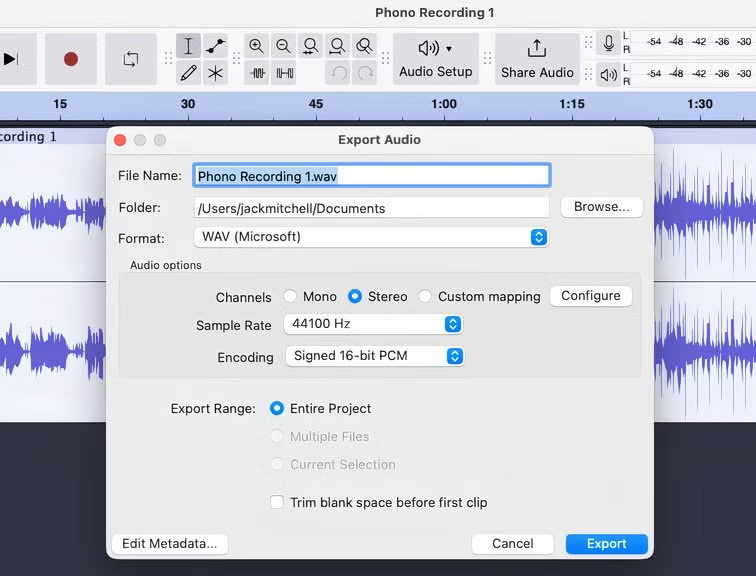
From the top menu in Audacity, click File > Export Audio and select Export to Computer . Here, you can choose to trim the space before the first clip (if you haven't already), choose your preferred sample rate and digital format, as well as the destination folder. Finally, click Export to save your file.
There are many reasons why you might want to digitise your analogue audio. You might have an old 4-track recording from a school band, study notes you want to preserve, rare recordings you want to back up, or tracks that can't be found on streaming services. GarageBand and Audacity are powerful free solutions that make this easy, and provide a valuable introduction to the world of digital recording that can be both fun and rewarding.
- 12 best free clock widgets for Android
- Invite to download Analog Pro, a photo editing application package worth VND 125,000, which is free
- 2 The best free software for cutting and joining music
- 5 cutting software, best free music composer and download link
- Top 4 best free music downloads 2021
- 2 The best software to listen to music on computer
- Instructions on how to cut, pair music with the best free music cutting software 2020
- Beautiful Analog photo correction recipe
- 6 best music software on your computer
- Discover free software
- Adjust the speed of watching videos in KMPlayer
- How to adjust the speed of music playback on Spotify
- How to Connect a DVD Player to a Laptop
- 7 Best Hi-res music player software for Windows
- How to fix 'The Original File Could Not Be Found' error in iTunes?
- How to install GSnap audio on Audacity
- How to Delete Movies from iTunes
- Common shortcuts for KMPlayer need to know
- Fix IDM error without capturing MP4 file download on Chrome
- Download music on Soundcloud with 3 simple ways
-
 2 popular NotebookLM features that will completely change the way you study.
-
Laptop has no sound: Quick and easy ways to fix it at home.
-
Instructions on creating your own AI voice.
-
How to fix the 'Realtek HD Audio Manager has stopped working' error when starting your computer or laptop.
-
What is Hi Res Audio? The secret to upgrading your sound to studio-quality.
-
TOP 5 best audio recording applications for computers
 2 popular NotebookLM features that will completely change the way you study.
 Laptop has no sound: Quick and easy ways to fix it at home.
 Instructions on creating your own AI voice.
 How to fix the 'Realtek HD Audio Manager has stopped working' error when starting your computer or laptop.
 What is Hi Res Audio? The secret to upgrading your sound to studio-quality.
 TOP 5 best audio recording applications for computers
-
Application
-
Web Email
-
Website - Blog
-
Web browser
-
Support Download - Upload
-
Software conversion
-
Social Network
-
Simulator software
-
Online payment
-
Office information
-
Music Software
-
Map and Positioning
-
Installation - Uninstall
-
Graphic design
-
Free - Discount
-
Email reader
-
Edit video
-
Edit photo
-
Compress and Decompress
-
Chat, Text, Call
-
Archive - Share
-
-
System
-
Mac OS X
-
Hardware
-
Game
-
Tech info
-
Technology
-
Science
-
Life
-
Electric
-
Program
-
Mobile