Table of Contents
This guide explains how to delete Virtual Drives on Windows 10, with clear steps, practical tips, and important checks before you begin.

1. How to delete a virtual drive created from Windows 10
Method 1: Delete the virtual drive with Disk Management
Step 1: Right-click on This PC and select Manager .
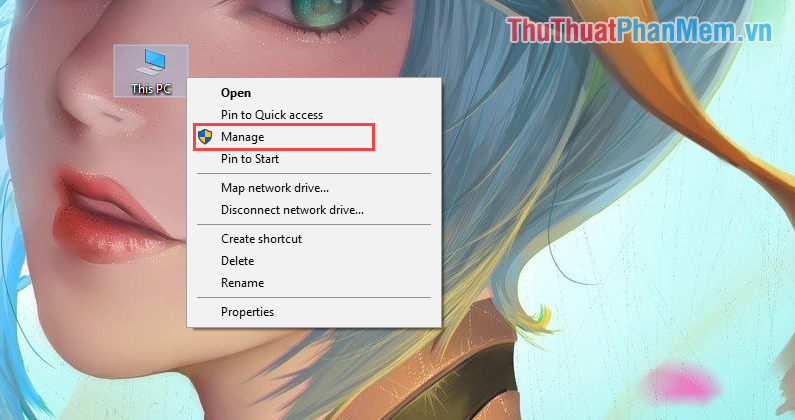
Step 2: Then, you select the Disk Managerment tab to see all the virtual and real drives that are currently on your computer. Next, right-click on the virtual drive and select Delete Volume.

Step 3: After you delete the virtual drives, it will become a standby drive if you do not merge them with the original drive on the computer. To merge them together, right-click on the virtual drive you just deleted and select Detach VHD .
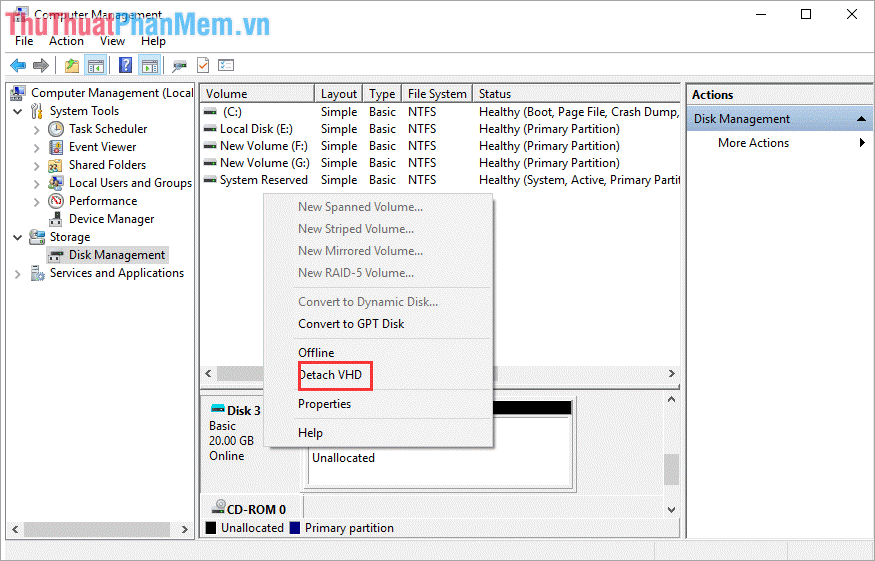
Method 2: Delete the virtual drive with Command Prompt
Step 1: Open MenuStart and enter Cmd. Then, you select Run as administrator to run Command Prompt under Admin.

Step 2: When the Command Prompt window appears, enter the following commands one after the other:
- Command 1: Type ' Diskpart ' and press Enter
- Command 2: Enter select vdisk file = 'f: virtual disk. vhd' ( Where: f: stands for virtual drive, virtual disk is the name of the virtual drive you want to delete. abbreviation, the name of the virtual drive into the virtual drive name you want to delete).
- Command 3: Type Detach vdisk and press Enter
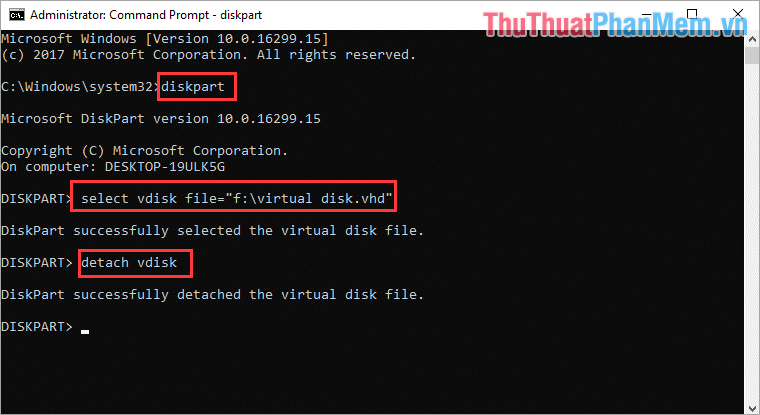
So, you have successfully removed the virtual drive on Windows 10!
2. How to delete a virtual drive created from 3rd software (UltraISO, Alcohol 120%. )
Step 1: You open ThisPC and Right-click the virtual drive to delete. Then you open Properties to see the settings.

Step 2: Continue to select Properties to view detailed information of the virtual drive.

Step 3: When the Properties window of the virtual drive appears, select Change Settings .

Step 4: Next, select the Driver tab and select Uninstall Device to delete the virtual drive.

Step 5: A window will appear asking if you want to remove the virtual drive or not? You choose Uninstall to proceed with the uninstall.

Step 6: After that, the virtual drive will be removed from your Windows system.

In this article, Software Tips have shown you how to delete virtual drives on Windows 10 in many different ways. Good luck!
FAQ
What should I know about Delete Virtual Drives on Windows 10?
Focus on the key features, requirements, limitations, and practical use cases explained in this guide.
How do I get the best results with Delete Virtual Drives on Windows 10?
Follow the recommended steps, use current software or information, confirm compatibility, and review settings before major changes.
Are there any risks or limitations?
Potential limitations depend on compatibility, data quality, cost, privacy, support, and how the product or method is used.
Related Articles
 Add Drives for Virtual Machines Running Windows XP on Virtualbox7 minutes read
 Create a Virtual Hard Drive, Turn the Real Machine into a Virtual9 minutes read
 Windows 8 Can Create Virtual Optical Drives Themselves4 minutes read
 Delete the Virtual Drive in Windows 73 minutes read
 How to Delete a Drive Cannot Be Deleted with Disk Management18 minutes read
 How to Speeding up Virtual Machines in Full Set10 minutes read
Reader Comments 0
Sign in with email or Google to join the discussion.