Table of Contents
The process for create floating Windows for all applications on Windows is straightforward once you know where to find the right controls. The steps below explain what to do and what to check.
The floating window feature Picture in Picture is available on YouTube, when minimizing the video interface that is playing down to the bottom of the screen to conveniently track other content. In addition, we can also install some utilities to apply floating window feature on Chrome browser. So, how do I do with other applications or programs installed on my computer?
PiP Tool is a tool to create the Picture in Picture feature for all active applications on Windows. Users will be given the option to bring any open application interface to the minimized window mode. Special tool allows users to select the area to display in the minimized floating window interface. The steps below explain how to use the PiP Tool on your computer.
- How to experience Picture-in-Picture feature on Google Chrome
- How to enable Picture in Picture Windows 10 Creators
- How to watch videos from the thumbnail screen on Opera
- How to view YouTube videos from a floating window on Chrome
Instructions for using PiP Tool on Windows
Step 1:
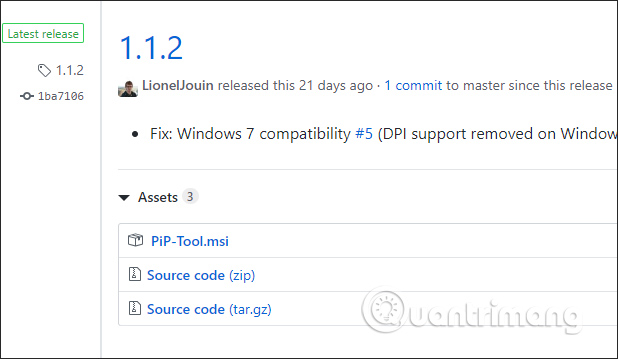
Users access the link below to download the latest version of PiP Tool to the computer.
- Https://github. com/LionelJouin/PiP-Tool/releases
Step 2:
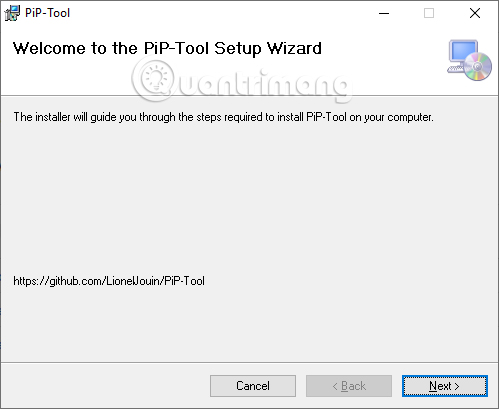
Next, click the msi installation file to proceed with the installation as usual.
Step 3:
Immediately after installation is complete, click The tool icon On the screen interface. The Black bar Display is located on the edge of the computer screen. This toolbar can be moved, click the 6 dot icon to move to a new position.

Click The drop-down arrow icon To display all the open application interfaces on the computer. click the app that wants to use the miniature floating window mode in the corner of the screen.

Step 4:
This will display a square frame so that we can Select the content area we want to display In the minimized floating window interface. We can also select the entire application window interface. Move the position of this frame to the content you want to use. After selecting, press the volume button on the black bar.

Step 5:
As a result, users will see the content on the app switch to the miniature floating PiP Tool window. When hovering, it will display a black bar to change the screen position conveniently for tracking. Square icon to select new minimized window, X mark to turn off floating window mode.

When you open the floating window in the correct application interface, all your operations appears in the window view. This minimized mode not only applies to videos that you can use when writing text, tracking images, etc.
Users should note, when scaling the original application, the original content will not be reflected in the minimized window.

So with the PiP Tool, all open application interfaces on Windows can be transferred through the minimized window interface. We can freely select the content area we want to minimize, move the thumbnail screen to any position on the screen interface.
I wish you all success!
FAQ
What should I prepare before I create floating Windows for all applications on Windows?
Review the requirements in the guide, confirm that your device or software is compatible, and save important work before changing settings related to create floating Windows for all applications on Windows.
Why might create floating Windows for all applications on Windows not work as expected?
The most common causes are incompatible versions, missing permissions, incorrect settings, or an interrupted internet connection. Recheck each step and restart the app or device when appropriate.
Can beginners follow these create floating Windows for all applications on Windows steps?
Yes. Follow the steps in order, avoid skipping confirmation screens, and compare your interface with the screenshots because labels may differ slightly between versions.
Related Articles
 Lesson 36: Form Floating Label in Bootstrap 53 minutes read
 How to Use Zipcall to Create Floating Video Chat Windows3 minutes read
 Top 5 Tools to Help Install Applications Always Floating on4 minutes read
 This Is the Only Part of the Body That Never Goosebumps3 minutes read
 Devil's Horns Floating in the Sea: Complete Guide3 minutes read
 8 Apps to Help You Watch YouTube Videos in Chrome Floating Window7 minutes read
Reader Comments 0
Sign in with email or Google to join the discussion.