How to Connect to WiFi in Windows 10
Wi-Fi has been around for a while now, enabling us to connect to our favorite websites and chat while playing games with our friends. Windows 10's brand new interface changes how you connect to wireless networks. Luckily, connecting to...
Table of Contents
Method 1 of 2:
Connecting to a Visible Wi-Fi Network
-
 Turn on the router if you own the network. The router acts like a man in the middle, connecting you to the internet. If it's off, then you won't be able to connect to that network.
 -
 Select the networkicon from the notification area to open the network flyout. If your device is able to connect to a wireless network through a wireless adapter, then you'll see a signal/broadcast radio wave icon with a star above it.
- If your device is wireless capable but the icon is missing, then go to "Settings > Personalization > Taskbar > Select which icons appear on the taskbar" and slide the switch next to "Network" to "On".
- You can also go to "Settings > Network & Internet > Wi-Fi > Show available networks".
-
 Make sure Wi-Fi is turned on. See if the "Wi-Fi" tile is colored at the bottom of the pane.
 -
 Click or tap the network name (SSID/service set identifier[1]) you want to connect to.
 -
 Decide whether to always connect to the network automatically when it's in range. Either check or uncheck the box next to "Connect automatically".
 -
 Press the Connect button.
 -
 Either enter the network password.
- If the router is WPS enabled, press the button on the router to connect.
-
 Click or tap Next.
 -
 Choose sharing settings. You'll be asked "Do you want allow your PC to be discoverable by other PCs and devices on this network". Clicking away will choose the "No" option.
- If on your home or workplace network, select Yes, otherwise choose No.
-
 Begin using the network. You might have to agree to the network Terms. To do this, open a browser and attempt to access a website. Complete the requirements and begin using the network.
 -
 To disconnect, simply open the Wi-Fi pane and select the network you're connected to. Press Disconnect.
Method 2 of 2:
Connecting to a Hidden Wi-Fi Network
-
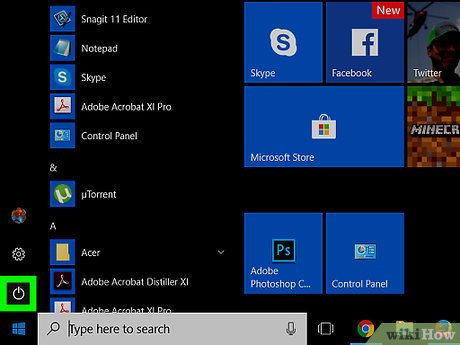
 Open Settings. Click the Startbutton and select the settings
 gear in the lower left corner.
-
 Go to the Network & Internet category.
 -
 Select Wi-Fi from the left pane.
 -
 Click or tap "Manage known networks".
 -
 Click or tap + Add a new network.
 -
 Type the network's name (SSID/service set identifier[1]).
 -
 Select the security type and authentication options/enter password.
 -
 Decide whether to always connect to the network automatically when it's in range. Either checkor uncheck
 the box next to "Connect automatically".
-
 Choose if you wish to "Connect even if this network is not broadcasting". Simply check the box next to it if you want to.
 -
 Press Save.
Was this article helpful?
Your feedback helps us improve.
Related Articles
 Wifi on Windows 10 does not connect after starting from Sleep mode5 minutes read
 Steps to connect wifi for LG Smart TV2 minutes read
 How to fix WiFi errors on Windows 10, simple and effective9 minutes read
 How to fix the problem of not connecting to WiFi in Windows 104 minutes read
 Steps to connect wifi on Panasonic Smart TV tivi2 minutes read
 How to connect a computer to Wi-Fi without a password on Windows 104 minutes read
Reader Comments 0
Sign in with email or Google to join the discussion.