Table of Contents
This updated guide examines Click: How to Connect to Itunes and organizes the essential facts, background, and practical takeaways in clear American English.
Part 1of 2:
Installing and Updating iTunes
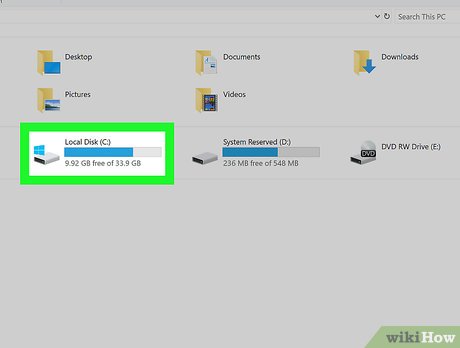 Decide which computer you want to use to manage your iTunes library. It should be a computer that has plenty of storage, has access to a strong Wi-Fi network, and is available frequently for your use.
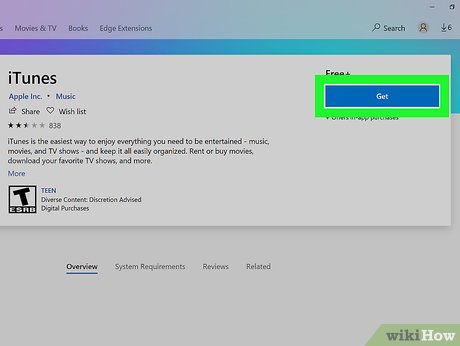 Install iTunes (if you're using a PC). If you have a Mac (or if you've already installed iTunes on your PC), skip to the next step.
- Click the Start
 menu and select Microsoft Store .
 - Click Search at the top-right corner and typeitunes.
- Click iTunes in the search results.
- Click Install and follow the on-screen instructions.
- Click the Start
 Open iTunes. If you're using a PC, you'll find it in the Start
 menu. If you have a Mac, click the music note icon on the Dock (which is usually at the bottom of screen).
- If it's your first time using iTunes, follow the on-screen instructions to set up the app.
- To learn more about navigating iTunes and using its advanced features, check out How to Use iTunes.
 Update to the latest version. The steps vary depending on your setup:[1]
- If you're using a Mac, your iTunes updates are bundled with regular macOS updates.[2]To check for macOS updates, click the
 menu, select System Preferences , and then click Software Update .
 - If you installed iTunes through the Microsoft Store, updates will install automatically.
- If you're using Windows and downloaded iTunes from Apple, click the Help menu in iTunes, select Check for Updates , and then follow the on-screen instructions.
- If you're using a Mac, your iTunes updates are bundled with regular macOS updates.[2]To check for macOS updates, click the
 Sign into iTunes with your Apple ID. If you've purchased anything from the iTunes store (apps, books, movies, etc.), signing in on your computer will give you access to those items. Here's how to sign in:[3]
- Click the Account menu at the top.
- Click Sign In…
- Enter your Apple ID username and password.
- Click Sign In .
Part 2of 2:
Syncing to iTunes
 Set your automatic syncing preferences. Before connecting the device to the computer, check the following:
- Click the Edit menu at the top-left corner and select Preferences .
- Click the Devices tab.
- If you want your iPhone or iPad to sync automatically when you connect it to iTunes, remove the check mark from "Prevent iPods, iPhones, and iPads from syncing automatically," and then click OK .
- If you don't want the device to sync automatically, place a check mark in the "Prevent iPods, iPhones, and iPads from syncing automatically," and then click OK . This options is recommended if you're connecting to iTunes on a computer that isn't yours (or isn't your primary computer).
 Connect the iPhone or iPad to the computer with a USB cable. Use the cable that came with your phone or tablet (or one that's compatible). Once connected, you'll see a button with a phone or tablet icon near the top-left corner of iTunes. This is called the "Device" button.[4]
- If you're using a brand new iPhone or iPad, see How to Connect a New Device to iTunes to learn more connecting the new device.
 Click the Device button. It's near the top-left corner of iTunes (the small button with an iPhone inside).
- If you see a message that says your device is already synced with another iTunes library, take caution. If you click Erase and Sync , the type of content you're syncing (such as Music or Photos) will be replaced with content from this computer.
 Click a type of content you want to sync. You'll see several categories (e.g., Music , Movies ) in the left column under "Settings." Click one of these categories now to view its syncing options.
 Set your syncing options for the category. The options will vary by category, but you'll always have to check the box next to "Sync" near the top of the main panel.
- You can specify certain types of data to sync per category. For example, under Music , you can choose to sync your entire library or to select specific playlists.
 ClickApply. It's at the bottom-right corner. If iTunes is set to sync automatically, the selected items will now sync. If not, you'll have to sync manually.
 Repeat these steps to sync other types of content. Click Apply when you're finished editing each category.
 ClickSyncto sync. The selected data will now sync.
 ClickDone. This button is at the bottom-right corner.
 Set up wireless syncing (optional). If you don't want to have to use a USB cable to sync to iTunes in the future, you can opt to enable Wi-Fi syncing. Here's how:[5]
- Make sure the phone/tablet and computer are connected to the same Wi-Fi network.
- Click the Device button in iTunes if you haven't yet done so.
- Click Summary in the left panel (under "Settings").
- Check the box next to "Sync with this (device type) over Wi-Fi."
- Click Apply .
FAQ
What is Click: How to Connect to Itunes about?
It provides a structured overview of click, explains the main context, and highlights practical takeaways for readers.
Why does this topic matter?
Understanding the main concepts helps readers evaluate the issue, avoid common mistakes, and make better-informed decisions.
How should readers use this information?
Use the guidance as a practical starting point, confirm details that may have changed, and follow current product, safety, or security recommendations.
Related Articles
 Error Cannot Connect to Itunes Store, This Is a Fix17 minutes read
 How to Connect a Device to iTunes: Step-by-Step Guide6 minutes read
 How to Connect the Ipod to Itunes6 minutes read
 Itunes Not Recognizing iPhone? the Cause and How to Fix It6 minutes read
 How to Fix ITunes Error Not Getting Connected to iPhone6 minutes read
 How to Play Itunes Movies on TV2 minutes read
Reader Comments 0
Sign in with email or Google to join the discussion.