How to Connect a Windows 7 Computer to the Internet Via an Android Phone
This wikiHow teaches you how to connect to your Android with your Windows 7 computer in order to use the Android's data to connect to the Internet. This process is known as 'tethering'. You can tether your Android to your computer by using....
Method 1 of 2:
Using USB
-
 Attach your Android to your computer. Use the charging cable and a USB port on your computer to do this.
- USB tethering for Android phones is a Windows-only feature.[1]
-
 Open your Android's Settings. Swipe down from the top of the screen, then tap the "Settings" gearin the top-right corner of the drop-down menu.
- On some Android models, you'll have to swipe down using two fingers.
-
 Tap Network & Internet. It's near the top of the page.
- On a Samsung phone or tablet, tap Connections instead.
-
 Tap Hotspot & tethering. You'll find this in the middle of the page.
- On a Samsung Android, tap Mobile Hotspot and Tethering instead.
-
 Tap the white "USB tethering" switch. It will turn blue
 . Your computer should now have a wired (LAN) connection to the Internet through your Android's data.
-
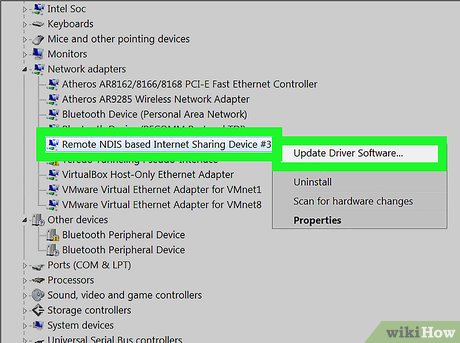 Fix the connection if necessary. If your Windows 7 computer isn't recognizing the attached Android as an Internet location, you may be able to fix this problem by doing the following:[2]
- Open Device Manager: click Start, click the search bar, type in device manager, and click Device Manager.
- Double-click Network adapters.
- Right-click Remote NDIS based Internet Sharing Device.
- Click Update Driver Software....
- Click Browse my computer for driver software.
- Click the Let me pick button at the bottom of the window.
- Uncheck the "Show compatible hardware" box.
- Click Microsoft Corporation in the "Manufacturer" column.
- Click Remote NDIS Compatible Device, then click Next.
- Click Yes when prompted, then click Close when prompted.
Method 2 of 2:
Using a Hotspot
-
 Open your Android's Settings. Swipe down from the top of the screen, then tap the "Settings" gearin the top-right corner of the drop-down menu.
- On some Android models, you'll have to swipe down using two fingers.
-
 Tap Network & Internet. It's near the top of the page.
- On a Samsung phone or tablet, tap Connections instead.
-
 Tap Hotspot & tethering. You'll find this in the middle of the page.
- On a Samsung Android, tap Mobile Hotspot and Tethering instead.
-
 Tap Set up Wi-Fi hotspot. It's in the middle of the page.
- On a Samsung, tap the white "Mobile hotspot" switch to enable the hotspot. You can then adjust the password by tapping Password, entering a new one, and tapping SAVE. Once you're done, skip ahead to the "Open your computer's Wi-Fi settings" step.
-
 Set up your Android's hotspot. Fill in the following fields:
- Network name — The name that your Android will display in your computer's wireless network area.
- Security — Select a WPA2 option from this menu.
- Password — The password that you'll use to log in.
-
 Tap SAVE. It's at the bottom of the menu. Doing so should return you to the Hotspot & Tethering page.
 -
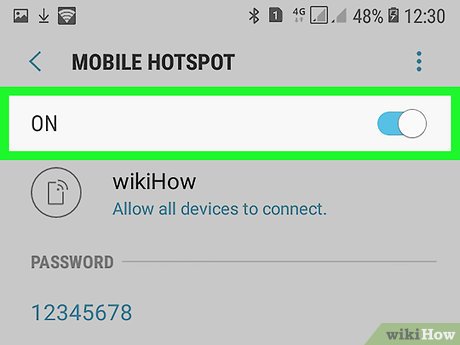 Tap the white "Portable Wi-Fi hotspot" switch. This is at the top of the Hotspot & Tethering page. The switch will turn blue
 . Your Android should now be outputting a Wi-Fi signal.
-
 Open your computer's Wi-Fi settings. Click the Wi-Fi icon, which resembles a set of signal bars, in the lower-right corner of the screen. A pop-up window will appear.
- You may first have to click ▲ here to see the Wi-Fi icon.
-
 Click your Android's name. It should be in the pop-up window.
 -
 Enter the password. Type in the password that you created during the setup, then click Connect or press ↵ Enter.
- If you didn't create a password during setup, your hotspot network's password will be listed on the hotspot's page in your Android's Settings. You may need to tap the hotspot's name to view the password.
-
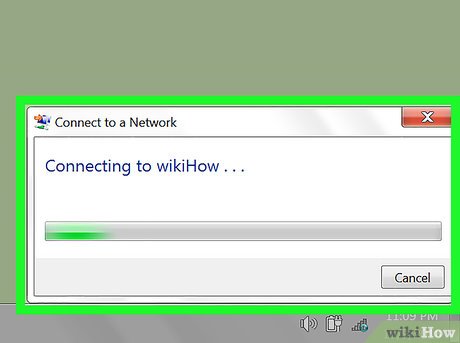 Wait for the network to connect. Once your computer connects to the network, you'll be able to browse the Internet as usual.