How to configure the MikroTik router
If you are familiar with these routers, you probably know that they are built using the MikroTik RouterBOARD hardware platform, powered by MikroTik RouterOS operating system - but, how about configuring these routers? Here's an overview guide to get you started!
Table of Contents
MikroTik routers are a popular choice for many users, Internet Service Providers (ISP), because they support home networks.
How to connect to the MikroTik router

To view and make changes to the configuration of the MikroTik router, you need a way to connect to it. You can do it in a few different ways:
- Connect Using Command Line Interface (CLI) - CLI is a Terminal-based approach that can be done over Telnet, SSH or serial cable.
- Connect using WebFig - WebFig is a web-based GUI that acts as a MikroTik RouterOS configuration, monitoring and troubleshooting tool.
- Connect using WinBox - WinBox is a configuration utility designed for Windows, but can also be used on Linux and MacOS machines.
You can access each of these tools by entering the IP address of the MikroTik router into a web browser.
Default configuration of the MikroTik router
The default configuration state of the MikroTik router depends on the RouterBOARD platform type. While the following overview guide is for the CPE Router platform type, you can run / export the system default configuration to see which default configuration is applied to your particular MikroTik device.
Router settings
All MikroTik routers come pre-configured with the following IP address, as well as a default username and password:
- IP address : 192.168.88.1/24 (port ether1)
- Username : admin
- Password : (none)
As you can see, the first configuration you want to do when connecting is to update the router's credentials from the default settings. Again, this should be done for any router you connect to indoors - regardless of whether the password is set or not!
User settings
User settings options allow you to configure who on the network has access to the MikroTik router. By default, you should see there is a user setting - "admin" - that has full control over access.
You should disable this user and create your own user (s) with tasks for the appropriate groups, depending on how the revolution was set up.
Internet access settings
The MikroTik router offers different configuration options for connecting to the Internet:
- DHCP Client Router MikroTik received at the WAN IP address from the DHCP server in front of it. This is the default MikroTik router configuration and must be removed if it is not supported by your ISP. You can do so by visiting the router's DHCP Client settings, found under IP.
- Static IP : Router MikroTik get a static IP address on the WAN side. By default, your router will only list local area network (LAN) addresses, but you can add new static IP addresses in your router's Addresses configuration settings .
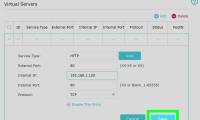
Another Internet access profile you want to check and, if necessary, make changes to the router's Network Address Translation (NAT) settings.
Was this article helpful?
Your feedback helps us improve.
Related Articles
 How to Configure a Router10 minutes read
 How to Configure TP Link Router22 minutes read
 Good hackers find and patch the vulnerability for more than 100,000 other routers3 minutes read
 How to set up and configure DDNS on Netgear router3 minutes read
 How to configure PPPoE connection on TP-Link WiFi 6 router7 minutes read
 Instructions for installing Wifi Router Tenda W311R2 minutes read
Reader Comments 0
Sign in with email or Google to join the discussion.