Table of Contents
This guide explains how to change the Value of HungAppTimeout in Windows 10, with clear steps, practical tips, and important checks before you begin.
If you do not make a selection in the End Task dialog box before the 1 minute expires, Windows 10 will automatically cancel the reboot, shutdown or logout by default.
HungAppTimeout also specifies the time (5 seconds by default) the system waits for the user process to finish, after the user clicks the End Task task button in Task Manager. If this threshold is exceeded, the End Task dialog box appears, indicating that the process is unresponsive.
This tutorial will show you how to specify a HungAppTimeout value, to indicate how long the system will wait before the End Task dialog box appears in Windows 10.
Change the HungAppTimeout value only for the current user
1. Press the Win+ keys Rto open Run , type regedit in Run, and click OK to open Registry Editor.
2. Navigate to the key below in the left panel of the Registry Editor .
HKEY_CURRENT_USERControl PanelDesktop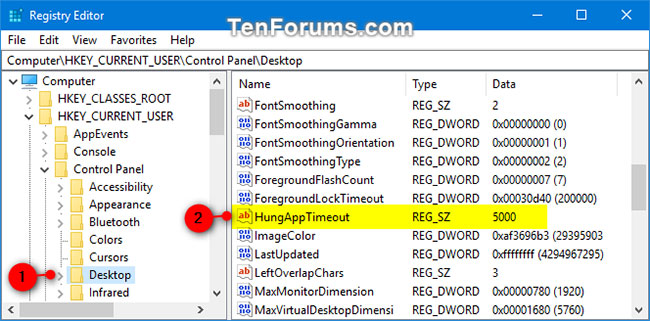 Navigate to the key in Registry Editor
3. In the right panel of the Desktop key, double-click the HungAppTimeout string value to modify it.
If you do not have the HungAppTimeout string value, right-click or hold and hold a space in the right panel of the Desktop key, click New , click String Value , enter HungAppTimeout in the name field, and click Enter.
4. Enter the number of milliseconds you want for the HungAppTimeout value and click OK.
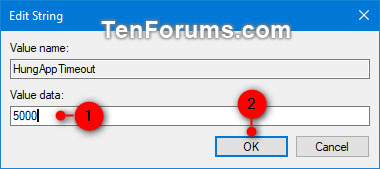 Enter the number of milliseconds you want for the HungAppTimeout value
Note:
- The default value is 5000 milliseconds (5 seconds). You can also delete the HungAppTimeout string value to default to 5000 milliseconds.
- Values should not be set below 1,000 milliseconds (1 second).
5. Log out and log back in to apply the changes.
Change the HungAppTimeout value for all users
Note : You must be logged in as an administrator to perform this option.
This section will override the above option.
1. Press the Win+ keys Rto open Run , type regedit in Run, and click OK to open Registry Editor.
2. Navigate to the bottom key on the left of Registry Editor.
HKEY_USERS.DEFAULTControl PanelDesktop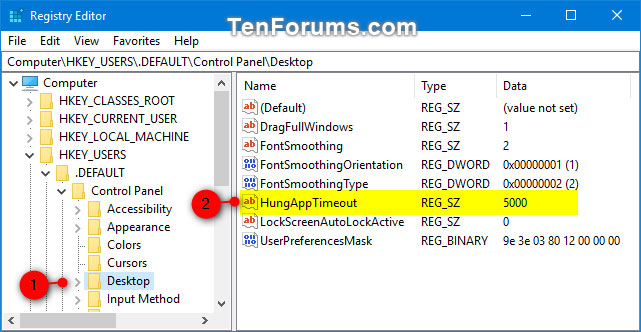 Navigate to the key on the left of Registry Editor
3. In the right panel of the Desktop key, double-click the string value.
If you do not have the HungAppTimeout string value, create a new value as in step 3 above.
4. Enter the number of milliseconds you want for the HungAppTimeout value and click OK.
Note:
- The default value is 5000 milliseconds (5 seconds).
- Values should not be set below 1,000 milliseconds (1 second).
5. Log out and log back in to apply the changes.
FAQ
What should I know about Change the Value of HungAppTimeout in Windows 10?
Focus on the key features, requirements, limitations, and practical use cases explained in this guide.
How do I get the best results with Change the Value of HungAppTimeout in Windows 10?
Follow the recommended steps, use current software or information, confirm compatibility, and review settings before major changes.
Are there any risks or limitations?
Potential limitations depend on compatibility, data quality, cost, privacy, support, and how the product or method is used.
Related Articles
 How to Change Sdr and Hdr Light Balance in Windows 105 minutes read
 How to Change DNS on Windows and Mac Computers4 minutes read
 How to Convert Windows 8 // 8.1 Keyboard Language4 minutes read
 How to Change the Date and Time Format on Windows, Change the Slash to a Dot10 minutes read
 Instructions for Changing Windows 10 Wallpaper Timer4 minutes read
 Fix Can Not Change Static IP, Fix Can Not Change DNS on7 minutes read
Reader Comments 0
Sign in with email or Google to join the discussion.