Table of Contents
This updated guide examines List: How to Change the Default Wi-Fi Network on a Mac and organizes the essential facts, background, and practical takeaways in clear American English.
Part 1of 2:
Opening Your Wi-Fi Preferences
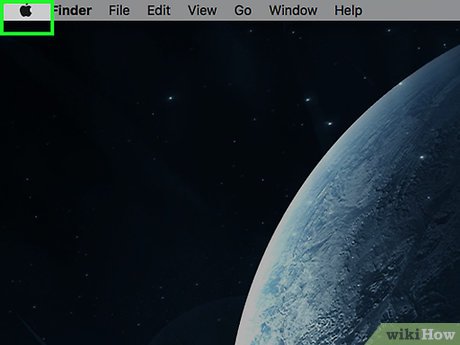 Click on the Apple logo. The Apple logo is located in the upper left-hand corner of your screen. A drop-down menu will appear.
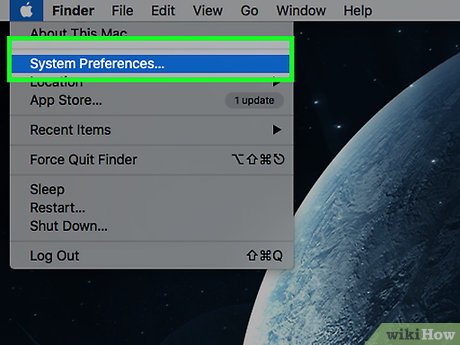 Select "System Preferences. " A new window will appear.
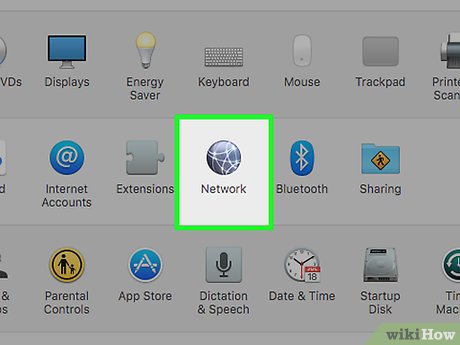 Select the "Network" icon. The "Network" icon looks like a globe with white lines running inside it.
 Confirm that "Wi-Fi" is highlighted in the left-hand panel. If Wi-Fi is not highlighted, click on it.
- If you do not see Wi-Fi as an option, click the + button at the bottom of the list on the left-hand side of the window. Click on the "Interface" drop-down menu, and select "Wi-Fi." Name your service by typing it into the corresponding text field, then hit "Create."
- An AirPort card must be installed in your Mac to use Wi-Fi.
- In older Mac Operating systems, the "Wi-Fi" section is called "AirPort."
Part 2of 2:
Changing Your Wi-Fi Preferences
 Click on the "Advanced" button. The "Advanced" button is at the bottom right of the window. Clicking on it will bring up a new menu.
 Locate your list of Preferred Networks. You should see a list of networks that you have been connected to in the past. The network on the top of your list is your default.
- When your Mac is within range of any two networks on your "Preferred Networks" list, it will connect to whichever network is placed higher up on the list.[1]
- If you don't see the networks that you expect, click the + sign to add a new network. The "Show Networks" button will give you a list of available Wi-Fi networks in your range. Select one and click "Join" to join it. You will need to type in a Wi-Fi password to join some networks.
 Drag your preferred network to the top of the list. Scroll through the "Preferred Networks" list until you find the one you want to be the default. Click and drag it to the top of the list.
 Remove a Network (optional). You can remove a network from the "Preferred Networks" section at any time by simply clicking on it, then selecting the - button. A pop-up window will appear asking you to confirm your changes. Hit "Remove" to remove the network.
 Click "OK. " Select the "OK" button at the bottom right of the window. Exit out of the "Network" window. Your changes have been made.
FAQ
What is List: How to Change the Default Wi-Fi Network on a Mac about?
It provides a structured overview of list, explains the main context, and highlights practical takeaways for readers.
Why does this topic matter?
Understanding the main concepts helps readers evaluate the issue, avoid common mistakes, and make better-informed decisions.
How should readers use this information?
Use the guidance as a practical starting point, confirm details that may have changed, and follow current product, safety, or security recommendations.
Related Articles
 How to Connect Wifi Device22 minutes read
 Change Wi-Fi Password: 2 Steps to Change Linksys Wi-Fi Password2 minutes read
 How to Change Your Wi-Fi Name on a Computer or Phone6 minutes read
 How to Change Wi-Fi Password, Change Wi-Fi Pass Vnpt, Fpt, Tenda7 minutes read
 How to Check Who Is Using Wi-Fi Temple, Your Home Wi-Fi Theft16 minutes read
 Change Wi-Fi Password: How to Change Vnpt Wi-Fi Password5 minutes read
Reader Comments 0
Sign in with email or Google to join the discussion.