Table of Contents
This updated guide examines Click: How to Change the IP Address on a Mac and organizes the essential facts, background, and practical takeaways in clear American English.
Method 1of 3:
Changing the IP Address
 Click on the Apple logo
 . You'll see this in the top left corner of your screen. A menu will dropdown.
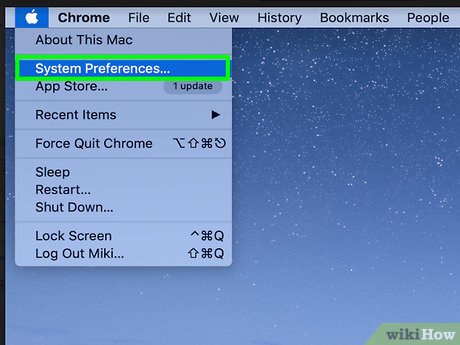 ClickSystem Preferences. You'll see this under "About This Mac."
 ClickNetwork. You'll see this in the third organized row next to "iCloud."
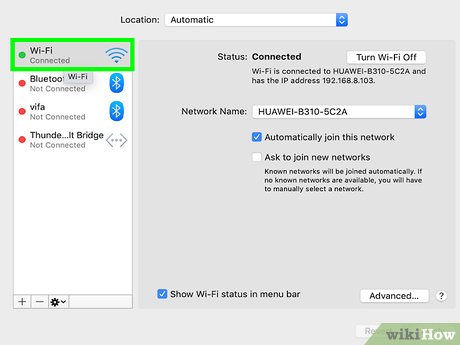 Click on the network you're using in the left sidebar. For example, if you're using a Wi-Fi connection, click on 'Wi-Fi.'
 ClickAdvanced. You'll find this at the bottom right corner of the window.
 Click theTCP / IPtab. You'll see this along the top of the window with tabs for DNS , WINS , 802.1X , Proxies , and Hardware .
 Click the dropdown menu next to 'Configure IPv4,' and select 'Manually.'
- Alternately, you can click on 'Renew DHCP Lease' to have your computer automatically generate a new IP address for you.[1]
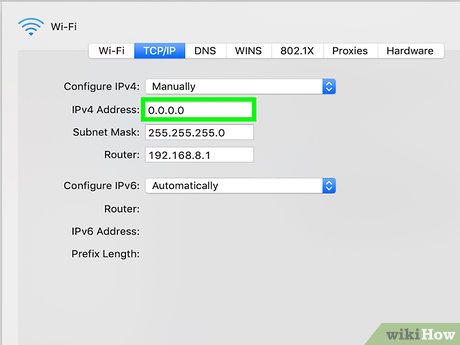 Enter your desired IP address into the field labeled 'IPv4 Address.' You can take your current IP address and change the last part of the number. For example, your current IP address is "10.0.1.8," so your new IP address can be something like "10.0.1.129."
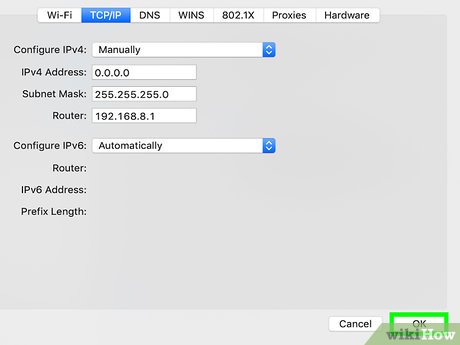 ClickOK, thenApply. Your IP address will now be changed.
Method 2of 3:
Using a Proxy Server
 Click on the Apple logo
 . You'll see this in the top left corner of your screen. A menu will dropdown.
- Use this method if your current network isn't doing the trick, as a proxy server is another, but temporary, network you'll use to connect to the internet.
 ClickSystem Preferences. You'll see this under "About This Mac."
 ClickNetwork. You'll see this in the third organized row next to "iCloud."
 Click on the network you're using in the left sidebar. For example, if you're using a Wi-Fi connection, click on 'Wi-Fi.'
 ClickAdvanced. You'll find this at the bottom right corner of the window.
 Click theProxiestab. You'll see this along the top of the window with tabs for DNS , WINS , 802.1X , TCP/IP , and Hardware .
 Click to select a protocol under the header 'Select a protocol to configure.'
- Select 'SOCKS Proxy' if you are unsure about which protocol to choose. The 'SOCKS Proxy' protocol is often used to route network packets between clients and servers through a proxy and is effective at boosting general security and hiding the client address of applications.
- Web Proxy (HTTP) and Secure Web Proxy (HTTPS) are also commonly used but are less protected than a SOCKS Proxy.[2]
 Enter the IP address of the desired proxy server into the blank field.
- If using a SOCKS proxy, navigate to the SOCKS proxy list at http://sockslist.net/ to select a type 4 or type 5 IP address.
 ClickOK, then clickApply. You will now be connected to the proxy server indicated.
Method 3of 3:
Unplugging Your Router/Modem
 Unplug your router or modem. Sometimes the router and modem are in the same unit so you can unplug them both from one plug. If the router and modem are separate, you can unplug either to reset your IP address.
- Wait a couple of seconds or minutes. Most residential connections have what is called a Dynamic IP Address. This means that your Internet Service Provider gives you a new IP address each time your router or modem connects to their network.[3]
 Plug the router back in. Wait for the router to reconnect to the internet.
 Check the new IP address. You can find this in the "Network" section of "System Preferences."
- If that didn't work, unplug your modem again and wait a few hours before plugging it back in.[4]
FAQ
What is Click: How to Change the IP Address on a Mac about?
It provides a structured overview of click, explains the main context, and highlights practical takeaways for readers.
Why does this topic matter?
Understanding the main concepts helps readers evaluate the issue, avoid common mistakes, and make better-informed decisions.
How should readers use this information?
Use the guidance as a practical starting point, confirm details that may have changed, and follow current product, safety, or security recommendations.
Related Articles
 Change IP Address: How to Change the IP Address for the Phone9 minutes read
 How to Change MAC Address on Windows: Clear Instructions7 minutes read
 How to Change IP Address on Mac: Practical Guide6 minutes read
 3 Ways to Change the Mac Address on Windows 7/8 / 108 minutes read
 How to Change Mac Addresses on Windows, Linux and Mac Os X6 minutes read
 Top 5 Software to Change Mac Address on Windows 105 minutes read
Reader Comments 0
Sign in with email or Google to join the discussion.