How to back up the EFS file encryption key and certificate in Windows 10
EFS enables transparent encryption and decryption of files for user accounts, using standard, advanced encryption algorithms. Any person or application that does not have the proper file encryption key cannot open any encrypted files and folders. Encryption is the strongest protection Windows offers to help you keep your personal files and folders safe.
Creating certificate backups and PFX file encryption key help you avoid losing your permanent access to encrypted files and folders, if the certificate and root key are lost or damaged.
If you lose access to your encrypted files and folders, you won't be able to reopen them unless you can restore the file encryption key and certificate used with EFS.
This tutorial will show you how to back up the certificate and file encryption key used with the Encrypting File System (EFS) in Windows 10 Pro, Enterprise, and Education editions.
Backup the existing EFS file encryption key and certificate from EFS symbol or message
You will see an EFS icon and message whenever a new file encryption key and certificate is generated.
This usually happens after the first time you encrypt a file or folder or create a new key manually using the Cipher command.
Step 1. Click the taskbar icon or EFS message.

Step 2. Click Back up now.
Step 3. Click Next.
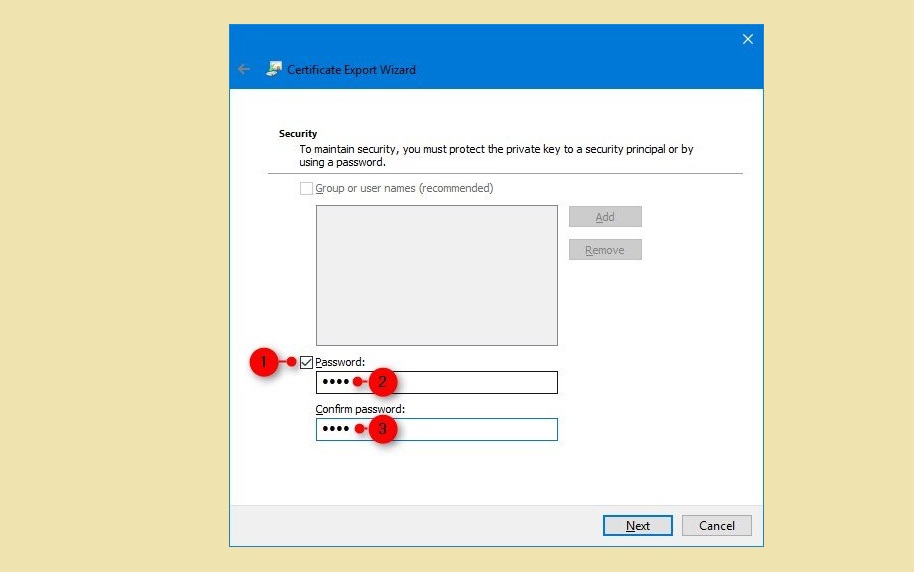
Step 4. Select the box Password, enter the password you want to protect your private key backup, re-enter this password to confirm and click Next.

Step 5. Click the Browse button, navigate to where you want to save the backup, enter the file name you want, click Save> Next.
Step 6. Click Finish.
Step 7. When the export is finished successfully, click OK.
Back up the EFS certificate and encryption key in the Certificates Manager
Step 1. Press Win + R to open Run, type certmgr.msc into Run and click OK to open the Certificates Manager.
Step 2. In the left panel of certmgr, expand Personal and open Certificates.
Step 3. In the right panel of Certificates, select all the certificates for Encrypting File System in the Intended Purpose column, right-click or long-click on these selected certificates, click All Tasks> Export.

Step 4. Click Next.
Step 5. Select Yes, export the private key and click Next.
Step 6. Click Next.
Step 7. Select the box Password, enter the password you want to protect the private key backup, re-enter this password to confirm and click Next.
Step 8. Click the Browse button, navigate to where you want to save the backup, enter the filename you want for the backup, click Save> Next.
Step 9. Click Finish.
Step 10. When the export is finished successfully, click OK.
Back up the current EFS file encryption key and certificate in Command Prompt
Step 1. Open Command Prompt.
Step 2. Copy and paste the command below into the Command Prompt, and then press Enter.
cipher / x "% UserProfile% DesktopMyEFSCertificates"
Step 3. Click OK.
Step 4. Enter the password you want to protect the private key backup in Command Prompt and press Enter.
Step 5. Re-type this password to confirm and press Enter.
Step 6. The MyEFSCertificates.PFX file is now saved to the desktop. This is a backup copy of your current file encryption key and certificate.
Step 7. Once the EFS certificate has been backed up successfully, you can close the Command Prompt if you want.
You should read it
- ★ How to encrypt files using File Guard
- ★ Top 20 best encryption software for Windows
- ★ Ransomware (ransomware) is showing signs of explosion worldwide, paying is no longer the most effective option.
- ★ The Encipher download offer, the file and text protection app on Win 10 costs $ 4.39, which is free
- ★ How to encrypt files and folders with EFS on Windows 10