Table of Contents
This practical guide explains how to split the screen on a windows 11 laptop with clear steps and useful context. It also covers common requirements, potential problems, and the details that can help you get better results.
Instructions to Split the Windows 11 Computer Screen in Half
Article Table of Contents: 1. How to enable Snap windows feature on Windows 11. 2. How to split screen on Windows 11 laptop with Snap Layouts. 3. Split screen on Windows 11 laptop with keyboard shortcuts.
How to Split Screen on Windows 11 Laptop
1. How to enable Snap windows feature on Windows 11
First you need to turn on the Snap windows feature on Windows 11 with the following steps:
Step 1: You click on the Windows icon on the taskbar and select Settings, or press the Windows + I key combination to open the settings application.

Step 2: Next, click System > Multitasking.
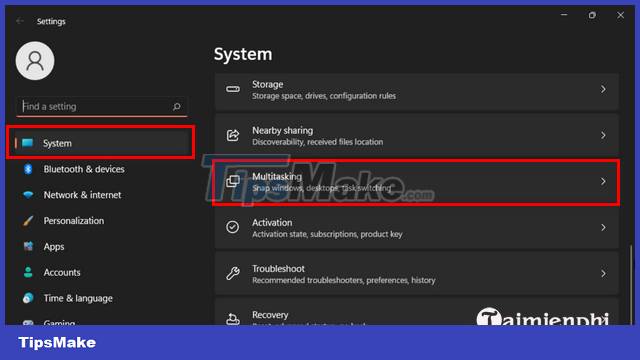
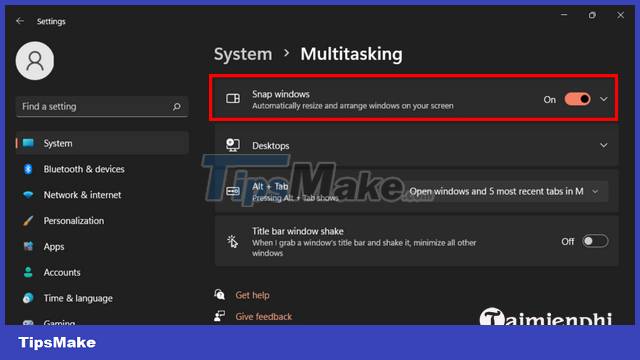
Step 3: Turn on Snap windows by turning the switch to On.
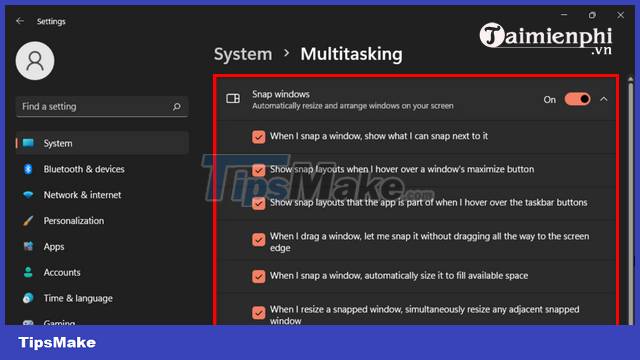
Step 4: Click on Snap windows and you will see a menu that includes various options. Here, you can uncheck or tick the options you want.
2. How to split screen on Windows 11 laptop with Snap Layouts
Windows 11 has made split screen much easier and faster with Snap Layouts built right into the maximize button for each window. You don't have to hold and drag the window aside or work with keyboard shortcuts to activate the Snap window like on Windows 10 anymore.
2.1. Split screen on Windows 11 laptop into 2 parts
To split the screen on Windows 11 laptop into 2 parts, do the following:
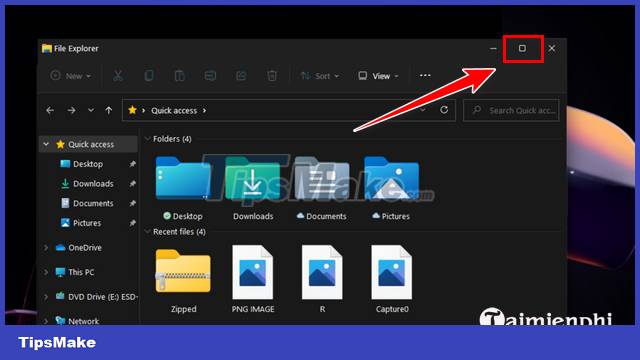
Step 1: Open the application window you want to split and hover your mouse pointer over the maximize button in the upper right corner of the window.
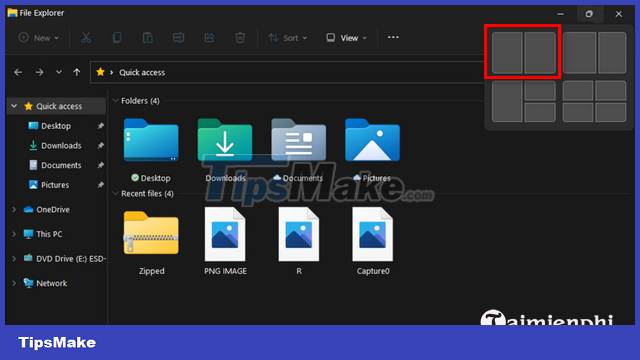
Step 2: In the layout that divides the screen into 2 parts, click on the left half or the right half of that layout.
Step 3: Now your current application window will be attached to the selected half of the screen and open applications will be displayed as thumbnails in the other half. Click on the app you want to add to the other half of the screen.
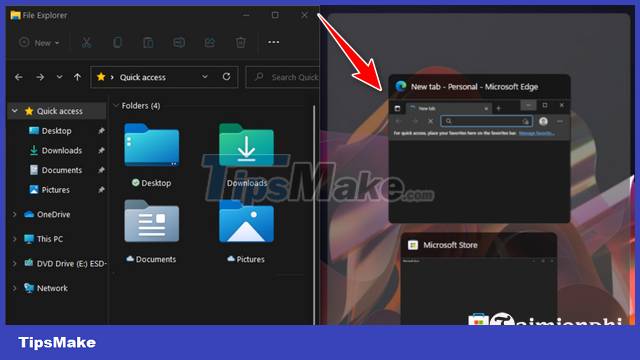
Step 4: Thus, you will have two application windows on the screen to use simultaneously.
2.2. Split screen on Windows 11 laptop into 3 parts
Step 1: Open the application window you want to split and hover your mouse pointer over the maximize button in the upper right corner of the window. Step 2: In the layout that divides the screen into 3 parts, click on one of the 3 parts of that layout.
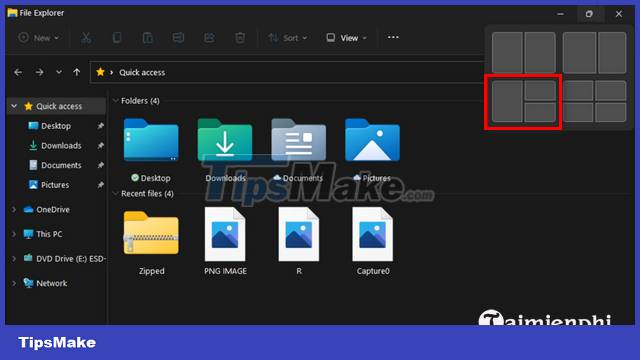
Step 3: Now, your current application window will be attached to the selected part of the screen and the open applications will be displayed as thumbnails in the 2nd screen part. You continue to select the application. used to add the 2nd and remaining screen sections.
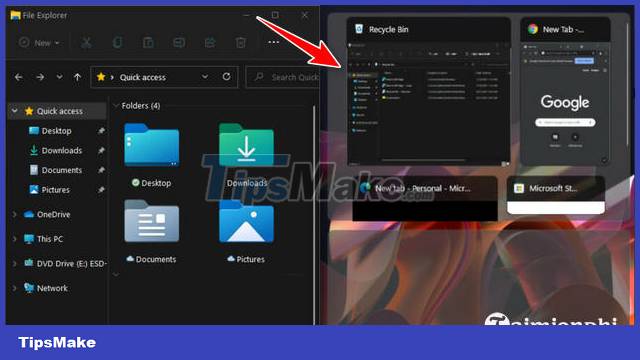
2.3. Split screen on Windows 11 laptop into 4 parts
The steps to divide the screen into 4 parts are also performed in the same way as above. You open the application window you want to split and hover the mouse pointer over the maximize button in the upper right corner of the window.
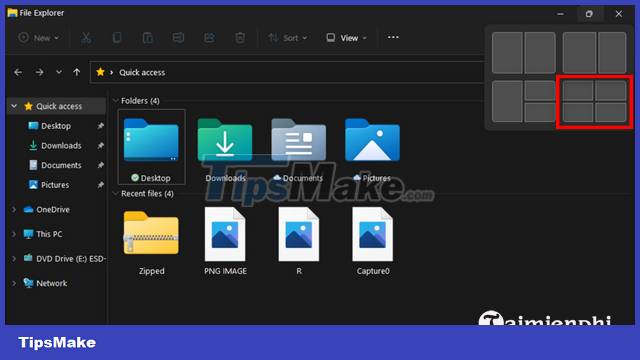
Then, in the layout that divides the screen into 4 parts, you click on one of the 4 parts of that layout. Your current application window will be attached to the selected portion of the screen and open applications will be displayed as thumbnails in the second screen section. Now you continue to assign applications to the second screen. the remaining 3 screen sections. After splitting the screen, you can also refer to how to take screenshots here when using Windows 11.
- See also: How to take a screenshot of Windows 11
3. Split screen on Windows 11 laptop with keyboard shortcuts
Besides using Snap Layouts to split the screen on Windows 11 laptops, you can also use keyboard shortcuts to do this.
All you need to do is open the window you want and press the Windows key + Left/Right arrow combination. The current application window will then be assigned to the selected portion of the screen, and other open applications will display as thumbnails in the other half. At this point, you just need to select the application that you want to add to that half of the screen. To divide the screen into 3 and 4 parts, you use the keyboard shortcut Windows + Left/Right Arrow and Windows + Up/Down Arrow.
The article showed you how to split the screen on a Windows 11 laptop. With just a few simple steps, you can split your computer screen into several parts and use many applications at the same time to serve your needs. their work and leisure purposes. In addition, you can also see how to record screen videos on Windows 11 to make your work easier.
- See also: How to record Windows 11 screen video
Conclusion
Understanding Split Windows 11 Screen makes it easier to compare options, avoid common mistakes, and apply the information in this guide more effectively. Review the relevant requirements before making changes or choosing a solution.
FAQ
How do you split the screen on a windows 11 laptop?
Follow the steps in this guide in order, confirm the required settings or tools, and verify the result before making additional changes.
Is it safe to split the screen on a windows 11 laptop?
It is generally safe when you follow the recommended instructions, use trusted tools, and avoid changing settings you do not understand.
What should you do if the process does not work?
Recheck the requirements, restart the device or application when appropriate, and review each step for missed settings or compatibility issues.
Related Articles
 How to Quickly Split the Screen on a Windows 10, 11, and macOS Laptop9 minutes read
 How to Split Laptop Screen in Half on Windows 7, 10, Super Easy!9 minutes read
 How to Split Screen on Windows 105 minutes read
 How to Split Screen PC: How to Split a Computer Screen3 minutes read
 How to Split Screen on Windows 10 Simply6 minutes read
 Fix Split Screen Feature Not Working on Windows6 minutes read
Reader Comments 0
Sign in with email or Google to join the discussion.